Create Node-RED App on IBM Cloud to Send Alert Tweet Based on Data from an IoT Device (Part 1/2)
Richard Li walks through building an IoT alert system: a Particle Photon with a potentiometer sends MQTT data to IBM Watson IoT Platform, Node-RED on IBM Cloud reads those messages and posts alerts to Twitter when thresholds are crossed. The tutorial covers MQTT configuration, device credentials, and a live demo of the whole pipeline.
Chapters
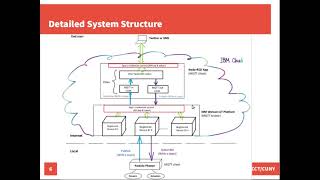
Hi there. In this video I'm going to show you how to create a load radar app on IBM cloud to send Twitter alert message based on some sensor data sent from a remote IoT device. Here is the outline of this video. First, I'm going to make a live demo to show you what the finished life looks like. Second, I will quickly go over the system overall structure and the major components that we're gonna work on. Third, I will walk you through the entire procedure step by step. But before giving you the live demo, please allow me to briefly talk about the system overall structure. Basically, it's going to have three layers. Local, cloud and end user. In the local, we are going to use something called a particle photon to connect sensor and publish sensor data to the cloud. Particle photon is a small form factor ARM Cortex microcontroller based development board.
Besides particle photon, there are many other.
Options in the market you can choose from for building the local IoT device on the cloud. We're going to use IBM Watson IoT.
Platform to register the device.
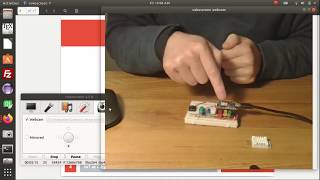
On top of that, we're going to create a load radar app to subscribe the sensor data, process the data and and trigger a Twitter alert message. If the data is greater or smaller than certain threshold, the end user will be able to receive the alert tweet on a terminal device. By the way, you may have already noticed in the diagram I have this load radar app to send something back to the particle photon. But that's something we're going to do in the next snap. I have another tutorial video to explain that. You can watch the details there. Now let me make the live demo. But first let me turn on the webcam on my laptop and then you can see what I have in front of me. Okay, I have the circuit already finished.
Here's a particle photon.
Here is a potentiometer.
I'm using this potentiometer to mimic some real sensor like the one I'm holding here, which is a temperature and humidity sensor.
DHT 22.
The reason why I'm using, and I do suggest use a potentiometer here is if you just use actual sensor like this one here, it can only give you a fixed reading of your room temperature. Then you cannot trigger the alert message.
But by using this potentiometer you can.
Manually change the potentiometer's position and trigger the Twitter alert message anytime. And I have some other LED indicators here, particular this blue one, it's gonna blink every time while data is sent out by the particle photon. All right, that's the circuit in this live demo, I'm not gonna send the potentiometers reading to the cloud.
Instead I'm gonna just send some dummy data starting from 0 all the way to 100.
Every time it increases by 10. If the number is less or equal than 20, a lower temperature alert message will be triggered on Twitter. If the number is between 80 to 100, another high alert message will be posted on the tweeter.
Let me power this sensor up by.
Connecting this USB cable to the house computer. And I already flashed the code into the particle photo and this one is booting right now.
And you will see the led, the.
Blue led, it's to going gonna blink anytime. Yes, here we go.
You see this guy blinks already.
That indicates some data has been correctly sent out from the particle photon. Okay, and then let me move on to the cloud and show you what's being received and what's the response coming.
From the load radar. First one, let me open up the serial communication tool I have here with the particle photon. I want to see what data, what actual data has been send out from Particle photo. And now I'm gonna open up my Twitter page. Okay. Right now may not be able to see the Twitter message coming out later. We will see it. And then let me go to the clouds. Let me show. You the loaded radar app here and the IBM Watson IoT platform page here. The visualization board IBM Watson IT platform already received and displayed the data coming from Particle photo. Let me put this one together side by side with the serial communication and then we can verify if the data is correctly received and visualized. Yes, here we go.
We have 50 being sent from particle.
Folder and then 50 being received and they displayed here on the Watson IoT platform. And the next thing I'm going to show you is the LoaderRada app. Let me open this up. That is the loaderrator app I created already. And then let me open up the debug view in the sidebar and you can see already some message, some data being received by the loaderbetter app and some alert message being created. Let me delete them all and see any new things coming up. And here we go. There's something here saying the status is duplicated because that's from the Twitter. I believe the alert message has been created before. And then right now the code is keep running and some alert message is being generated. So the Twitter is reporting this alert is duplicated. Okay, let me put everything together side by side, particularly the load radar apps output debug view and. The Serial communication between the host computer and the photon. And then you can see what's been sent now from the photon is 50, 60. And let me delete this message here again. See? Yes, here we go. We have 70 being sent. And the 70 it's being correctly received by the Notebreak app. And the next one is 80. 80 come in. Yes, here we go. We have 80. Oh, 80 is skipped. And then we have 90 and 90 is being received. And then immediately a high alert message is being generated. And 100. 100 is being received by load radar app. And then alert message is being created. And then 0, 0. And then load alert message is created here. Warning, sensor readings. No current readings. Zero. Here it's zero. Here it's 10. We have 20 coming in. 20 being received and there's a lower alert message being created. And then it's double check with the visualization Interface on Watson IoT platform here.
Yes, everything works perfectly. We have 40.
We have 40 here, here. All right, very good. And then let's go to Twitter to verify any alert message being posted or not. Yes, here we go. I just refresh and then we have the alert message being created. Okay, the reading 190, 80, 20. And then scroll down, we have 0, 10. Okay, here we go. Everything's good. If you want verify, let me delete this message and then see if this high alert may say 80, 90, 100 wizard. It's gonna be credit. Okay, let me refresh this one and open up this one. And here we go. Look, I just deleted that alert message for 100 reading. And then this alert it's created again. Okay. Because over here we just have the 100 pin sent out. Okay, Everything works perfectly. Okay, last view of these three components. The particle photon, the IBM Watson IoT platform, and then the load radio app feature. 50, 40, 50, 60, 50, 60. Bingo. All right, I think that's it.
The three major components that we're going to work on to build a system as in the live demo in the.
Local.
We needed to program the IoT device, which is a particle photon, to publish sensor data to the cloud. On the cloud, we're going to use IBM Watson IoT platform to register and manage the IoT device. We can also visualize the sensor data on IBM Watson IoT platform. The data visualization is an optional step, but it can really help us verify what the data is actually being sent. Particle photon and received by IBM cloud. The third component is the load rater app. We're going to use load radar to create an app on IBM cloud to subscribe sensor data, compare the data with predefined thresholds and trigger Twitter luminal messages. Here I have diagram showing the detailed system structure. From this diagram you can have an idea how these three major components are all linked together and work together. The Particle Photon is registered on IBM Watson IoT platform with the correct authentication token. The Particle Photon can get connected with the IBM Watson IoT platform anytime and subsequentially send data to the cloud through MQTT. Load Raid and IBM Watson IoT Platform are two different services running on IBM Cloud. The Load RAID app will be connected to IBM Watson IoT platform through the app's API key and authentication token. That's how all the three major components are linked together. Regarding the MQTT message flow among the three components, the IBM Watson IoT platform acts as the MQTT broker. Both Particle Photon and Node Radar app are the MQTT clients. Particle Photon publishes the data to the cloud with an event topic. On the other hand, the loaderat app subscribes same event topic. So that's the reason why every time whenever Particle Photograph Photon sends the data to the cloud and then Node Radar app can immediately receive the data. Now let's start the entire procedure. I have the first five steps here. Step 1 Log into IBM Cloud and launch Watson IT Platform Service Step 2 Step 2 Create a Device Tab Step 3 Register a Device ID Step 4 Change the Connection Security setting on IBM Watson IoT Platform to optional Step 5 Build a Circuit to connect a potentiometer with Particle Photon. Verify the circuit connected Photon to your host computer. I have tip here Use a potentiometer instead of actual sensor for manually activating the Twitter alert message. If you just use an actual sensor, for example a temperature sensor, you may not be able to activate the alert message because the reading will give you one fixed reading of your temperature.
The five steps listed here are the same as in the last Lab 6. You can refer to my Lab 6 tutorial video which I post on the YouTube for more details. To save time here, I'm gonna just quickly run through these step. First of all, log into your IBM Cloud account, click Catalog. Search IoT platform service. And create an instance of the Watson IoT Platform Service. Because right now I'm using a LAN plan so I can only have one instance per service. In order to create a new IoT platform service instance, I have to delete the existing one which I don't want. Then let me just go to the dashboard and open up the Watson IoT Platform Service Instance and Then launch it. Right now. I'm landed on IBM Watson IoT platform page. Over here. You can add a device tab and add a device which I have already done. That's the one I created already. I'm gonna use this one for today's lab. I have already saved the device credential when I registered that device. I'm gonna use this credential information later for writing Photons code. Next thing you need to do is change the security connection security setting on IBM Watson IoT platform. Make sure you set the default role as TLS optional. Because that's the one we're gonna use in the Photons code. Alright. The next one is to build a circuit which I have redone. Now let me connect my Photon back on to my host computer. Photon is back on and then let's go move on to the next step. Step 6 Log into particle online ID Verify Photon's Internet connection. Use the registered device credential information and program Photon to publish data to IBM cloud.
I have two tips here.
Tip one. You can refer to my Lab 6 example code posted on CityTech Robotics Research Lab website. Here's the link. Let me show you where you can find it. Go to citytechrobotics.org that's my research lab's website. On the main page click teaching and then CET4925 interlevel synth. Here is the webpage for the IoT course overlay at CityTech. I created this webpage when I was teaching this course and I put a substantial information the documentation there. You can go to weekly schedule and find the lab handout and some example code. The one we're going to use is for same as the one for Lab six right under Lab six here you can see an example code for sending data for visualization on IBM Watson IoT platform. The code we're going to use today for Lab 7 actually is the same as Zone 1 for Lab 6. So you can just open this up. Here's the sample code. Use MQTT to send data from Particle Photon to IBM wasn't IoT platform. I have in this sample code I have substantial comments to explain to you what each and line of code does. You can quickly go over. You can also go back to Lab 6 tutorial video on YouTube to see the detail there. I have already explained over there. Over here. Let me just quickly re explain which part of this code you need modified for your own needs for this lab. First the host MQTT host port number. Because we're not going to use TLS. So we choose 1883. If you use TLS Secure Connection then you have to change it to 443 for IBM Watson IoT platform. And the next big segment of code you have to change is right here. That's where you need to provide the device credential information here and then your particle photon can have a successful connection to IBM Wanson IT platform. First one is MQTT Host. That's the link of the MQTT Broker which is the IBM Watson IoT platform. You need to put your organization ID here. The next one is MQTT Client which refers to your particle photon. Your particle photon will be one of the client to the broker and the other one will be loaderate app. We're gonna set up the client ID over there later. Over here you need to put your organization id, device type and device ID here. Another very important thing to set up is MQTT password which is your device authentication token. The next thing you need to set up is the MQTT message topic over here right now. In this example code I use something called test data as the event name. You can change to whatever you want. And please be notice that over here the MQTT message type specifies the message as JSON format. That means later in your code you have to correctly generate a JSON formatted MQTT message payload. Another thing you may want to change is the payload set over here. I only specified 8 bytes string as the payload size. Another big part you need to change for your code for this lab is this one. In this example code I only send out some test data starting from number 0 all the way to 500. Once the number hit 400 it will be reset back to 0. So if you have a potentiometer connected to your particle photon, you need to use analog read to get the potentiometers reading and then put it into the reading into a variable and then later you can send out okay. Another very important line of code you need to change is this one Sprint payload blah blah blah and then your data. This line of code is to generate the MQTT message payload by using some sensor data here and then together with string this thing together gotta be ensured to follow the correct JSON format. You have a data property first and then you have the actual value. Over here I use test data as the data properties name. Of course you can change it later to anything you want. And then the next line of code here is this actually send the JSON formatted payload. This client data publish is a Function to be used to publish the data to the cloud. And you can see as two the first part is MQTT message topic, the second one is MQTT message payload. So pretty much that's what you needed to modify in this code for this lab. Let me summarize the MQTT and then the device credential information here. Also the MQTT host address which is the MQTT broker. And then over here immediately changes the MQTT message topic. And put your events ID or events name here. And if it's necessary you may need to change the size of the payload. And over here in the named code for generating the JSON formatted payload, you may want to change the data property. Okay, pretty much that's how you can write up your code for Particle Photon. Then let's move on to the next step. Oh, by the way, I have a second tip here. Make sure take notes of the event ID and data property used in the code because the two parameters are very important and they will be needed by IBM Cloud later. Okay, let's move on to the next step. Step 7 Go back to IBM Watson IoT platform to create a board and a card to visualize the data. Note, when you set up a connect data set for your card, make sure that event and the property fields exactly match what is being used in Photon's code. That's the reason why in the previous step I mentioned to keep a record of the event ID and the data property because you needed to use those information right here. Okay, let me go back to IBM Walson IoT platform and quickly create a board and a card. Let me call this new board as my demo board one and over here I'm not gonna set up anything to share this board with anyone. Just click submit and here we go. We have the my demo board one here open up and there is no any card yet. So let me add a new card. Let me choose the card have as a gauge and then select what device you're gonna receive the data from. That's the device I registered before which we're gonna use here. My Photon 1. Click Next and then on this page we need collected data set. This is extremely important. We have to make sure the event.
ID.
Match with what you have in your code. Also the property as we. I have already copy pasted the event ID and data property and putting the record together with the device credential information here. Make sure the event and property fields over here on this page are correctly and then click next. Let me select the Medium size of this visualization style and click Next. Let me change the title to something called say. Demo data from my Photon one and click Submit. Oh here there is something missed. You must define a property name for each data set. Oh sorry, I forgot to click this. Here we go. All right. And because my code is up and running there on my particle Photon already and then now you can immediately see some data being received by the IBM Watson IoT platform and visualized over here in this card. My Photon is working already and successfully send out the data to the cloud already. And here, let me quickly show you. The Photons code. Basically you can just simply copy paste the example code from citytechrobotics.org website and then modify some part there. Let me show you what I did. Okay, here I have the correct MQTT host and then the MQTT client password. All have been correctly modified. And also I changed the MQTT message topic. I replaced the event's name by this thing called MyTest event. Another thing you need to change is this one, the nine to generate the MQTT message payload it changed the data property to something else over here I called my data property. Alright, another thing I made some modification from. The example code is here. In the example code I have. Something like this. The data property and then column and slash quotation and percentage d and then the sensor data variable and I deleted this backslash quotation and another backslash quotation after the percent d this is a backslash quotation together is actually output exact quotation mark in this page. I did it here because I want to make this parenthesis d to really make the data dummy data as a integer number instead of just a string. So that's another modification you may have to change. Okay, let me come out the original line. Let me zoom in this one a little bit and then make it a larger. You can see here. Let me repeat. Okay, if you want the sensor data be treated as integer in your payload as what I have here. And don't put backslash quotation mark backslash quotation mark because this two quotation mark will make this sensor data here into a string later on the Loaderat app. Because I want to extract this number out as an integer number as an actual number, not as a string. So over here I'm gonna delete it just two backslash quotation mark. All right, that's something you can keep in. Okay, pretty much that's how you need to change the code for this lab and then you can flash the code which I Have already done. Let me reflash the code actually is correctly running right now behind. That's the reason why we can successfully visualize the data center from the particle photon already. Okay. And then flash successfully. Let me rephrase this one. And also you can open up a serial communication to see what actual data is being sent out from particle photon. Right now my photon is restarting so nothing being sent out yet. Let's give it a few minutes. I just refreshed. Okay, here we go. Photon is now connected to IBM Watson IoT platform and data starting beam sending out and then the visualization here is success. Okay, we are done with this step. Let's move on to the next one. Step 8 Open your IBM Cloud Dashboard Open catalog software Launch Loaderata app service Create a Loaderata app. During this step you will also create a cloudant service, a secret store service, a developer tool service and a continuous delivery service instance. Now here's the step where we're gonna create the loaded app. I have a warning here. Keep a record of your app's API key. Just as for device credential information, you can use a simple editing software to copy, paste and keep a record of the API keys. The API keys will be very important. Alright, let's get it back to my dashboard page and launch the Loaderat app service. To create a new loaded app, click catalog. Click software here. Very important. Okay. You have to switch the tab from service to software and under web and application you can find the Loaderata app. Of course you can simply just tap the keywords here and search right here. The loaded Radar app. That's the service we're going to use to build a loaded radar app on IBM Cloud. You can click this and open up the starter page of the Loaderat app service again. Quickly go over this brief description. Get a rough idea what this service is about. What are we going to do is just to simply click this button to create a new Loaderator app. And over here you can name your app. Let me call this app as node rate app one IoT lab demo tweet. That's the name I'm gonna give to my notorator app. You can add something here for the text, but let me skip that part. The next one is you can choose the region, going to choose Dallas. And then just click to create.
More from Richard
Create Node-RED App on IBM Cloud to Send Alert Tweet Based on Data from an IoT Device (Part 2/2)

Video Survelliance Autonomous Robot with Android - NYCCT Course Project with Dr. Li