Visualize IoT Device Data on IBM Watson IoT Platform
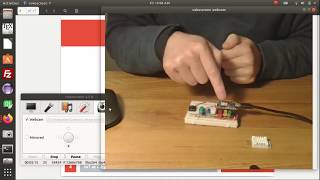
Richard Li shows how to send sensor data from a Particle Photon to IBM Watson IoT Platform and visualize it with Boards and Cards. The tutorial covers building the circuit, coding an MQTT client in Particle Web IDE, registering devices on Watson IoT, and creating dashboards to display your data.
Chapters
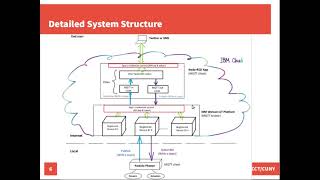
Hi there, how's it going? In this video I'm gonna show you how to use the visualization tools ON IBM Watson IoT platform which is part of IBM Cloud to receive and visualize sensor data sent from a remote particle photon. Here is online. First I would like to make a live demo to show you what the finished system looks like. Second, I will quickly go over the major components we're gonna work on for the system and the system structure. Next I will show you the entire procedure step by step. But before giving you the live demo, please allow me to briefly talk about the overall system structure. Here I have very simple diagram to show a simplified general IoT system architecture. It has three layers. Local, cloud and end user. In the local, some types of physical computing board is being used to connect sensors, actuators or both. Right now in the market there are many options you can choose from for the physical computing board depending on your computational needs of your projects and of course your budget. It can be a microcontroller based development board or microprocessor based single board computer or even FPGA computing platform. The one I'm going to use here is something called particle photon which is ARM Cortex and microcontroller board. It's a very small form factor development board perfect for LTE projects. In the center, the layer of cloud plays a very important and central role in terms of collecting data, storing data, analyzing data, reviewing insights behind the data and many other activities for information fusion and decision making support. On top of that, end users may view the data, receive analysis results, make a decision or interact with the remote local devices through the cloud. So for today's lab you can expect we're gonna go through each of these three layers and work on corresponding components there to complete the entire system. Now I'm gonna give you a live demo but before we start I needed to turn on the webcam on my computer and then you can see what I have in front of me. So over here I have a circuit already finished. This is a particle photon and I have a potentiometer here. Connect to mimic some sensor. Of course you can connect an actual sensor like this one I'm holding here. It's a temperature and a humidity sensor DHT22. But for the demonstration gonna just send some dummy data starting from 1 all the way to 100 to the IBM cloud. And then we're gonna go to IBM cloud to visualize to display the data. And I have some LEDs here. Basically they are indicators and I have this a LED here, the blue Color aed. Every time a data is being sent to the cloud, this AOD is gonna blink once. Right now I'm gonna connect the circuit to my host computer. But of course, if you have something like this additional battery here, you can connect the entire synthesis battery and the gigantic power and then the code will start working. Okay, and then right now this thing is powered on and then you can see the LED blinks that indicates a data has been successfully sent to the cloud. Of course, I already have the code compiled and flashing into the particle photon. Okay, and then let's go to the cloud. The IDM wasn't platform to see the visualization there. Back to my computer and I have the IBM Cloud. The Watson IoT platform already opened up and I have a board. That's the name of the tool, the visualization tool coming with IBM Watson IoT platform. You see here. Right now I'm on the IBM Watson IoT platform page and I have already created the board. I have this visualization interface here which is called card and I have some data pouring in from the Photon and then displayed here. And the code I have is here. Okay, I already flashed this code to my Photon to verify the data sent from the photon. Let me open up a server communication and then you can see the actual data. Was the actual data being sent from Photon every time. Okay, here we go. At this moment we have the data being sent to cloud is 18 and then on the IBM cloud it received 18 and then 19 and then display the number there. Something very interesting you can do on the visualization board is you can modify the visualization style. Okay, we're gonna talk about this later here. I just quickly show you what I refer to. Okay. And what I have here so far is just text. And then you can change the visualization style to just download the chart. And then let's take a look what it looks like. I don't change anything else. Accept this name. Let's call the sensor data from particle Photon. Now here we go. Now you can see the visualization style changed. And we have 28 being received. The reading. Current reading is 28 and then 29. You can play with this guy and try some other visualization style. Probably this one is better gauge. Let me choose the larger one. Yes, this is much obedient. Okay, here we go. You can see the sensor reading keeps changing whenever new data comes in. Okay, I have 33. Just come in and then here we go. The 33 is received and displayed here and then next one is a 34. Okay, Certified is coming. I and I have certified being received and displayed. All right, here it is quite a simple action. All right, and then let's get back to the details. The tag details. Let me temporarily. Let me pause the video and then disconnect my photon. I don't want the photon. Keep running and then send a lot of data to the cloud. Okay, and then I disconnected my folder and then let's come back to the details. I start the entire procedure. Here is a summary of the major components that we're going to work on in the local. We need to write code to the device, which is a particle photon, to publish sensor data to the cloud. On the cloud side, we need to register the device and visualize the sensor data. Here I have a detailed diagram to show the system components and system structure. We're going to work on two major components, the local and the cloud. In the local, we need to write code for particle photon to publish sensor data with a given topic to the cloud. On IBM Cloud, we're going to use IBM Watson IoT platform to register the device and visualize the sensor data. IBM Watson IoT Platform is a service provided by IBM Cloud for IoT applications. It acts as a portal to IBM Cloud by which you can register devices, manage the devices, and many other services you can do over IBM Cloud. For the end user, they just simply need to come to IBM Watson IoT platform page to view the visualization resources that are displayed by boards and cars. And now I'm going to show you the entire procedure step by step. First step, log into IBM Cloud and Launch IBM Watson IoT Platform Service. Let me go to IBM Cloud page and login to IBM Cloud by my IBM id. It's loading. Here we go. We need to locate the IBM Watson IoT platform service. You can just simply click catalog and then under the service tab here, scroll down come to IoT interlevel sync section here. Another way to quickly locate the Watson IoT platform service is type of the service name here, then directly search it. And here we go. That's the service we're going to use. That is a portal connecting our device to IBM Cloud. You can simply click this create button here to create an instance of this service. But let's click this one now here. And then we can read a little bit brief description about this service on this page. That is the first page of this source. You can read about this summary, the features here and get a rough idea about this service. And then you can click this create button here to create a new instance of this service. Here we go. That is the page to create an instance. Because I have already created an instance of the service and I'm using the light plane, so I cannot create more than one instance. To create another new one, I have to delete the existing server instance, which I don't want. If you do not have any instance created yet, you can just click this create button here to create a one. Let's move on to the next step. Step 2 We need to create a device hub on IBM Watson IoT platform. Before you can register any device on IoT platform, you should have a device tab ready. Let's get back to the IBM Cloud page. Let's launch the IoT service instance we just created. You can simply click this navigation menu and then click Click the dashboard to get into your dashboard. On your dashboard, all the services you are using will be listed here. You can click the service and then locate the instance you just created for the IoT platform. Okay, here it is. Let's click this guy and launch it. And here you go. Right now we are landed on IBM Watson IoT platform service page. On the top right corner here you can see what service you are using right now on IBM Cloud. On the left side there is a navigation menu. There are several things you can do on IBM Watson IoT platform. By default you will be automatically landed on this device pages. On this page you can browse your device, take a certain action, create a device or view device tabs and let's add a device tab first. On the right side you have this button Here click Add Device type and right now we are on the page to add a device type. There are two types of device tabs you can add. One is the device, one is for Gateway. Since we're not gonna create any device type for getaway, let's click the device and then type off device type name. It's called LT Demo Devices. And then click Next and on this page you can provide some detailed information regarding this device type. And you can skip this part and simply click the finish button here. Type of a short description line here. Say device devices used for LT Mac demos and finish. And here we go. We do have this device tab created and then immediately this page ask you provide the option for you to register devices and then you can click this one to register device which actually is the next step. Step 3 Register a device ID. I have a tip here you can open a very simple editing software such Notepad in Windows Nano in Linux to save the device ID credentials information, which is very important. Let's get back to this page to register a device for the Photon we're gonna use. Click this button and then come to the page here to add a device. Over here you can choose the device type you want, register this device. I'm gonna create the device type we just created and then you can type a device id, any ID you want to name for your photo as my photo one. Then click Next. And here on this page you are asked to provide some detailed information for the device. And since I have several pieces of particle Photon, so I'm gonna provide some information here, the serial number here to help my hope myself distinguish different photons. What am I gonna use? Is the photon the hardware's serial number? So let me go to Particle console here I already have the Particle console page open up. Okay, and then here on my device list here I have three devices and I'm gonna open up the one I'm using for this live demo and then take the ID the last six digits of the ID number of this photon and then put into here as the serial number for the IoT platform. By looking at this number I can easily identify which one is the one I'm using. And now I want to get it confused. And you can also add up some other information here to help yourself to understand to know better about the device you are using. Okay, the model is photo, manufacturer is particle. Okay, then let me click next and then we come to this page regarding WhatsApp application. This is a very, very important page. And over here you can just use the default auto generated authentication token which means you don't need manually, you don't need to manually type any token here and just need to simply click this next button. Let IBM Watson IoT platform to generate token for you. Okay, and then we are on the summary page over here you can review whether you have already tapped, check it out, make sure everything's good, particularly the device id. If you are not very happy about the device id you want to give it to your photon to your device change, you can click back and change it. Everything here looks good. And then I'm gonna click finish button here to finish the registration. And now here we come to the credential page. Credentials information is here or very important. It's just like the key to a door. When your device tries to connect to IBM cloud, it absolutely needs to provide all this information correctly in order to get into the door. The door to IBM cloud is the IBM Watson IoT platform where we just get the device registered. Another extremely important is Here the authentication tokens are non recoverable. So it means if you misplace, you cannot get it back. The only thing you can do is to re register your device and generate another new token. So we have to keep a record of the token. What you can do is simply open up editing software in your system like gedit in Linux. If you are using Windows, you can just use Notepad and then copy paste the token and save it. What I suggest you do is to keep a record of all this information at once, not only just the token and then save it. Okay, here we go. We have a record of everything. The Organization id, device tab, Device ID the token. Alright, we are done with this step. Let's move on to the next step. Step 4 Change the connection security setting of IBM Watson IoT platform to TLS optional. TLS stands for Transport Layer Security. The code we're gonna write will not use any tls. So we have to change the setting on the IBM Watson IoT platform to use the same security setting, which is TOS option. So click the security button here in the navigation menu on the left and then you will come to the connection policy policies page and then you have connection security section here. And then click this icon to edit. And under the default rule we change the default rule into TLS option. You can see there are several other security level choices you can select. Of course if you change the security setting here, then the code in your Photon has to be changed corresponding. Let's choose the TLS TLS optional here in this demo to make things simpler. Alright. Okay. And then let's move to the next step. Step five Build a circuit. Connect a sensor with the particle Photon. After circuit is built, connect the entire thing to a host computer. Let me reconnect my Photon together with the circuit back to my host computer which I disconnected before after the live demo and I got a connection. But we need to verify the connection of Photon. So what I can do is go to Particle Wave ID and you can check out your device status there. Here we go. And actually you can see the Photon I want here. That's the one I used to register on IBM Cloud. And you can see the device is connected here. Of course you can refresh. Double check. Yes, the device is connected. Another way to check the device connection status is go through Particle console here. Click this icon here and that will bring you to the Particle console page. On the console page you can click my device list and then expand the detailed information about your device and then you can verify the connection status there. Alright, let's move on to the next step. Step 6 Log into Particle Online IDE use the device credential information. We just kept a record and program photon to PUBG sensor data to IBM Cloud. I have two tips here. Tip 1 refer to my example code which I post on my research lab CityTech robotics research lab website. Here's a link. Another tip here is take a note about the event ID and data property when you write your code for filter because these two information will be needed by IBM Cloud later when we set up the visualization. Okay, let me open up the course page. Cdtech Robotics. Org that's my research Lab website. Let me close this tab. And here we go. That's the lab site. On the Labs page you can see teaching under teaching I have CET 4925 inner level since click that. I will bring you to the interactive Scenes class we are offering here at CityTech. I have quite a substantial information post here. You can check out the example code is listed under Weekly schedule. Let's find the lab. What we are doing right now is Lab 6. Zoom in the page, make it larger and yes, we are on this lab now. Lab 6 using MQTT to send the data to IBM Watson IoT platform and data visualization. Right below it you can see a hangout here. Example code of sending data for visualization on IBM Watson IoT platform. That is the example code you can use. You can refer to Open it up. Okay, here we go. Use MQTT to send to send data from Particle Photon to IBM wasn't IoT Platform C sample code and that's the sample code. I have quite substantial comments there to explain to you what each part of the code is doing. And also I highlight some parts which you need to modify for your own use. Let's quickly go over the sample code and I will explain to you which part of the code you have to revise. Okay, first of all you have to include the MQTT library header file and then second line here is the host port because we are not going to use any TLS security in this code. So so we use the port number 1883. This should match with the connection security setting on your IBM Watson IoT platform which we talked about before. If you are using certain TLS in your code then you have to change the port number. For example for IBM Watson IoT platform. Yes, right here. If you use TLS for secure connection then you have to change the port number to 443. By the way, AWS by default use TLS and the port number there is not 1883. Okay, and now we have MQTT QoS Kos 0, that means the message will be delivered 0 or once. That's the default QoS for MQTT communication with IBM Watson IoT platform. If you choose QoS as one, that means the message will be delivered at least once. If Kos is 2, that means the message will be delivered exactly once. All right, here we come to something very important. Okay, I have here 2 comments here. Use your device information to fill in the following code in line 17 to 21. That's some part in this code you have to rewrite for your own need. First thing you need to change is MQTT host. You have to put your organization ID here. Another thing is MQTT client. Of course the client will be your particle photon. So what you need to put in here is the organization id, the device tab and your device id. So this is very important for your device. You gotta match with the registration information you had on IBM Watson IoT platform, particularly the device type and the device ID. The next one is MQTT password, which is the token when you register your device. Okay, and then another thing you may need to change is right here, the MQTT message topic. In this string I have this red color highlighted part that's actually the event id. Over here I could test the data. Okay, right here, I expand right here. Take comments. Right here is also the event name. This is very important. This information will be used on Watson IoT platform when we set up the visualization interface. Of course you can name the event as whatever you want. Another thing I want to mention here is the format of the MQTT message. Okay, over here we use JSON format. This will affect the code later on. We have to write a code to create a proper JSON formatted string. I will show you later. And very quick thing regarding the test data we're gonna send to the IBM cloud is here. I set up this variable as integer starting with zero. And then later in time I increase that one by one. And then in this example code here you can see once this test data hits 500, it will be reset back to zero. That's Adami data we're gonna send to Watson IoT platform and visualize there. Of course, if you have your own sensor data from actual sensor connect to your photon. You have to rewrite this part of code. Okay, and then we come down to the payload, the JSON format payload. Okay, that's the code here. We have to create a JSON formatted payload. Okay, this is a Sprint. We're going to use the test data together with this data property here and then form the payload. And then later we use client publish to send the payload to IBM cloud. And then you can imagine, okay, that's the actual data it will send to the IBM cloud. And along with this actual value, the actual value of the data, another very important thing is this. The property for any JSON formatted string, you have this property in this quotation mark. Then the value if we have another property and then we have property two in a pair of quotation mark and then we have value two, so on, so forth. You can have multiple values together with properties. Okay, so this line of code generates actual MQTT payload which you will send to IBM cloud. And very important thing is this, this data property over here. In this example code I called the property. I use the same name for the property under the data variables name. Of course you can change the property name to whatever you want, but you have to keep a record. Okay, both the data property here and the MQTT events name. Let's go back to the record we had for the credentials information. Let's add up that piece information there. MQTT MQTT event. Oh, sorry, that's called a test data. And then the property data, Okay, is also coding testing data. Of course, let me save. Of course you can change this one to whatever you prefer. Okay, let me just show you over here how you can use this editing simple editing software to keep a record of the most important information altogether. Okay, let's get back to the code. Basically that's what you needed to modify for your own use. Okay, let me summarize. First thing is mqtt host and then mqtt client and then mqtt password. All this information are really coming from the device credential information you, when you register your device. Of course, depending on the security connection security you may need to change the MQTT port number. And in this demo we're gonna not, we are not gonna use any TLS security settings. So we use 1883 and the next thing you need, you may change is the event topic right here in this part. And then another very important thing you may need to change and also you need to keep a record. Is the data property in the JSON formatted at the payload. All right, pretty much that's it. Of course, as I mentioned, if you have some actual data sense sensor data coming from actual sensor, connect to your photon of Course you need to change this part. Okay, let's get back to particle web ID and have the code loading here. And then let's make some changes here and make the flash to the photon later. Actually, I already made some changes already. And let's check out any other changes we need to make. Let's go through the port number. Yes. And the host. I think that's correct. Organization I.D. yes, and MQTT client. All right, I think this one needs to be updated. Okay, we have MQTT device type tab IOTLAB demo devices and the device ID is my photon one. Okay, let's change this. Okay, this one is called LT lab demo device. Okay. And then the device ID is my photon one dot okay. All right. And the next thing I need to change is the password. The token. Okay, let me copy paste token. Here. We go. And then the event named. Okay, I have already changed this one into my test event. So let me update my record. I'm not gonna code test data anymore. Okay, here we go. This is very important. You have to keep a record about your event id, your event name. Another thing is the data property about the data you're gonna send to the cloud. Okay, in this sprintful code I have the data property named as mydata property. Okay, Let me copy paste and keep it in my record. This two piece of information is extremely important because there will be needed when we configure the visualization interface. So we have to keep a record. Alright, and pretty much that's it. Let's flash the code. Okay, flash successful. Very good. Let's move on to the next step. Okay, we are done with this step. Step six. The next one is step seven. Go back to IBM Watson IoT platform to create a board and a card to visualize the data. Board and a card are the visualization tools provided by IBM Cloud. It's running on IBM Watson IoT platform. It's a part of the service available in Watson IoT platform. Note. Make sure that the event name and the data property when you set up the data set for your board and car exactly match the code you have in your board Photon. That's what I mentioned before. Okay, let's go to Watson IoT platform to create board and a card. Okay, we are back on to IBM Watson IoT platform page. Where is the board and card I can use? Right here. The very first icon in the navigation menu. Let's click this one and then we come come to the board page. By default there are two board coming with IBM Watson IoT platform. They are called usage overview. Yeah, Usage overview. Another default. Oh, sorry, I opened another software here. Another default board is rich and security overview. What we are going to do is create our own board. Already have some board here. Okay, let me delete this one. Okay, and let's create a new board. Okay, you can just simply click this button. Create new board. Here we go. That's the page we can create a new board. First one, let's type a board name that is called mydemoboard1. You can put a short distortion here to explain a little bit about what this visualization board is about. Let me skip this part. Click next and over here you can set up if you really want to share this board as read only with everybody. So let me skip that. I just click submit and here we go. We have this, my demo board one being created. And over here there's nothing yet. There's no any new card yet. So what you need to do next is to add a new card. A board can have multiple cards. Cards is the actual visualization interface. You want to visualize the data. It has to be located in a board. Okay, let's create new card. Click add a new card. And then here's the page where you can create card. First thing you need to do is the card tab. Snake card tab. And then the next one is Snake the device. Okay, let's select a very simple one first value. Okay. And then here you need to select what device you want. This visualization card receives and display the data from. Okay, the one we're gonna use is my Photon one. That's the device ID I registered before for my Photon and then its device type. It's called IOTLAB Demo devices. All right, that's the device we're gonna use. We're gonna receive the data from and click next. And here we come to the connect data state page. This is extremely important. Okay, expand this part and then over here we need to provide event property setting here. What do you type here? Gotta be match with what you have in your code. So let's go to my record. I have the event name here, my test event. And then copy paste here. And then for the property let's go back to the record. Copy paste the data property and then put it in right here. Okay, here we go. I got the event correctly set up property correctly set up again. These two settings are trimmingly important. Let's move on. Okay, click next and then here we come to the visualization style selection page. Okay, you can choose a different style, of course. The one we chose before is Value Card. Okay. And then you can select different size for the visualization card. Let's use large. Okay. Then click Next and here you can provide a title for your card that's called Demo data from my photo 1. That will be the title of the card. Okay, let's click Submit. Here we go. We have this card created on this board. My Demo board one. The card title is called Demo Data from my photo one. Alright, we're done with this step. Let's check out what's the next step. 8. Run the code on Particle Photon Refresh the World card page on IBM Watson IoT platform and view the data visualization. I have two tips. Tip 1 open particle console page. Check Photons connection status which we have already done. Tip 2 Use a serial communication tool such as Putty or Terra Term in Windows screen in Linux and macOS to view the data being sent from Particle to the cloud. Okay, let's go to the Board and Card page on Watson IoT platform to view the data. We come to the Board and card page. Let's refresh this page. Hopefully the data comes out. If it's not coming out, oh no, nothing happens. Let's refresh again. Still nothing comes out yet. That means we have to do troubleshooting. All right. A very good way to troubleshoot is right here. Use a serial communication and then we can check the actual what is the data being sent from Photon to the cloud. Okay, I'm using Linux so I'm gonna open up a screen that is a serial communication tool. Okay, but first of all I need to check out the device port number my Photon is used is using to connect to my host computer. Okay, I have here device ACM0 right here. That is a port number and then let me close the screen. Delete C M 011-52-0011-5200 that is the Baudel rate Photon uses to communicate with the host PC. By default it's run. Let's see what data is being sent to cloud. Yes, from here we can see the Photon right now is actually sending data to the cloud. But on the cloud nothing being received. That means the fault on works fine. But the configuration on the cloud on the Watson IoT platform has some errors. Let's troubleshoot. I have this troubleshoot checklist here. First thing you can check is the Particle Photon circuit and Photons Internet connection which we have already done. The next thing you can check is the code running on Particle Photon. Is the host address correct? Pay close attention to the organization id. Let's check out that the host MQT host address. Yes, yes, that's correct. And the next one is, are the device credential information correct in your code? Make sure the device tab, device ID username token, all are correct. Okay, and let's go through one by one. MQTT client organization ID, device tab IoT labs demo device. That's correct. And then, oh, here is a table. The device ID is my photon one. It's not my photon A1. I use photon A1 for particle wave ID, not for the cloud. So I have to correct this. That's the error. And let me also check the others password. I think this is absolutely correct because before I just copy paste here, nothing to worry about. And then of course the event topic, the event ID events name is correct because I just copy paste before let's reflash the code. I think we found the error a very, very minor error typo in the client name. Okay, we flash the code successfully. Let's get Back to the IBM Watson IoT platform page. Hello, Here we go. You can already see the data come in already, right? And this guy has the visualization working already. But we need to verify the data displayed here is correct. So let me open up the screen again and see what the data being actually sent by Photon. And here we go. We have six being sent and six being received and displayed right here. Okay, seven is being sent, seven is coming in and correctly displayed. Awesome. Eight. Eight. All right, great. It works perfectly. Now by the way, let's get back to this troubleshooting checklist. I have some other things you may need to check that if your code or your visualization still doesn't work. Another thing here is the event id. It should match with your board and card setting the data property. The two parameters are extremely important. Another thing is the MQTT payload. If you use JSON format, the Sprint code should generate a correct JSON format payload. The third perspective when you do troubleshooting is IBM cloud. First of all you have to check if the AWASome IoT platform serv is running. Of course, since we already landed on the IBM Watson IoT Platform Service page, so the service is started already. And then the next thing big thing is the border card data setting. It should absolutely match with the code. And then the third thing you need to check is the connection security. It should match with whatever you put in your code. If you have TLS security configured IBM Walson IoT platform and then your code, you have to provide the security information such as TLS certificates, which we're gonna use when we use AWS IoT. AWS IoT service does use TLS. Okay, let's get back to this one. And yes, it's working. There. Perfect. Works like Charm. All right. And pretty much that's it. Oh, another thing we can play with this guy is here. Click this editing icon here. Okay, Come to the editing page. Then let's modify the visualization style and see what it looks like. And over here, we do not change the device because we want the data coming from the same device being visualized. Okay, so just click next and for the data set, no, we don't change it. Same event, same property, same data property. So we leave those things untouched and then move on. That's the page. You can select different visualization style. Okay. For example, you can choose donut chart or gauge chart. You can scroll down and then you can change different visualization style. Let's try this one. The gauge chart. The gauge card looks like it looks good. Okay, let's take a large size and click next. And over here, let me change the car's title. Let's use the same title we had before. Any more data from iPhone? Turn 1 and I click submit. Here we go. We have a different visualization style, which is much better than what we had before. And then let's verify the data. Yes, we have 44 coming out of Photon and. And then coming into IBM Cloud. And the 45 is being sent. 45 is being received and display 46 coming out from Photon, and 46 is being displayed here on Watson IoT platform. Perfect. Okay. All right. I think pretty much that. That's it. And the last part here, I have several references being used for creating this live and this tutorial. So you can check out. And. That's it. See you next time.
More from Richard
Create Node-RED App on IBM Cloud to Send Alert Tweet Based on Data from an IoT Device (Part 2/2)
Create Node-RED App on IBM Cloud to Send Alert Tweet Based on Data from an IoT Device (Part 1/2)

Video Survelliance Autonomous Robot with Android - NYCCT Course Project with Dr. Li