Lighthouse Inkspired Sketch
Jason Nicholas sketches the Pemaquid Point Lighthouse in Maine, starting with a Sharpie outline, then layering Lamy Safari and Pilot pens for detail. He uses Winsor Newton watercolors with a bamboo brush, mixing turquoise and lemon yellow, and shares techniques for loose linework, perspective, and letting mistakes become part of the sketch.
Chapters
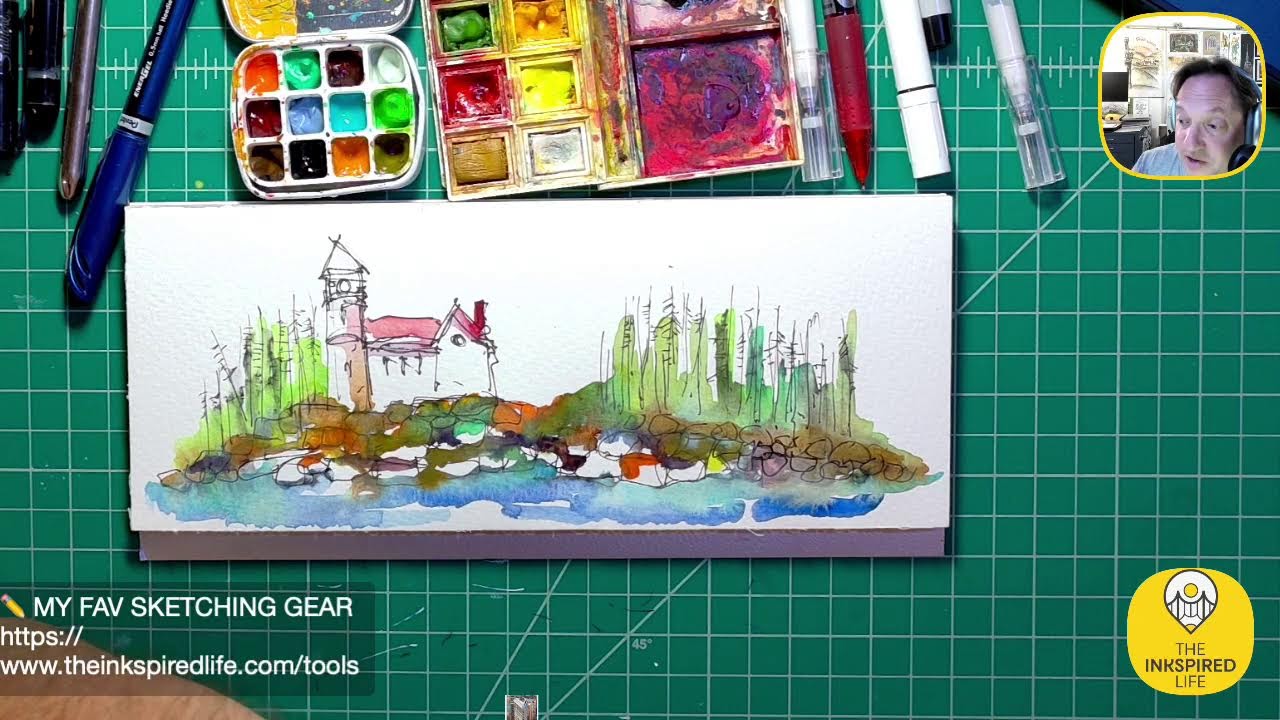
Hey there, happy, uh, June 4th. Hope you're doing well. I'm gonna pop on for just a few minutes. I always say that, it always ends up being more than a few minutes. But yeah, I'm gonna pop on, do some sketching. Um, sketching is a great way for me to wind down my day, you know, whether it's been a crazy day or even a good day or a good crazy day. Sketching is a great way for me to wind down and just kind of get things out of my head onto paper. It's one of the many, many things I love about sketching. And I'm feeling summer vibes, so I'm gonna sketch a lighthouse. I'll bring an image on screen, and, uh, I'm gonna use it as a guide just for the initial kind of line work. So yeah, so follow along with me. I'm going to kind of go maybe a little slower than usual. And I'm just trying a different format of a tutorial. Lots of times I'm pretty quick, sketchy, uh, rampant in a fun, positive way, but I'm gonna slow down, I think, a little bit and just try to explain. Yeah, so let's do this thing. I hope you're having a great, great day, and we'll keep the music on. Okay, so here is the image I'm going to work with here today. This is, uh, Pemaquid Point Lighthouse in Pemaquid, Maine. An amazing, amazing place, one of my family's favorite places to go visit. So Pemaquid Point is just an incredible beautiful landscape rock outcroppings. This view is not your typical lighthouse view. If you look at it, you can see the lighthouse kind of in the back behind this red building. And anybody out there who knows Pemaquid, I forget what this red building is. It's been a while. I want to say it's like the— I don't know if there's a foghorn in there or some kind of, uh, outbuilding. But anyway, so we're going to use this as our starting point. And just so you know, I like to set intentions lots of times before I start sketching something. So an intention— an intention is really an outcome I'm going for. It doesn't always happen. But one of my consistent intentions is I never want my end sketch to look like the photograph. Or if I'm out urban sketching, I don't want my end sketch to look exactly like the building or the landscape I'm sketching. What I'm seeing is a guide to get started So we're gonna use this picture, just lay out some of the basic line work. Um, after we do that, I'm actually gonna get rid of the picture, turn it off, because I don't even want to look at it after a certain point. I just want to use it as starting inspo. So I hope that helps. One of the big questions I get a lot when I'm sketching is, um, I call it blank paper syndrome. And I get a question, you know, how do we conquer— how do I conquer blank paper syndrome? Where do I start? So one of the ways to start is use a reference photo. It's— there's nothing wrong with looking at a picture. So that's how we're going to start today. We're just going to go with this picture. We have— I have other ways to conquer blank paper syndrome, which I've talked about on other podcasts or videos. And I'll be talking about them in more future videos. Anyway, I'm rambling a lot, and that's okay because I'm trying to slow down a little bit intentionally. Um, so let's do some sketching. Also, feel free to leave comments or questions. I will go back and look at them every so often as I'm sketching here. All right, so I'm going to leave this on screen. I'm going to cover the paints because because we're not going to add color or anything, so I'll leave it to the left. Here we go. So again, I'm just using this as a guide. Couple of pointers to keep— if you want to keep your sketches loose, one of the ways to do that, one of the ways I like to do that, is don't hold your pen or pencil or marker close to the end like this. When you hold it down close to the end, it causes you to have a really tight grip, makes your wrist tight, your hand tight, and your lines are going to be really tight. So, um, kind of flex your hand, loosen up a little bit. It's okay to stretch it out. Sometimes I'll start with a meditación, where I close my eyes for a couple minutes and just kind of scribble. We're going to skip that tonight. All right, so loosening up, holding the pen a little further away from the end, maybe in the midpoint, or even sometimes further. I am using a Sharpie, and the reason I'm starting with a Sharpie is I know I want to add color to this, maybe an ink wash or watercolor wash. The Sharpie black ink will not bleed, so that's why you'll find me using a Sharpie probably 9 times out of 10 to start sketches. All right, so I am looking at the photograph. Here's what I'm seeing. Um, so I'm going to try to walk you guys through my brain a little bit tonight. Yes, it's a scary place, but we'll get through. Um, all right, here's what I'm looking at. I see the red building in the front that pops out at me and kind of the roof line. There. So I'm going to start actually with that triangular roof here. So let's just sketch it here. Boom. Um, you'll already notice that I'm not afraid to go back over lines. Let me zoom in. I have multiple lines happening here, and I like that because it adds to kind of the look. So we have a triangle kind of shape. I see When I start— when I sketch architecture, I tend to sketch usually the roof lines. So I see this, I see kind of this tower coming up here a little bit, down. It actually slopes, the walls angle. We have a piece back here that angles, and there's also almost like a flat pyramidal kind of cap on it. So we have that happening. Um, I see the lighthouse over here, just a tippy tippy top kind of doing this. So we're going to sketch kind of a little dome shape, a little curve here. I'm going to bring this lighthouse wall out a little bit. Uh, I'm not worried about scale, I'm not worried about exact perspective. I'm not measuring anything. I'm just putting pen to paper and letting things happen. If I wanted to create a precise drawing, I could use rulers and triangles. I could, you know, do an architectural type sketch. All right, so we kind of have this happening. I see a little roof here. I see this here. I'm not even looking— if you look at my face, I'm not even looking at the photograph. I'm sorry, I'm not looking down at the paper. I'm just looking at the photo and sketching some lines I see. So the reason I'm doing that is it helps to keep it loose also. If I'm looking at the photo and not the paper so much when I'm sketching. There's a little roof dormer happening here. And then I have this rock outcropping, which is pretty dramatic. So it's— I'm just going to kind of bring it down like this. And it comes down here. We have some land kind of happening here. I like this picture because of the perspective you get with that kind of the walkway going up towards the building. So to sketch that, I'm gonna— again, I'm holding the pen kind of loose, and I'm just gonna sketch this— oops— like here. And then I'm gonna sketch angle line like that. So if you look at my pen, look at the angle, that's kind of the right side of that walkway. And then I'm just going to kind of— there's growies happening here. Growies for me are, um, plants, flowers around the area, weeds growing up around the area. But I'm going to exaggerate it. I want to make a little perspective, so I'm going to take this edge and just kind kind of bring it out this way. So these lines are creating a perspective or depth going back. Hopefully that makes sense. Um, also what's helping to create the idea of depth or perspective is that kind of the top of that rock here, you see my pen, it's going down at an angle. And then we had this roof line back here on this building that's going at an angle. So these are coming back to what's called a vanishing point, or a focal— kind of a focal point. All right, cool. All right, so it is hard, it is hard for me to slow down and talk and describe when I'm sketching because usually I'm in rapid-fire mode, but I feel like I want to be a better teacher when it comes to sketching architecture, and to do that I have to slow down a little bit. And I'll check the chat in a minute. I see some peeps on there, so thank you guys. All right, cool. All right, here's the point where I'm gonna say no more photograph. I have enough line work down. And I don't want to look at the photo because if I keep it on, I'm going to want to copy what I'm seeing. Remember I talked about intention? My intention is to not copy the photograph, so we're going to actually turn it off. Ta-da! All right, let's go look in the chat, see how you guys are doing. Linda H, what is up? I see you on YouTube, great to see you. It's been a while. Uh, Linda S says good evening, friends over on the Facebook side of the world. Love it, love it. Inside Jason's brain, I will be brave. Thank you, Linda. It's a scary place. No, it's not really scary. Um, if you were to look inside my brain, you would see I don't know, at least a dozen different ideas. More, definitely more ideas in my brain. Things I got to do, things I want to do, things I have to do. Um, yeah, there's always a lot swirling around inside here, and one of the ways to help, uh, unswirl things, so to speak, is sketch them. This puts my brain in a different kind of place for a while. It's kind of an escape, a way for me to get refocused, repurposed, refreshed, reinvigorated. Oh, I like that. Um, yeah, it's been a while, Linda H. No worries, it's all good. It's great to see you. I see the coastline in Maine. Awesome, I love the coastline in Maine. All right, so let's sketch this. I have the outline, so I'm gonna— there's a roof edge kind of coming down here, so I'm gonna bring this down. Boom, boom, pull that out. This was a window, so we have the overall shapes happening. Now I'm gonna start adding just a few more details. Um, I should say a few more details. I'm gonna start adding details with my Sharpie And I like to start with— my brain typically would go to doing some windows and doors. So I know this is a window, and I'm not going to draw all the different glass panes here. I'm just going to draw in some rectangles just to indicate that we have some glass happening here. So for me, that's a window going on. The lighthouse in the back, I want to look at— make it look more lighthousey. E. I do like to make up my words. So I'm just going to curve some lines here. We're going to throw an ink wash on this and you'll see it'll take on a different character. Again, this lighthouse was kind of behind this red building, um, there, and we had our pathway going up here. Let me just sketch in a little bit, make this look kind of rocky here. Not like Rocky the boxer. So we got some rockiness going on. Cool. All right, let's, let's just throw down some color. We're gonna keep this one pretty, pretty loose, so Just a quick recap. One, we had a blank page, pulled out a photograph. Photograph was used just to create some of the basic lines to start with. Photograph's away. Um, let's break out some colors. I have watercolor here. I'll move this over so you can see, see it better. Again, another reason I don't have the photo open is because I would feel like I need to recreate the colors exactly the same, and I don't want to do that. I just want to have a fun vibe. So not looking at a photograph frees my brain to use any colors I want. I'm dipping into a new, uh, bamboo brush. I can't find my other one. I think I took it to school the other day. I was doing some watercolor demos in class, so I have this watercolor brush. It's new, different, feels like I like the other one because it's a little stiffer, but we'll just play around with this. This one holds a lot of water. Um, I don't need paper towels, so I have a napkin here. All right, cool. When I add ink wash or watercolor washes, I like to do at an angle, so I'm going to put something under here just to prop it up a little. I'm going to use— I have a Moleskine sketchbook here. I'm just going to prop that underneath just to put that at an angle. That way the water runs down. I love the effect of the water running, mixing colors, and the water will pool up. You'll see. All right, let's do, um, add color again. I'm just grabbing— I'm gonna actually start— I'm gonna do a little wet on wet technique. So I added some water here. Wow, this, this holds tons of water. So this is a new brush, so I'm gonna have to practice and get used to it. Um, the other one I knew really well, like how much water to add or not add. So don't be afraid to use new tools and be playful and experiment and see what happens. So we got that. I think I am going to use the red. It was red there. Let's continue to use red, why not? Yeah, this brush definitely feels so different. It's heavier. Um, I liked the stiffer tip on the other one better. All right, so we got some red happening. I'm gonna dip in here. This is— these are rocks here. Let's create like a gray color. Unfortunately, I'm actually— fortunately, I don't have blue in this, this palette, but I have another palette here. So I'm going to grab some blue. Um, this is one of my go-to watercolor palettes. I love traveling with this thing. It's Winsor Newton Cotman watercolor palette. You can tell it's well loved, well used. Yeah, this is— this palette is amazing. We're going to mix some gray up, so I'm dipping into blue. Um, I'm a messy watercolor person. I will mix paints on the pans of color in here. So I am not a purist by any means. I am kind of messy and I don't mind. So I'm making a little bit of gray. I'm just mixing blue and brown here using whatever is left on here. I just want to throw some of that on here maybe. I don't mind if the colors are mixing. I'm intentionally— actually, I like to call this bridging. Bridging is where I'll just take two different colors and add some water on top, top, and, um, have the colors kind of connect. All right. Let's go for some yellow. I feel like, I feel like I want to brighten this up a little, so let's throw in some yellow here. So if you remember the photograph, the White House is light— the, the lighthouse is white. Not the White House is light. I mixed that up. The, the lighthouse is white. Oh my gosh, guys, only a week and a half left of school. I am ready for summer, can't you tell? Um, I love teaching, but my brain is saying, yo, you need a break, sir. Um, that was pretty funny. All right, there we go, we got some yellow on there. Aichiwawa. Got it. Of course we have to dip into some, some turquoise here. Turquoise is probably my favorite watercolor color. Where do you want to do this? So we had— this was actually another building back in here, so let's just throw some turquoise on there. Again, this is, uh, so this is like step 2. Step 1 is inking out the line, the main building lines, landscape lines. Step 2, we're adding a little bit of wash on here. Um, after this dries, we'll come back and add more detail with my Sharpie or Lamy pen or Pilot Precise Pen, either one of these bad boys. And orange— I have the— my go-to colors I like to use in most of my paintings. Pretty cool, right? I'm liking the colors. I'm gonna leave a lot of this white. I did it again, this Lighthouse White. I keep, I keep mixing up the white and the light. Oh my gosh, pretty funny, pretty funny. Gotta have fun, guys, gotta have fun. All right, we need a little bit of lemony freshness, a little bit zestiness. So I'm dipping into this lemon yellow color. Lemon yellow color, for me, this is like adding zest, lemon zest, when you're cooking. That pop of freshness, that, that brightness. Same thing in watercolor. We're just going to add that little brightness and pop of freshness to this. Feel free to let me know if you have any questions or comments in the chat. I'd love to hear from you guys. Hopefully I'm imparting some positivity out there, some motivation. Sharing maybe some tips with you. I want purple. I can mix purple with blue and red, make my own purple. Um, I actually have this sparkly purple paint in here. This was a sample I got somewhere. Let's just use it. Why not? It's in here. I don't know if you can see it, but it kind of shimmers. You see that sparkle happening? So let's grab it. Lots of times I'll twirl my paintbrush in the paint to pick it up. I'm kind of spinning it around. Let's just throw some purple, some purple down. There we go. I wanna, I wanna throw this on heavy. I just want this sparkly purple to pop. It'll be fun to see what it looks like when it dries. There we go. So you can see this brush, this brush is very bendy, it's very soft. So I'm def— I'm getting used to it. It's gonna take a few times. Using it. Um, I do like my other— the other brush better. I only— because I'm used to it. And we'll just dip some on here. All right, we'll throw some here. And I'm— so I'm kind of just kind of throwing it here, balancing it out with a little bit more down in here. Cool. All right, we'll let it dry for a sec. Let's see if there's any cues Uh, the watercolor doesn't seem to be smearing your ink. What pen did you use for the black lines? Hey Matt, good to see you. Hope you're doing well. Welcome, uh, to the YouTube side of things. So Matt, great question. So 9 times out of 10, I will start my sketches with a Sharpie right here. And the reason I'll start with a Sharpie is it gives me the option to add color afterwards if I want and not worry about the ink bleeding. And don't be afraid. It takes guts to throw down Sharpie because it's so— it's permanent, right? Just go for it, have fun. So yes, it was a Sharpie. So you will definitely see me using the Sharpie, like I said, 9 times out of 10, or maybe even 9.5 times out of 10. Starting with a Sharpie pen. And then if I do want to come back and bleed some black ink, I love to use my Lamy Safari with Lamy black ink in there. This is great for bleeding. I can show— I'll show you guys an example of that if you want. I also like using the Pilot Precise. So these are probably the 3 black inks, black pens I like to use. Let's play around with the Lamy, guys. I haven't used it in a while. Just to show you how the ink bleeds. So the Lamy is great for bolding up lines. Let's say I want to pull out the outline of this building and this edge here. Let's do with the Lamy and then we'll bleed a little bit of the ink. By the way, if you hear a noise in the background, I'm 3D printing one of my students' projects, so that's the 3D printer going off in the background. All right, so here's a Lamy Safari pen. Love, love my Lamy pens. I have another one somewhere. Where is my green Lamy? Somewhere around. Well, let's throw down some here and I'll just show you how dark it looks. Let me zoom in even closer. There you go. So I didn't even test to see if there's ink in here. Maybe I should have done that first. I'm actually just going to wipe this. All right, cool. So you can see the ink is dark, but I'm going to come back and I'll show you what happens when I add a little— add some water. Again, this brush I'm getting used to, but see how it works. So you can see by adding the water, it kind of bolded it up a lot, right? One of the cool things about the Lamy ink is that if I come back over it again, for me, um, sometimes it will go from a black to like a purplish color, or sometimes a gray color. So I'm just going to kind of bold this out, just want to pull this out so you guys can see the edge of that building. I'm gonna switch it up. Where is— all right, never mind, we'll stick with it. All right, so let's add a little bit of water here again, and this is just fun, guys, so it might look a little cray-cray. See how it really bleeds? So this is a good demo. This brush holds mega water, so you can see how it's bleeding. I don't like what's happening there a little bit, so I'm just going to blot it back a little bit, and we'll just kind of do that. So that's just a demo of how you can bleed the black Lamy ink, but it really did pull the outline out, right? Uh, Matt says love V5. Yeah, so you have a V5. So I use the V5 and V7. Um, these are great pens. I've been sketching with Pilot Precise pens probably since architecture school, so I have always have them with me, as you can see. So yeah, so I always have Sharpies, I'll always have the Pilot pens with me as well. Cool. All right guys, so, um, so typically I would not have added the Lamy probably till towards the very end, but I want to show you guys how it would work. Let's go ahead. This is kind of a quick sketch today, and I'm actually loving the colors. Look how these are drying. These are so fun. And you can see what I mean about the colors puddling or pooling because I have the paper at an angle, so it's dripping down. And I love how it's kind of puddling up right here. That's a look I like. So for me, that's a win. Um, I love the hard edges, the way these dry, and Again, that's because the paper's angled, so it's kind of just drying along this edge. For me, that's another win. Love that look. Uh, there's that purple shimmery paint. You can, you can see it shimmering. Look at that, it's like there's glitter in there. Pretty cool purple. I don't know where I got it. Again, that was a free sample. Um, I think I'm gonna add some green, a little bit of green along the edge here. So I'm just gonna dip back into my watercolor, just grabbing some green. This might be a sap green. I'm not really good at memorizing color names. But we'll call this a sap green. I'm just kind of, uh, you might notice I'm not actually even painting. I'm not doing brush strokes like this. I'm dabbing. I'm literally taking the tip of the brush and dabbing it down a little bit. Maybe we'll just throw some over here as well. And you'll see what I do with this after it dries. We'll turn it into growies. I'll take my black pen and make it look like we have some weeds or flowers growing along the side here. I want— actually, I want to connect this for some reason. My brain's saying connect. Let's bring this across here just to connect the colors across. Cool. I'm really, really liking this. If you can guess what other colors I might add to this, put it in the comments— I mean, in the chat. In the comments, what color have I not added that I typically add. There's a, there's a couple. And then let's break out— this is still damp, so I really can't use my Sharpie to add detail. Sharpies don't like to write on wet areas, so we're going to use the Pilot pen. Let's just indicate maybe some shingles happening in this, um, roof peak. Again, I'm gonna hold this really loose. My hand is towards the end of the pen. It's not up here. If I had it here, I would want to draw tight lines. I want it to be kind of shaky. So embrace your shakiness for loose style sketching. Embrace the shakiness. So let's create some— and also look at the lines. They're not solid continuous lines. They're kind of broken up. Sometimes we'll call the— I'll call these Morse code lines. We have dashes and dots, or I'll call them broken lines. It just adds character, I think. And let's make it look like shingles. So we'll just throw in some verticals, just kind of like this, and we have kind of shingles here in that roof peak. Let's do some hatch lines to create shadow. Let's say our sun is coming from this way, down this way, so we're gonna add some hatch lines to to make it look like the roof is projecting out a little bit, right? So we just gave a little bit of depth there. Hatch lines are these separate diagonal lines I have. We can do the same thing here. Let's say there's a slight overhang, so we'll just go across like this just to create the idea Um, let's make our lighthouse look a little rounder. So we're going to do this. Let's just see, there's a band across here like that. Yeah, so this close-up really shows how that Lamy bleeds. It takes off. So if you're gonna bleed your Lamy ink, be careful. Like I said, this is the new brush I used. I'm not used to the water, so I threw away too much water at it. I think there's actually shingles on this kind of tower piece here. So we'll just kind of throw in some verticals like that. I'll zoom out so you can see it kind of that way. Uh, this summer I'm gonna go back to what I like to do in the summers, is have more of a regular schedule coming on at night and sketching. Or wow, I could even do it earlier in the day. That's a thought. Um, so I might, which I have a regular sketching schedule where I'm on 2 or 3 times a week, so you guys know where to find me. And if not, you could always watch the plays. So these are rocks here. I'm just going to jaggedy up it a little bit here. And then to show growies, just like to take my pen and kind of flick it up. Typically I would use my Sharpie for this because I find the Sharpie picks up the texture of this cold press watercolor paper better, whereas the Pilot pens don't skip as much on the texture. I'll go close here. You can see how the lines are not skipping. And when I mean skipping, um, it's not picking up the rough texture of the paper, and I kind of like that look more. And the Sharpies are really good at doing that. So we're just going to kind of throw here, and then I'll just kind of throw down some stippling or some dots on here. You know what, I, I just looked over here. I'm gonna, I'm gonna break out some of this Pilot Precise. So Matt, here's a V5. I have a blue one here. Let's throw some blue on here. Yeah, Linda just said it in the comments, needs some blues. Linda, I love that you said that. I'm gonna— I'm actually gonna sketch in a background. I'm gonna— let's, let's just do it. Let's try it. Um, let me take this off of here. I'm gonna change the music up a little bit. All right, cool. I— so I have this Pilot Pen Blue, uh, so I could have done the sky a few ways. One, I could have done watercolor, right? Could have done— I love doing sunset skies with oranges and yellows and pinks. Could have done that. That would have been one way to do sky. I could use blue watercolor paint, um, I could have taken blue ink and bled it. I have a cerulean blue watercolor marker here. Let me see if I can grab it, show you guys. I have it, uh, in my tool roll here. So you guys, you guys know I'll be— I'll make a Lockbee plug during every show. Love Lockbee, love their products. This is such a cool tool roll. I have watercolor markers, regular markers in here. Um, highly recommend it if you're looking for a convenient way to carry markers. This is a great tool, but this is a cerulean blue watercolor. Sometimes I use that, but I'm just going to actually just do with a Pilot pen tonight. Yeah, if you're looking for a cool tool roll, I— this is a really, really awesome, uh, if you go to Lockbee.com, use my discount code Jason Nicholas. You could save some money. It's also on my website if you want to go check it out. All right, cool. Here's what we're gonna do. We're just gonna do— I'm literally just gonna scribble a sky in the background here. Lots of times when I'm working, I will turn the paper, twist it and turn it. So that's why it's— you'll see at an angle right now on your screen. So kind of losing this— this pen's dying a little bit. Um, I love the sound. For me, the sound is very therapeutic. No one said I need to have white fluffy clouds in the background or nice bright sun. Maybe I just want to show a background like this. One of the cool things about this technique is if I keep going back over it, I can create darker areas if I want. Yeah, I'm running out— I am running out of blue ink. As we speak, but you get the idea of what I'm trying to do. So there you go, just a quick way to scribble in a background for a sky. I like it. Another sky technique I like to do, um, let I'll show you. I have a scrap piece of paper here. There's another Sky technique. Let's just draw just a really simple, just really simple kind of little perspective here. By the way, announcement, I'm gearing up to do a a fishing shack online workshop this summer. So if you were interested in joining me in sketching— sketching— sketching some wonky fishing shacks, let me know. I'll probably be posting more about it very soon so you can sign up for the workshop. Anyway, all right, let's say we have a building. Another thing I like to do for skies I'm going to grab this marker, probably has more juice in it. Instead of doing vertical like we just did, I like to do this. I like to do swirlies. I had a professor in college who was a master at this technique for, for doing skies. Um, I love it so much. It's kind of fun. You could leave white spaces. Maybe I want to have a cloud in the background. I'll leave a little bit of white there. Maybe we'll leave another bit of white here. So just doing these kind of scribbly lines, we can create a background for a sky. And you can see here, right, we got some kind of clouds happening. Uh, this is really fun. This is also very for me, very therapeutic to kind of just scribble in. And if you go back over it, you can darken some areas, kind of blend it together by scribbling over the scribbles. We'll just bring it down here. You can see it come down here a little bit, right? So that's just another really great, uh, creative way to make a sky. I prefer this technique over this technique. This for me has more movement, more interest in it. I'll hold up close, you can see it. So that is the scribbling sky technique. I need a more creative name than that. If you guys have a creative name for that, let me know. Swirly scribbling sky. If you want to create a swirly scribbling— wait, a scribbling swirly sky. We'll come up with something, you know where I'm going. All right, so I mean, I could do the same thing here vertically. Let's try it. So I grabbed this, this is a Stabilo fine point marker. I don't really use these too much. Not that I don't like them, I just, I just don't use them. Well, let's, let's kind of scribble these up a little bit more. And I think it was— I didn't like the way it looked. It's too static. This gives it more movement, more energy. I'm having much more fun doing this, scribbling it. I'm also killing, killing this marker point. Don't be afraid to sacrifice your tools, man. Get in there, be creative, be playful. You can always buy more, right? Sometimes we just don't want to touch our art supplies because they're pristine, they're new, they look beautiful in their boxes. Break them out. That's why we got them, guys. Break out the stuff. Got to have fun with it. I used to stare— I would stare at watercolor paints for years. I'd buy these cool watercolor kits, leave them closed, open them, leave these in their wrappers. I didn't want to break it out because it just looked so darn nice, clean, brand new. It's a mindset, right? Sometimes we have that mindset. We just don't want to mess up something that's new. Our tools, our supplies. Switch that out. Switch that around, right? Switch it into a playful, creative experiment. Mode. You can buy more. I could buy more pens. I could buy more watercolors if I sell artwork. Now see how different that is by adding the swirlies? This looks so much different. So I would go back and look at the replay and check that out. Just go before and after and see how much dyn— dynacism— is that a word? It is now. How much dynacism, or how dynamic the sky is. And you could even tell, I think I even got more excited in my voice, more energized. Before I was just doing the verticals. Now I'm like into it. I'm going to zoom in so you can see a little closer. Um, check that out. Really, really cool. Love it, love it. I went through the ugly duckling phase where I really didn't like this. I'm still not too crazy about the way the ink bled here. It works, it's acceptable. Um, let's take this Stabilo— I'm gonna say it, guys, I'm sorry— Stabilo, and let's just use it for shadows. Let's bring some of that blue onto the building. Now I don't know if this bleeds. I've never tried to bleed these. Let's see, I'm gonna do on a scrap here, see if these bleed. Yeah, so actually you can see they do bleed if you want to bleed it, but I don't want to bleed it. Yeah, let's just throw some of that on here. Need someone here. Um, let's even bring some of that blue down here as well onto the pathway. Alright, cool. Alright guys, I'm gonna go look in the comments if there's questions for me or any thoughts you guys have going on. This has been a real fun kind of loose Wick watercolor ink and watercolor wash based on Pemaquid Point Lighthouse in my— one of my most favorite, favorite, favorite places on the planet, Pemaquid Point. Um, you guys are awesome. Let's go back to the comments. Linda says, love my, my, uh, Lamy Safari fountain pens. Yeah, Linda H. You can't go wrong with the Lamy Safari pens. If you're looking for a fairly inexpensive fountain pen, um, my starting point would be the Lamy Safari by far. Love it. Um, yeah, blues, we got the blues. Hey, Patty's in the house! Patty, great to see you, it's been a long time. Hope you're doing well. The Build-A-Sketch looks like it's freestanding. Cool shading. Hey, thank you, that's cool. Love your comments. That's pretty wild looking. Yeah, it's fun. I love the colors of Stabilo pens. I have a whole bunch here, I'll show you. Let me bring this out. Here's a cool little pen holder I 3D printed a while ago, but in here you can see I have these Stabilo Pens. Of course we have pink. That's the color I didn't throw down yet, guys, was pink. Um, yeah, I have a bunch of those pens in here. Uh, closed caption working. Cat will appreciate that. Hey Patty, that's great to know. I didn't know the closed caption is working. Working. That's why I teach architecture and not language arts. I, you know what, one of the cool things about being on, on live, um, it's given me confidence to be myself. I stammer, I stutter all the time, as you guys know. I'm, I'm wacky, I'm a little cray-cray, but it's just fun being on camera and just being real. So thank you guys for accepting me for me and my wonky words. Um, I really appreciate that. Um, it's a Jason word now. Thank you. Hey, Linda said glad I caught you live. I am so glad. Karen's in the house. Karen says love lamby. Karen, great to see you. Yeah, yeah, yeah. I will do a whole show about the lamb you've had. And Linda Linda S, I know you love my green Lamy pen. If I can grab it and show you guys quickly, I will. Uh, where did I put it? But yeah, I have a really cool green Lamy pen. I don't know where it is right now, but let's do a Lamy show soon. Let me know if you guys are on board for that. That'd be awesome. Um, I love this little reunion we got going on here. Very storybook looking sketch. Thank you. Yeah, this was cool. I'm— this is done. I actually overworked it a little bit. Um, I like it, it's fun. Like I said, I bled the Ami— the Ami— the Lamy ink. I bled and I get excited, I really can't speak. Um, I applied the Lamy ink a little too much. That's because I'm using this new bamboo brush that holds a heck of a lot of water. It's— I think it holds— yeah, it just holds tons of water. I had to get used to it. Um, you guys are amazing. Let me grab a quick drink here. Fish Shack works— got workshop. Yes, awesome. So yeah, there will be the Fish Shack sketching workshop. Um, I'm gonna do it in July. Sorry about that. Let me pull this one down here to show you guys. So look on my Facebook and Instagram and YouTube. I'll be posting links to that workshop. Hope you guys will join me. I think it's going to be just a one to one day, two-hour sketch workshop. I like the kind of quick format ones. So here's the last fishing shack I did, which is cool. I actually had a student, um she saw me sketching it and she really liked it. So when students say they like what I'm doing, that's really cool vibes. Um, so here, this is an example of— this is out of my imagination, quick, loose, uh, shack. A lot of fun colors, right? So yeah, we'll be doing a whole workshop, sketches like this. I have a clever name for the workshop. I Just can't remember. Let's put this back here. Yeah, let's add our pink and we're going to wrap on here, guys. So I think I'm going to grab— let's grab my pink color pencils. Color pencil, where is it? I have to, I have to clean my space this summer. It's a mess. All right, all right, so we're gonna grab mixed media. Love pencils along with ink, so we're gonna grab— we got the pink right here. Ta-da! You know what I might even do? I might— yeah, let's do it. All right, that's right, I'm at the point of no return. I don't care if I'm overdoing it. I— let's pull out the red Pilot pen. I feel like I do want a little more red on this building. Um, let's put some red on this side. I want to darken it up. So for red, I really love using the Pilot pens. This is probably my favorite red color to use on sketches. There we go. So I just wanted to pop a little bit of red on there just to contrast the other side. I like it. Pink is going to look really— hmm, let me do pink on this. Alright, so here's our pink. So I just popped it in 3 places. Don't want to overdo it. So I kind of have it in this pattern just to kind of bring your eye kind of along a path there. Um, let's break out— let's break out some neon yellow. I just want to pop some of this yellow out in this lighthouse a little bit more. There we go. Oh, that really should— look at that, that really, really works. That's awesome, love it. This is another color I've been using lately. I really like it. It's called Sunburst Yellow. I love layering on the colored pencil towards the end. For me, it kind of makes it a little more whimsical, a little more playful, a little more whimsical. So We got some orangey on— oranges on— oranginess on there. And let's throw down some chartreuse, of course. What would this be without some chartreuse, right? All right, done. I think this one is done, guys. Linda's like, pink! Hey Karen, thank you for the stars. Karen, I always appreciate you, uh, sending me some stars on Facebook. So let's give it up for, uh, let's get it for Karen, guys. That's really, really nice of you. Will you be auctioning off any of your work again? Hey Jennifer, great to see you. Jennifer Beth, love that question. Do you know why? Oh my gosh, yes. I am looking at 40— I have at least 60 New York City sketches here. If you guys would love to see an auction, put in the comments auction. Um, I would love to auction off these pieces. They're sitting here. I love looking at them, but I would rather have them be in a home where they're appreciated even more. So let me know if you guys would be interesting— interested in a New York City sketch auction. That would be so fun. And I'd like to do it pretty soon, actually, because I'm going on vacation end of the month. I could use some, a little bit of money for vacation. But more importantly, it's really about just sharing this because it's sitting in here. I'm staring at it right now. Also, go back on my YouTube, Instagram, and Facebook Reels. You'll see a video I did, real short video, maybe 2 minutes. Where I have a video just kind of panning around and looking at a lot of different sketches I did. Great question. So thank you, great to see you. You guys are awesome. Linda says, I'm not on Facebook though. Linda, no worries if you're not on Facebook. For an auction, you mean the auction could be broadcast on YouTube as well. We'll have to figure that out. Good point. Um, a wonky fish shack, love it. Pink, yes. I'm just looking at the comments here. Yeah, you guys are awesome. I, you know what I'm gonna do for anybody watching, if you're interested, let's If anybody's interested, I am. I would love to auction off this sketch I just did. It actually came out pretty cool. Do you see the sparkles of that purple when I move this? Look at the glitter. That's really awesome. And that's, that's this watercolor paint here. Or what we could do is, um, you know, instead of doing like an auction, we can interested in this. I'm not sure what to do. Let me know if anybody's interested. If we could just put in the private comments, interested, and this would be a cool one. I really— I think adding these colors really made it— it pulled it together for me. I love this red. Really, really love that red. So how big is this? Let's do this. Let's measure this. So it's on a 7-inch by 10-inch sheet of paper. The image is about— let's call it about 8 inches to here. 7 inches. Um, let's see, this is just a pre-cut. You see, look, this is just a little mat I made out of cardboard here. 6— this is 6x8 cutout. I like it. I actually kind of like it. I think I like it like somewhere in— yeah, I think I like it this way, the lighthouse more to the right. I think the perspective is working. I could come back and add a little bit more shading. I think it works. Pink, pink. I love the Barbie pink. Yeah. You guys are loving the pink. I love that you love the pink. It's become kind of a signature on all my sketches, most of my sketches. All right guys, this one is a wrap. Um, if anybody is interested in this, message me on Facebook or Instagram or email me at Jason Jason at JasonJNicholas.com. I gotta shorten that email. Or send me a YouTube message and, uh, we'll talk. I would love to get this one out there. Pretty cool. All right guys, thank you so much for watching tonight on this amazing June 4th. I hope you have a rest— the— I hope you enjoy the rest of your evening. Yikes. Um, tomorrow's Wednesday. I'll try to pop on again later this week, and this summer we'll have a more of a regular-ish schedule. Guys, thank you so much. I appreciate y'all. Linda H, thank Thank you for watching on YouTube. I saw Linda S on Facebook and YouTube. It was great to see you as well. Uh, Karen and Patty, thank you for joining. And Jennifer, it's great seeing your names in the chat tonight. And, uh, we had Matt over on YouTube as well, so thank you, Matt. You guys are amazing. Be sure to like this on YouTube and give me a thumbs up. That would be cool so we can share it out. If you haven't subscribed to my YouTube channel, please please do. I have— I'm over 750 now, I think. 750 peeps, which is awesome. So I've— yeah, it's going up every day. I'm getting new people, so I love it, love it. For me to be able to put positive vibes out there just through sketching and creativity is a win in my book. Guys, take care. Have a great, great night. Peace and live creatively. I'll see you guys soon. Take care.