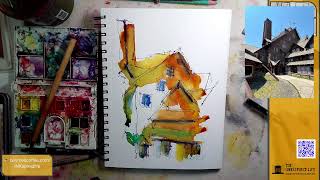
In this live sketching session, Jason Nicholas walks viewers through his spontaneous approach to drawing an Adirondack‑style building based on a photo shared by his friend Michael. He begins by locating the rooflines where the building meets the sky, using a Sharpie to outline the overall mass, and emphasizes a loose, wonky style rather than exact replication. Jason highlights key architectural features—log‑wrapped chimney, multiple dormers, overhanging eaves, and intricate woodwork—while encouraging viewers to focus on a single element (e.g., a window or chimney) if the structure feels overwhelming. He then transitions to adding color, starting with a brown base using Winsor & Newton watercolors applied with a bamboo brush and “dirty” water, followed by playful experiments with Distress Watercolor Pencils, Apple Snail ink, Rusted Rivet ink, and a turquoise hue he dubs “TT, the turquoise temptation.” He explains his technique of “bridging colors” by inserting water between adjacent pigments, and leverages gravity to let inks flow naturally. Throughout, Jason stresses the importance of experimentation, not fearing mistakes, and using the photograph only as loose inspiration. He discusses practical considerations such as letting layers dry, using a hair dryer, choosing between Sharpie and Pilot ink depending on wetness, and adding texture with broken lines on cold‑press paper. The session ends with a promise to return later to add finer details like shingles, hatching for shadows, and more defined windows, while inviting audience interaction and feedback.
Chapters
Hello, hope you're having an awesome day. Um, on here, uh, for a few minutes I want to do a sketch of this really cool building that my friend Michael sent to me. Um, I think it's near Yellowstone zoned somewhere. I'm not exactly sure how you can find out, but it's a really cool building and I thought we'd just take a look at it and, uh, sketch it and have fun. So here we go. So when I sketch, um, buildings, I like to look at where the roof lines hit the sky, and that's usually kind of where I start. So you might notice that's where I'm headed. Also, I'm just creating my own style, which is very loose and wonky. I am not trying to replicate um, this building exactly as the photograph has it. I might not even fit the whole thing in, and it's all good. We're just playing around. I love this chimney structure that looks like it's wrapped— looks like it's wrapped with logs. This is that dormer we see on the right-hand side, sitting on the roof line. I'm almost looking at this as, um, almost a single line drawing, although you've seen me lift my pencil— I'm sorry, my Sharpie up a few times. I'm going to have this lower roof happening here. And I'm looking at shapes, so I'm just sketching some overall shapes. I see some windows kind of happening here. We have a group of windows here also. Really interesting building. A lot of incredible, um, woodwork here. I see branches, like outriggers that are branches helping to hold the roof eave or overhang up. Really cool. There's another dormer kind of popping off the roof here. There's a lot happening on this building. Very, very busy structure. And I'm not letting that stop me. Sometimes you look at buildings and there's so much happening, we're afraid to, to even try to put them on paper. If that's the case, just focus on an area, maybe a window grouping or a chimney or a door. Just focus on a part of it that really interests you. We don't always have to sketch the entire building when we see it. So right now I'm putting in some windows. I kind of captured the overall outline shapes. Now I'm going back and adding some windows I see happening. We have this entry kind of happening over here, this overhang. This building to me has a very Adirondack style to it. With all the logs I see, all the timbers. Adirondack architecture is really, really cool. So I kind of like this big loose outline. Let's, let's throw down some color on here. So the build is very brown, very, very brown. Maybe we'll start off with some brown. Usually I just go crazy and throw fun colors, and let's just start off with some brown and see where it goes. Brown is a color I rarely ever use, and I'm not going to try to replicate the photograph, but maybe it's a cool base to throw down. Alright, so I have my Winsor Newton watercolors here, bamboo brush, dipping into some dirty water. I love using dirty water. I just love the aesthetic it helps to give. Let's throw some of this down. We actually might even break out I have some of these, uh, Distress Watercolor Pencils I've been using lately, and I really love them. So maybe we'll play around with those. And I know there's windows and things I didn't show here in the dormer. That's okay. All right, let's just grab some of this, this kind of brownish color. Like I said, maybe this will be a base and I'll come back. And I'm just kind of throwing it down quick, keeping it fast. All right, cool. And along that— actually, let's grab, um, we're going to throw down some ink here. I have Apple Snail ink, love this color. All right, that's cool. All right, so we got some of that going on. What else are we going to use? I'm just being really playful and I have another— let's— I'm just grabbing another color ink. This is called Rusted Rivet. Who knows where this will go? I have no idea, but that's the fun of just being playful, right? It's just paper, guys. Don't be afraid to throw colors down, ink down on it, and just see what happens. It's how we learn. So this will be interesting to see how it dries. Let's, uh, grab some color again. So I am not going off the photograph. I want to throw down I love turquoise, so we're going to dip into some turquoise here. I can't— I can't resist the turquoise temptation. We'll call it TT, the turquoise temptation. I'm just taking water and adding it on here in places. I like to do that to loosen up the color. Sometimes I call it bridging colors. If I have two colors next to each other, different colors, I can bridge them by just putting some water between them and have them connect. This is cool. I like what's happening here. We're going to let it try to stay that way. This is going to have a hard edge. This is— let me zoom in. You can see how it's kind of drying. Um, I love the way it's drying right in here. Hey, Crafty Scorpio! Hello, good to see you. Glad I caught this. Looking forward to seeing it unfold. Hey, thank you so much. Me too. And that's one of the exciting things about doing this stuff, is seeing how it ends up. I never know. You never know what the magic— what magic is going to happen when you throw down ink and watercolors. And it's just fun, right? Um, let's see, I need some— I want some purple on here. Let's use a— let's grab a watercolor stick. And we'll throw down some purple with it. I'm just going to throw it on here dry. Uh, lots of times I like to dip the watercolor stick right in water, but I figured the paper is damp enough, so I'll just sketch right on top of it. And I'm using purple where I imagine I would have some overhangs and some shadows happening, maybe. So I'm almost— I'm basically just sketching with this. Cool. All right, so we definitely— let me zoom in so you can see how this is drying on here. Hey, Paul loves art. Hey Paul, hello from the Midwest, great to see you. I am so glad you caught me live also, that is awesome. Awesome, awesome. So I like the way this is looking, right? So the first step we did is we just kind of used a Sharpie to some outlines here. Um, typically I'll start with where a building meets the sky and then kind of work my way down. After that, I'll come in and start to fill in some windows and doors. And other big shapes I might see. After we did that, we went to the watercolor and ink, just started throwing down some different colors. And we're just using the photograph as a loose— as a guide. It's, it's really nothing we're trying to copy. It's just there for inspiration. Don't need to replicate the photograph because we have a photo, right? So this white paper then becomes a playground of letting you express yourself however you want to. Don't— for me, it's not about copying pictures. That's why I take pictures, right? This picture was shared with me with— from my friend Michael. So, um, thank you, Michael, for letting me use your, your photo here for inspo. But yeah, just throwing down these colors. So after this dries, I'll probably come back later tonight and work on it. I want it to dry a little bit. Um, I'll come back and I'll start throwing in some more detail. We'll start adding some of the materials of the building, the siding that's on the building. We'll show the shingles. There's logs on here, sticks on here. This is a really interesting building with a lot of woodwork happening. So we'll definitely come back and we'll show some of that. After this dries. But the first step is just kind of throwing, throwing down some, uh, ink and some color to get started. Let it run down a little bit here. Gravity is our friend too, so don't be afraid to use gravity to help in the creative process. Just let the paint kind of wander down. It's kind of fun to play around with. I really, um, I'm loving— I don't know if it's showing up on camera because of lighting, but I love the green kind of color that's happening here, right? So there you go. Let me see if there's— is anything dry enough to Kind of. I need a hair dryer in here. Let's see, Sharpies don't play nice on wet areas, so I mean, I could use my Pilot pen. Let's see, I don't know if, uh, do I want to use this? Yeah, let's do it. Let's just try it. Really lightly. The reason I'm hesitating about the Pilot ink is that it'll bleed if I come back and add more color on top and it gets wet. Um, actually, you know what, let's— I'm going to go back to this Sharpie. I want to show just some of the shingles here, and I know this area is dry, so I can do that. I'm lightly dragging the Sharpie across the page. It's cold press paper, so it's going to pick up the texture of the paper. I don't want solid heavy lines. I really want— I call them dashed lines or broken lines. They're not solid. And then we can just show some shingles on here. We'll just do this. When this dries, I'll, I'll do the same thing on top of it. You can also come back and just pull some of these windows out a little bit more, bring their shapes back. This is going to be fun when I come in here and add some hatching lines for shadows. See these roofs— these roof edges pop out more. Okay guys, I think that's it for now on this. I'm gonna let it dry and, um, I'll come back and wrap it up later. Thank you for watching. Let me know if you have any questions or comments. If you're on YouTube, I'd love for you to give it a thumbs up if you like this. That would be awesome. Thank you guys, I will see you later.