If You Don’t Understand Auctions, You Don’t Understand Trading

Jesse Rogers teaches auction market theory for trading, showing how markets spend 70% in balance and 30% in imbalance. He breaks down price, volume, and time to identify who's winning the auction, then walks through volume profiles, entry models, and concrete trading rules using real market data.
Chapters
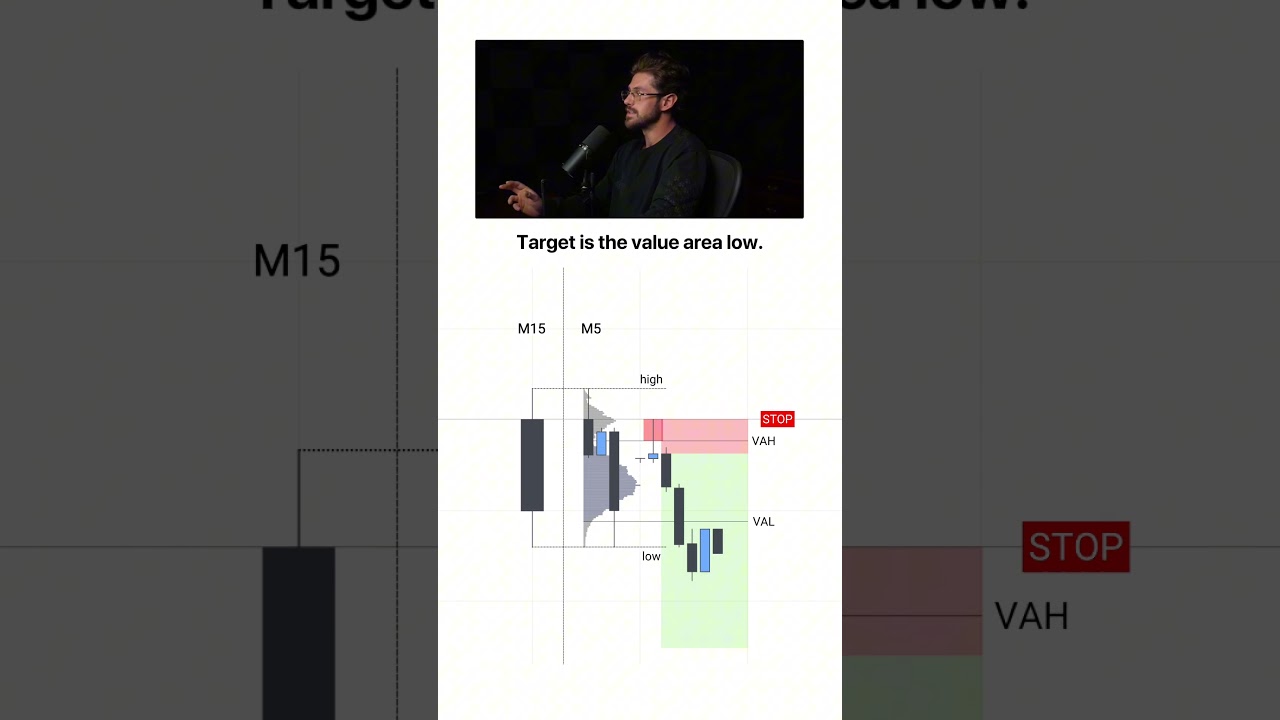
If you're overwhelmed with trying to become a profitable trader, you're constantly switching strategies. Well, the answer isn't another pattern or indicator. It's viewing the market through the lens of an institutional trader using auction market theory. Auction market theory is simple, and it basically states that the market is always seeking one thing: fair value. And this also says that the market is moving from states of balance to states of imbalance. And pretty much every single strategy or concept. Or tool that I've learned in my 10-year trading career can be simplified into auction market theory. Most content you'll see on auction market theory is pretty vague, but in this video I'm going to give you a tactical process going step by step of all of the different phases of auction market theory and showing you how to actually make trading decisions based on this ideology. So in this video, I'm going to break down my entire process for using auction market theory to make profits like this, this, and this. And at the end, we're going to go through the 5 rules of trading auctions. That way you walk away from this video ready to actually go out and take trades using what you've learned. In order to understand auction market theory, you need to understand balance. Now, balance just means that buyers and sellers have agreed on what they say is a fair price, also known as fair value. Now, above this fair value, we consider premium pricing and sellers are expected to show up. And below it, we consider this discount pricing and buyers are likely to show up. The market is going to spend 70% of the time inside fair value. Now, the other 30% of the time is where the markets are expansive. But while the market is in fair value or in balance, we're typically expecting lower volatility and choppier price action. Now, when the market peaks out of fair value and stays there, this shows that one side of the market is getting more aggressive and taking control of the market. And now there is an imbalance, hence the name imbalance. And this means that the market is likely trending and it's going to run to another key area. Sometimes it can be older areas of value or higher timeframe key levels. And during these markets, we're going to get more trending price action and more volatility. Now, whether we are in balance and trading within value or we're in an imbalance, there are multiple different trading opportunities we can take. But in order to find these opportunities, there are three concepts that you must understand: volume, price, and time. And these three concepts are what we're going to use to confirm whether we are establishing balance, whether we are breaking out and going into imbalance, and essentially who is in control of the auction. Because this is how all of the trading opportunities we're going to take are going to begin. But in order to find these opportunities, you need to understand who is winning the auction. And we're going to break this down into two concepts. The first is initiative versus. Responsive activity. So let's just say we are trading with imbalance and the market starts to make a move to the upside and we see buyers pushing above value. Well, this is what we would call initiative buying because they're trying to initiate an imbalance. And typically this is not expected because buying above value doesn't really make sense if the market thinks that this is fair. And if this buying continues and the market stays up here, well, that can tell us that since buyers are willing to buy for a premium and they're getting more aggressive, that maybe the market is now seeing a value higher than before. And this is what we would call a bullish market. But what can happen whenever we trade into this premium is responsive selling. Now, this is typically what we expect since remember, the market stays within value about 70% of the time. So since we are in a premium up here, we would expect sellers to step in and sell the market. And what we want to watch for in these situations is whether or not the market can stay outside of this value area with price, volume, and time. Now vice versa, let's say if the market went to the downside, this would be initiative selling, and this isn't expected because this is a discount. And if sellers were willing to continuously sell for a discount, well, that might tell us that the market is now seeing a lower valuation than previous fair value, meaning a bearish market. Now, the second concept you need to understand in order to find who's winning the auction is acceptance versus a failed auction. So if we look right here, the market established value and then the market traded right to the upside, and we see this initiative buying. And what happens after this? Do we really see any sellers step in? Well, you might see a couple little candles, but that's not what we're looking for. Because if the market is just holding outside of this area of what we used to say was fair value and almost now establishing another little consolidation outside of it, well, if we see volume building in this range, if we see time spent outside of old fair value and we see price just sitting there, remember volume, time, price. Well, now we can say the market is likely shifting to a state of imbalance, and this is where we're going to start to get trending markets and be able to find more explosive trades. But a lot of times this fails, and that's okay because there's opportunities there as well. And this is what we call a failed auction. Now, a lot of you guys probably know this as a liquidity sweep, but instead of just marking out random highs and lows on a chart, you're actually going to be able to do this with a statistically backed edge. And that is the power of auction market theory. And I'm going to show you some tools that you can use to do this later in this video. So in this example, the market kind of poked outside of value, and we didn't really spend any time here. Price didn't accumulate here. We didn't get any volume. In fact, the market just shot right back into the range. So this means that those responsive sellers stepped in and sold for a premium. So if sellers are willing to aggressively sell at a premium, well, that tells us that the market is likely not going to go up. And if the market pops out of one side of the range and then falls back in, we're likely to go to the other. So this can provide trading opportunities for obvious reasons. If you know we're likely going to get a reversal to the other side of the range, well, there's a lot of different ways you can trade that, which we're going to go over later with some examples. Now let's look at initiative selling, where the market got accepted underneath value. So if the market sees this big sell-off, this means that sellers are initiating an imbalance. And then if we get accepted there and the market just sits there and we establish price, volume, and time, well, guess what? The market is likely going to move to an imbalance to the downside, and it's going to continue moving until we hit into some kind of key level, and the market will eventually form value again, and we will see this process go over again and again, or vice versa. You get a failed auction and then you just trade the reversal to the upside of the range. It's really that simple. Also, if you're new to trading order flow, I have a free workbook that's interactive, has tons of examples. I'll leave a link in the description where you could download that and I'll send you an invite to my free trading community. We've went over the basics of auction market theory and how to tell who is in control of the auction, but we need to understand market profiles and how to read volume in order to confirm these concepts. So let's go ahead and talk about how to identify where value is being established using a volume profile. So what you see here on the left-hand side of the screen is just volume by price. Now, a lot of you guys have probably seen volume, you know, candlesticks at the bottom of your chart, and that just shows you how much volume in each candlestick. But what the volume profile is going to show you is actually how much volume was traded at each price level. When we're in balance, we will see higher volume being traded. Whenever there's higher volume being traded in an area, this shows the market accepted this area as fair value. This is also called a high volume node. Now, when the market is moving in an imbalance and moving very fast, you will likely see that the market doesn't really trade a lot. Now, a lot of people think that if the market's moving really fast, that there has to be a lot of trading going on, and in fact, it's actually the opposite. These areas are called low volume nodes, and the market didn't really do any business here. So if the market were to move back into this low volume node, let's just say the market peaked outside of this and it just hung out here and got accepted. Well, a lot of times you're likely going to get a very large move. Now inside of a volume profile, there's also something called the point of control. And this essentially is where the largest amount of volume was traded at any given price level. So remember, like we said earlier, price, volume, and time, all 3 are very important. So now let's talk about some different ways that you can use volume, aka establishing value, to read the direction of the market and find levels and find ways to execute trades. So simply put, whenever we look at value, we want to see which way it is migrating, meaning which way it's kind of stacking on top of each other. Now, volume profiles, you can mark these on a given candle, you can mark it on a given trading session, you can mark it on a week. Typically, I like to just mark them on trading sessions and weeks to keep it simple. And what I'll look for is where are the value areas, meaning the areas in the volume profile that are going to be marked for trading 70% of all of the volume. Because remember, that's where we saw the balance form. That's where the market agreed was fair value. And you see how you can actually see this on price but also with volume. Now, if we just see value like a stairway upwards, Well, that is the definition of a bullish market. And let's just say in the market, if we had a move back down into an old area of value, well, if we're bullish, we're actually expecting that to hold, to continue that trend to the upside. So we can expect the market to have a failed auction to the downside into previous value areas simply by understanding whether we're in a value up or a value down environment. Now let's take a look at value migrating lower. So if we see the same thing where value areas are just moving to the downside, well, we can determine that that is likely a bearish market. And on any given day, if we have a bearish value down environment, what we can expect is if the market trades into previous volume profile levels, then we can expect a continuation to the downside. Now, a really cool way to look at this is just that it simplifies market structure because a lot of times people learn market structure like higher highs and higher lows are bullish and The market just isn't that easy. We all know it's more like kind of a little bit of a mess. But as you can see, we can kind of remove the noise by understanding value and looking at volume profiles rather than trying to just pick random highs or lows. And once you see this and you realize that where the market is accepting value and where we're developing value, that is actually the overall trend of the market, everything becomes a lot simpler because you know that you're trading based on data and you actually have these levels painted out for you by the tools that you're going to be trading with. And you're not just guessing based on random highs or lows. Now, understanding where value is being developed is very powerful, and there are 2 tricks you can use to do this called the P profile and the B profile. So it's really simple. It just means that the profile is shaped like a P. But what does this actually tell us? And it's really important you understand this and don't just say, oh cool, P's mean bullish. I want you to really understand why, because this can change the way that you look at trading. So essentially, the whole idea of everything I'm telling you here is that the market is going to establish value in the direction that it's likely going to continue. Because let's just say if this market made a really big move up and then the market just establishes fair value here, well, what is that telling us? That means that the market is agreeing that a fair value is higher and they're just okay with that. That is the definition of a bullish market. And in this kind of scenario, even if you were to get some move to the downside, you're actually expecting that to be a reversal and trade to the upside. Now, I'm sure a lot of you guys have probably traded into a key level and the market trades into it and it just kind of sits there, and then finally you get your market structure shift, you enter the trade, but it aggressively stops you out, and then you're wondering what happened. Well, this is what happened. And I know that for myself, whenever I was a newer trader, it was so hard for me to ever trade continuations because I always just wanted to trade reversals. Because let's say if you hit into a key level, your brain is trained that it's a liquidity sweep or that it's always going to be reversal, and that's just not the case. In fact, more times than not, the market's going to continue, and this helps you understand how you can actually catch those trades. Now I'm going to break down some examples of the entry models you can use with this, but I really want to drill home how powerful this is, because if you trade into some kind of key level, this could be Uh, liquidity, like a high or a low. It could be an old volume profile. It could be the value area high of the day. Uh, it could literally be any key level. And if you get accepted and the market establishes value, meaning you see volume, price, and then time spent past a key level, well, that tells you that key level has failed and you're likely going to continue. Now, if a key level was actually going to give you a reversal, you would see that responsive action pushing the market down, rejecting that price, and that would help you confirm. So when you are watching reactions to key levels, you need to pay attention to how sharp the market is actually moving. Now, vice versa, we have a B profile, and this is because it is shaped like a B. And I'm not going to spend a ton of time on this because it's the same thing, just bearish. Because if we have a big sell-off and the market just stays down there, well, that means the market is likely going to continue. And any move to the upside, you're actually expecting to be a fake out and a sell-off. All right. So you've learned everything from the basics of auction market theory to who's in control of the auction and the concept of value and volume profiles. But now for the most important part of all, actually trading it. Now we're going to break this down into 2 key entry models, and I'm going to actually show you multiple examples of this. That way it really drills home and you can walk away fully ready to trade these strategies. So let's take a look at this first image here, and we are looking at a successful versus a failed auction. Now, we talked a little bit about this earlier, but to really drill this in, what we want to look for is if the market is forming balance. Now, balance can happen whether or not we're in a value area. So balance happens on a daily basis, like let's just say the RTH profile, which is the 9:30 AM to 4 PM profile. It could happen on a weekly profile. It can also happen when you're just watching the market trade sideways. And if the market's just kind of trading sideways and then you end up seeing the market peak out of whatever consolidation it's trading within and you see a large increase of volume and the market just stays there, well, that means the market's likely going to make a big move up towards some next level. So whenever we're trading with order flow, whether using just candles or whether you're using some kind of footprints or heat maps or whatever you're using, it's the same thing. You're just actually looking to see, was there volume behind the move? And then does the move stay there? Because if it does, then that is showing you acceptance. And anytime we get that acceptance, you can look for one of two scenarios. And we're going to break down how to actually trade this in a second. But understanding the failed auction is pretty much the same thing, except instead of us getting accepted outside of the balance, We're just going back into the balance, right? So this is usually going to happen like, let's just say if the market had made a move down and you were in some kind of B-shaped profile, or maybe the market had been in a value-down environment, you have different ways that you can lean and understand which way you're kind of leaning towards is likely to happen. But typically we always are going to expect that the responsive action is going to win because remember, 70% of the time the market's going to be in balance. So in order to trade this kind of trade where it only happens 30% of the time, where the best opportunities are, we need to be patient and have a very clear system on how to confirm when we're actually breaking out. But when we're trading these reversals, aka failed auctions or liquidity sweeps as a lot of people call them, what we are going to be looking at is how fast the market moves back into the range. So we don't want the market to spend a lot of, you know, either time, volume, or price getting established outside. Ideally, the faster we move back into the range and close candles— and also too, another kind of gem here is what you'll see usually on the way up, you'll see a very large rise in aggression and in volume, meaning like aggressive market participants and also volume. And if that happens, and then what you see outside the market just kind of dies down and volume dies down, well, then you know that that's likely going to be a reversal. So rule of thumb, if you trade into some kind of key level and you don't see volume and then you see the market move away from it, it's likely going to reverse and then you can trade back to whatever balance sent you there. So that gives you a good trading framework and understanding of how to read the market. And these concepts are universal, meaning you don't just have to trade them at the current area of balance or the current value area. This can be traded at any key level. So let me give you an example. Let's just say that this was the previous daily high, okay? So the high of the previous day. If the market trades above it and then you just see the market trading sideways and we just form a lot of volume and we spend a lot of time here, well, guess what? The market's likely going to continue. So you're not going to expect a reversal, you're going to trade that continuation. And then vice versa, let's say if we trade into a key level like this, and then the market just doesn't really trade any volume, we don't spend much time, and we reject, well then you know that that's likely going to be a reversal. So this could even be used with previous areas of value. So for example, let's just say the market had traded on some previous day, and you know, we— let's say we just moved down here, and here was the value area. And even if the market had moved down, like even if the market had moved down and then we had this value area. Well, if the market trades inside of it and then you get accepted, at the very minimal, you're looking to trade towards the high of whatever range you're getting accepted into. So anytime you're trading into a range and you see acceptance there, or anytime you're trading into a level and you see acceptance there, just know you're likely going to continue to the next level. So in a range, that would be to the opposing side of the range. If it's a level, just look for some next level on your chart. Now, vice versa, if the market trades outside of balance and we go into some key level and reverse, likely you're going to come back down and trade through whatever range kind of failed to put you there. So let's just say here was the old balance. If the market traded up into a level and then falls back down into that balance and gets accepted inside of it, the market's likely going to trade to the downside of that, and that can give you a trading opportunity. Now let's talk about how you're actually going to trade these setups, because there's 2 different ways this can unfold. So let's just say we head into a key level and you started to form this, this balance, right? We start to get accepted. Well, what you're waiting on is the market to either trade to the top end of this newly formed balance or the bottom end. So if the market trades to the top end and you see a large increase of volume and you start to close candles and spend time out there, that is going to be your entry. And you could place stops at the low of this balance because if the market is forming balance and then it makes a big move up and you're getting accepted outside of it, well, you don't want to see the market come back down underneath it. So you could put your stop loss right here. Now you can also watch for if the market were to like just trade back into this area of value and it just gets accepted here. Well, you can exit the trade early because if we get accepted in this range, you're likely going to get stopped out. And this can help you tremendously because as a trader in the long run, the most important thing that you need to polish and need to improve on is how to manage losses. And sometimes, contrary to popular belief, that might mean cutting a trade early. But when you do it like this, you're doing it based on data and not just out of fear. Now let's look at another example where the market moved through a key level. You got that acceptance and we're just going to draw our imaginary volume profile here. And let's just say we had a lot of volume traded. Okay. Well, what we're expecting is if we get a pullback into that level, then we are expecting the market to reject it. So if you move up and you get an acceptance, even if you get this move down, you're looking at whatever key level was down below. Or if you have some kind of low volume, aka what a lot of people will notice here are these fair value gaps. So in a low volume node, so let's just say if this was the volume profile A lot of times in those fair value gaps, it's going to be a low volume node, right? So remember we talked about earlier, in a low volume node, if we are already directional, meaning the market has moved to the upside and gotten accepted, we're expecting any sell-offs to get quickly bought up, especially at that key level. So if we see the market getting that responsive action away from that key level and the market moving up, then that is where we can enter the trade and we put our stop under the key level. Now let's look at some actual examples of this on candlesticks. Using profiles, and we're even going to look at some heat maps. And I'm going to simplify this for you because a lot of people think these softwares are way more complicated than they are. Now don't get intimidated when you look at this because with what you've learned, I promise you it's going to be very simple. So this was actually from a live trading stream that I did, and we were in a trade during this, and it was very, very simple to catch this trade. So look right here at this dashed line. So right here, this dashed line, that was the value area high. Okay, so what happened was on this day, the market started to trade back down into the value area high, and we were already in a bearish market, so I was expecting bearish price action. And what happened when we traded into the value area high? Well, this is just showing you the amount of volume and who is more aggressive. So these silver bubbles show you whenever sellers were more aggressive, and the blue shows you buyers. Now the size of them shows you the amount of volume. You can also see the volume right here. So notice right here Huge increase of volume as we're trading into the balance. So what happens after we trade into balance? The market just moves sideways, right? And we see a lot of volume traded right there, and we see this continued volume trading. And then what ends up happening? Well, just based on this alone, we're expecting one of two things to happen. We would expect the market to either jab up and get a failed auction, or to get a successful auction lower because we're already in that bearish flow. So the market moves from balance to right here, we move to imbalance. And notice right here what ends up happening. We had that start of an increase right here of volume. Now it looks a little smaller because this was an insane amount of volume, but really you're paying attention to the relative volume. So it's an increase right here, and then what happens right here, the market just spends time outside of it. Now you could zoom in and You know, expand this, and then you're going to see the same pattern right here, and you're going to see it where we're making every little move. Now, I'm not saying you have to get that crazy with it, but that's literally how this stuff works. It's how price action works, because the market is, is an auction. It's always trying to seek fair value. And if the market pops out from the bottom of this and the market's just trading there and no one's buying it, or at least not enough people are buying it to dampen the sellers, well, the market's going to rush down to where there are more buyers. So all those sellers who are trying to take part can get filled, and that's exactly what happened. And what you're seeing with these heat maps, these little orange things, are actually buyers that are waiting for sellers. So if you want to learn more about this, I have a full 4-hour-long order flow course that goes more in depth on this stuff. I'll leave that link in the description. But as you can see, it all comes back to auction market theory, which is what you're learning today. So what ends up happening here, the market trades outside of that balance At the value area low. Notice that's that dashed line. So we traded outside of it, huge increase of volume. We stay outside, spend price, time, and volume, and then boom, got this big move to the downside. And then we moved where? To where these buyers were located. And this is the, the kind of flavor that's going to end up happening again and again in a bearish market, is it's going to go from balance to imbalance to balance again. Now here is looking at a regular price chart with just the volume profile. And what you see here is the market had a value area that was established here, and this is going to be the RTH profile. So on the RTH profile, that just means 9:30 to 4 PM Eastern, and that's just the trading hours for the futures market. That's when the most volume is traded, so that's why I use that. And what do you see right here? Well, obviously this value area was much lower than this one over here. So on this trading day, you would be expecting bearish price action. And since value is migrating lower, you're in a value-down environment, so you're expecting there to be more auctions to the downside. I'll give you another example here of value rotating to the downside. We see right here this P-shape profile, but this P-shape profile had actually hit into a key level. So since we didn't get any successful auctions to the upside, Because you can notice how did the market react when we get to that value area high. We got that rejection, very, very fast responsive action. And then right here as well. Now the speed of responsive action is very important as well, and you want to pay attention to all these things. Now if you're seeing those blue bubbles and red bubbles, those are just showing aggression, and you can see sellers were getting really aggressive at this area as well. Now this red line you see is the point of control, and what do you see happen after the market starts to trade through this? Well market just moves to the downside. And then if we look over here, basically at that value area low— and ignore my kind of curly, uh, line there— um, you can see the market just started to get accepted here. Market just got accepted. And then guess what happens? We get that big push down to the downside. Now, after we got that push to the downside, the thing I want you to really notice here is this session. So remember, these are RTH sessions. And this right here was kind of the overnight price action, but this session actually opened lower than that previous value area. And that is what I have drawn with this shaded box. And notice what happens here. So the market sold off right there, we traded lower, and then what happens when the market trades back into that old value? You see us immediately get rejected, and that is a trade opportunity. So you can look for your entry models right in these areas and know that likely we're going to trade down lower. Now, where are we going to trade down lower? Well, if we get accepted in this area, which if you're looking right here, what ended up happening? The market started trading sideways and we started forming a lot of value. So hopefully this is starting to come together and you can see how powerful this is because we're able to establish the direction. Based on the where the value is migrating, and then key levels based on old value areas. And then as we see the market reject, that's a trade entry. Let's say if you miss that one, cool, well, you can wait for this. And as the market's trading into these areas, that is a trade opportunity as well. And where are you going to take this trade? Down to the low of the range. Now let's take a look at the next trading day, because remember, we're in a value-down environment, so we're expecting bearish price action. Now this shaded area is just the old value area, and it's a little hard to see here, but you can see that we traded up into that previous value area high, and guess what happened? We got rejected. So if we get rejected here, where are we likely to go? Down to here. Now also, as the market hit into this area, what ended up happening right there? Did you get any responsive buying from buyers? Absolutely not. The market made a very aggressive move to the downside. And this is where a lot of these big moves are going to happen when you see this kind of price action in a trending market. And then what ends up happening? We establish value even lower. So that is the definition of a bearish market. And on the next day, you could look to do the same thing. Now here are some examples of weekly volume profiles, and you can use this to get a bigger view and kind of understand the direction of the, the market in a longer time frame. So as you can see right here, this one I don't have the blue on them, it's just these lines. So here's the value area of the previous week. So if we notice what happened with this week right here, well, we started to push to the upside, and what did we see? We saw this successful auction higher, an acceptance. So when we trade back down lower, what are we expecting? Upwards price action. And what did we get? Upwards price action. We can see the next week opened outside of value, and where did we trade into? That previous week's value area high. You can see how powerful this stuff is. Now, what happened when we traded in that previous week's value area high? The market moved up and did what? On this session profile, we established value higher. And you can see this happens over and over and over again. Now, in this environment, what kind of profile was forming? A P-shaped profile. So what do we expect at the low of the range? A failed auction. So hopefully this is really coming together because this stuff is very, very powerful. I mean, look right here what ended up happening on this day. We had our value area. Where did the market end up trading into the next day? The value area high. And you're expecting the market to reverse from that because it's a bullish market. And you could see that the market moved to the upside. Now these are hourly candles, so it looks like not much of a move, but this was a pretty big move if you can catch that on NASDAQ. And once you understand this All these charts that you used to think looked like hieroglyphics, they all start to make a lot of sense, and you can actually get a cleaner and simpler view of the market than using candlesticks. So as we can see here, the market was moving down, and we are saying, okay, cool, well, we have value here. The market established value lower. So then what do we expect in this day? Well, this day trades up. Where does it trade up into? Previous day's value. Then what happens? We trade down lower, so we're expecting more downwards price action. Right here, we trade into the previous day's value and trade down lower and so on and so on until we start to see that value shift. And think of it like a market structure shift. Like you look at the markets maybe like this, right? The way I'm looking at the market is how do we react to value? Because if the market starts to move up and we close and establish value higher, what is that telling us? That is telling us that the auction is moving higher. That is telling us that the market is saying a fair value is now up. So then we expect the market to do what? Trade from the previous day's value areas and trend to the upside. And it's really that simple. And this works so well because it's based on statistics. This is why all institutions and professional traders use these concepts, because they are based on data. They're based on where positions were actually built in the markets. Because we know that if buyers are still in control of the market and buyers were active in this value area, which we know that 70% of the trading happened on that day. And if the market's bullish, then we know buyers are in control. Well, guess what? Those buyers are likely going to defend that area so we can continuously move price to the upside. Now let's talk about the 5 rules of trading auctions. Now these are going to be some very specific nuanced gems, which I know that whenever I am trying to learn something new, I always want to know like, okay, give me some really like niche examples. So I wanted to put that together for you guys. But first, I also wanted to let you know that if you're interested in actually trading these concepts live with me at the market open, I do have a mentorship where I'm actually trading live, sharing my screen. We also review every single trade you take and do a lot of cool stuff to help traders become profitable. If that sounds interesting to you, go ahead and click the link in the description to apply now. All right. So rule number 1 is if you get accepted back inside, then you're headed to the other side. So let's just say we have some old area of balance. Like, let's just say the market had traded here. And even though you had been bullish, the market ended up trading back down. Now sure, we want to say that the market's likely going to stay, you know, outside of this balance, right outside this old value area. And this goes for consolidations, it goes for value areas, it's just really any area of balance. So really anywhere that you saw a lot of volume traded, it doesn't necessarily have to be a value area. It could even be on a very lower time frame, like, you know, how we are using some of these Uh, tools like this, like it could be this as well. Like for example, let's just say if the market traded back into this and got accepted, we're likely going to go to the other side. So that goes for literally any concept. And actually, you know, speaking of, on that day, another reason I was selling is because we were getting accepted into an old area of value. Okay, so if we go down here and break this down now, what you can always do is let's just say, let's say you were long in this, this range right here. Well, if your stop loss is down here and you see us get accepted inside of that area, well, you are probably pretty good to just go ahead and exit that trade. Now, there is one caveat to that I'm going to go over in a second. But overall, most of the time, if you're getting accepted back inside an old value area, an old area of balance, then the market's likely going to auction through that and go to the other side. So this can help you avoid losses. It can also help you find trades because if you're trading into a range and you see us get accepted, Well, you can look for that same entry model that I talked about earlier, whether it's just a pullback to a level or you're trading the continuation down lower. Now, another way you can use this is to trade choppy markets. So if you're inside balance, remember we're expecting that 70% of the time the market is going to be in balance. So if the market trades to one side of this range, we're going to be expecting the market to fail until that initiative action is actually proven. So we can look for our entry models on a lower time frame at either side of the range and just trade back and forth. Now, bonus if this happens in a positive gamma environment. Now, gamma, I won't get all into that. I go into that in the free course. But essentially, it's just the options environment. And if we know that we're in a positive gamma environment, we know the market's likely to chop. So these kinds of setups are absolute gems during those days. Now, let's talk about what happens when the markets get accepted outside of a balance and where are they likely to go. Well, to draw this out, let's just say the market had formed a balance all the way up here. Okay? And let's say the market started to form a bounce here. We had hit into some key level. So we're kind of expecting a possible reversal. And you know, if the market's at a key level and we form balance, what we're watching for is do buyers like start to actually bid at this this key level? Okay? So I'm going to draw this right here. Now, what we're waiting for is to see you know the market might have some failed auctions. Even if the market has a failed auction right here. That doesn't necessarily mean we're going to break out to the upside, but let's say if the market trades to the upside and we just form a lot of price, time, and volume, then what we can actually expect to happen in this scenario is if the market is to trade to the upside— let's just say it makes a big move and let's say it blasts through this range, or even let's just say it traded into this old area of, uh, value or old area of balance Let's say we traded into it and just got accepted there. So if we get accepted there, we know that we're likely to trade to the other end of this range. And I'm gonna have to draw through these numbers, but I think you guys will be able to, to still get it. Now what we want to watch here is if we get accepted above this, and let's just say the volume profile looks something like this— got really low volume and we have this low volume node. So with low volume nodes, you can expect the market to just be reactive. It's not always going to reverse, but let's just say if you're in this low volume node above this old value and the market just gets accepted there and you see a lot of volume trading, like in this range where this used to be low volume, that's going to be a very high probability that even if you get that sell-off, you're likely going to get a very fast move. And the key here is a fast move through that low volume, and you're likely going to trade it to the old point of control, not just the value area low, but the old point of control of a previous range. So this is a very, very powerful setup that I love to trade. And then you can revisit and see, you know, how the market responds to that point of control. If it gets accepted above it, you're gonna go to the high, or if the market, you know, starts to reject, that can be another trade setup as well. You, you can see how powerful this stuff is. It's just, it's literally how the markets work. Now, this is the caveat to rule number 1 that I said earlier. So let's just say we have this area of balance and the market made a big move up. We came back down and we got accepted into it. Now let's just say you're really strongly convicted in a trade, and this is— maybe it's been in a value-up environment. There's a lot of things telling you it's gonna be bullish. You might not want to close it as soon as you come into your old area of value, but if the market trades into the point of control, you want to pay very close attention to how we react there because you want a very fast rejection off that. If you get accepted under that, you're, you're almost definitely going to go to the other side of the range. But if you can react off that point of control and start to move to the upside quickly, that can give you kind of that breath of life and the market might trade to the upside. It can also help you get early trade entries if you are really confident in a move and you want to trade before the acceptance happens. You can look to trade off point of control. Now, there are very, very rare occasions I do that. Most of the time I would wait. But, you know, you can kind of take that with a grain of salt and use it as you will. Now, rule number 5, is that if you spend a lot of time and volume right at the edge— and this is one of those nuanced use cases that I know you guys will have questions about, and people overthink a lot of this stuff— you just got to ask yourself, like, what is the market telling me based on the concepts that I understand? Like, let's just say if the market moves to the edge of value and we're just staying right there, if you're just really building up and a lot of volume is forming there and the market's kind of like having almost a mini balance form right before you break out The longer that happens, the more time and volume spends there, the more likely you're going to get a successful breakout because that means that buyers are just accumulating in that area if you're just towards the high of the range. Because a lot of people overthink this. It's not as if like, you know, you cross this one tick and now the market's in this crazy area of premium. Like, yes, you will get reactions from that zone. It's a good zone, right? We use the balance and the value area for a reason. But if you're very close to it, it's kind of the same idea is that buyers are willing to buy high. They're willing to buy high in the range. And if you see them doing that at volume, you're likely going to get a very, very aggressive move. And what you can do in these scenarios is, let's just say if we have another reason to be bullish and the market is just moving sideways, you can position yourself and give yourself a little bit of a wide stop. But if the market does make a really fast move, because a lot of times it will, especially let's just say if you have some kind of level that's right here— and this is one of my favorite setups— like let's say Even if you're in a bearish market, whatever. If you have a key level above and you see this setup forming where the market's just peaking right at the top of value, you're likely going to get a very explosive move. Bonus if you are trading into a low volume node. So one of the big things I want you guys to have from this video is is I hope I did a good job of really explaining this to a point where you get the concepts. It's not just looking at patterns; it's understanding the language of the markets. Now I appreciate you guys tremendously for watching this video. If you want to learn more about order flow, again, I have a full free course that is 4.5 hours long. I'll leave that link down in the pinned comment and in the description. As always, thank you guys for watching. Make sure to subscribe to the channel, helps me out a ton, and comment any video topics that you guys want to see from me. I'll see you guys in the next one.