My UPDATED Trading Strategy (2026)
Jesse Rogers presents the CZT method, a three-step mechanical trading system using volume profile, value area, and VWAP to identify market conditions and entry zones. The strategy reduces trades to precise triggers like market-structure shifts and absorption zones, with stops at new structural highs or lows instead of fixed take-profits.
Chapters
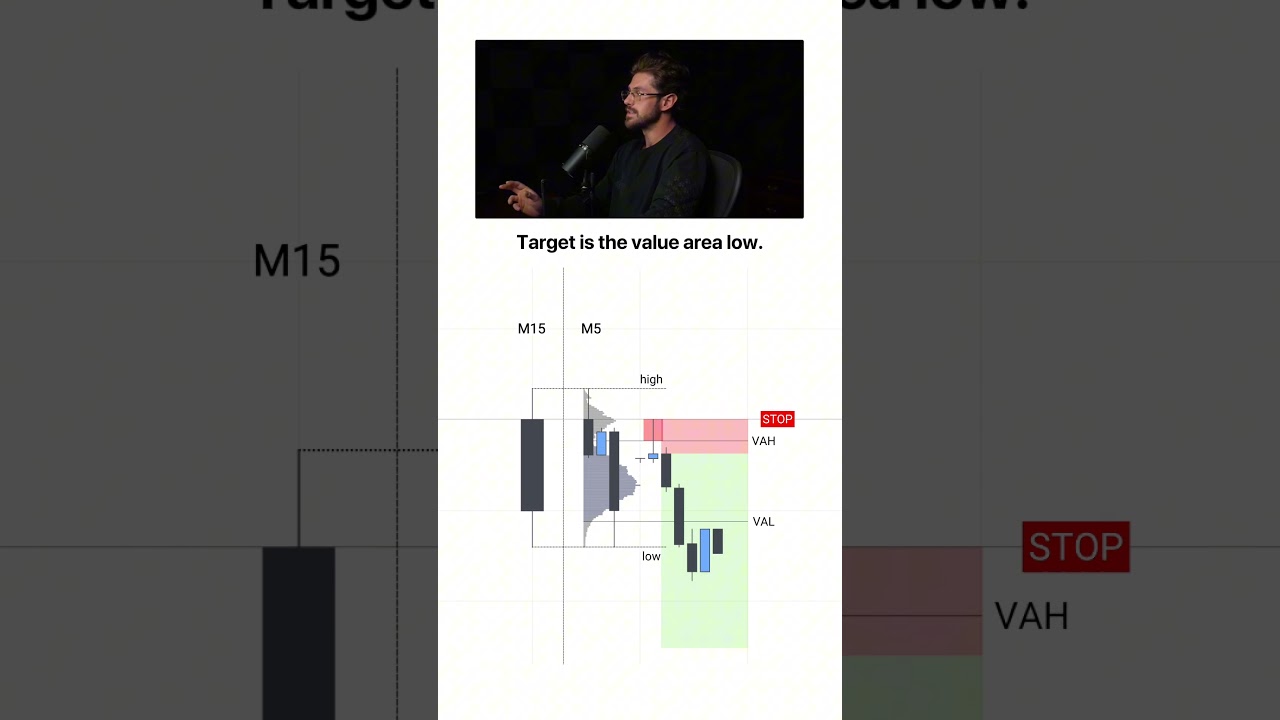
My new strategy gets me wins like this, this, and this consistently. Now, I designed this strategy so it simplifies every trade into 3 mechanical decisions. That way, overthinking is impossible. And in this video, I'll teach you all 3 steps over multiple live trade examples. But first, you need to understand the real reason you're not profitable, because it's probably not what you think, because you don't have a knowledge problem. You already know far more than enough to become a profitable trader. You just can't tie it all together and execute consistently. And this one may hurt a lot of feelings, but no, you probably don't have a trading psychology problem either. And the solution to your trading isn't just to become more disciplined or to get your mindset right. And it's definitely not to go watch a bunch of motivational videos because you're not broken. The good news is the solution is much simpler and more direct. You just have a decision-making problem, and every time there is pressure on you, you kind of just crumble and it's like you forget everything you knew and you start making bad trades and missing the good ones. Because right now your process probably looks something like this. You get to your desk, mark out a bunch of fair value gaps and liquidity and market structure. Then you check for news. Then you want to know what the direction of the day is going to be. And before you know it, you've got a dozen different conflicting concepts or markings on your chart and you can't actually execute because everything is contradicting each other. And you overthink everything and now you're stressed out and you repeat this cycle day in and day out. Now, I've been trading for 10 years and I can tell you with confidence that all of the different things you're doing on a chart really just come down to making 3 key decisions. Now, the first of these 3 decisions is really simple. It's just understanding whether or not you should actually trade or should you sit out of the markets, meaning are you expecting good market conditions or bad market conditions? And if you are going to trade, what direction are you going to look for trades in? Are you bullish or are you bearish? Now, a lot of traders overthink this to pieces and they don't have a mechanical process to make this decision. But what I'm about to show you is going to allow you to look at a chart and know this within less than 30 seconds. But first, there are a couple foundational concepts you need to understand. So let's talk about volume profile, the concept of balance and imbalance. So the volume profile is really simple. It's going to show us the amount of volume traded at different price levels. So the larger these bars, the more volume was traded, and the smaller the bars, the less volume was traded. In these mountains where we have clusters of a lot of volume being traded, we call that a high volume node. In these valleys, so to speak, we have these little bars which show us that there was not much volume, and that is called a low volume node. Now, the concept of balance and imbalance is simple. It's that the market is always in one of two phases. Either we're consolidating, moving sideways, or we are expanding. And in high volume nodes, we're going to expect balance because there is a lot of positions that were built here. We know there was a lot of volume traded, and that means that on either side of the market, people are going to be managing their positions, and these areas are going to kind of act like gravity. Now, low volume nodes, these are going to be areas where there wasn't a lot of positions built, so there's not much to stop the market. And in these areas, we're going to likely see an imbalance. And for these areas to be created, we had to see an imbalance at one point. Now, volume profiles can be drawn on a candlestick like you see here, but for this strategy you're going to learn today, it is going to be based on the regular trading hours, meaning 9:30 to 4 PM Eastern Standard Time. Some other concepts you need to understand are point of control and then also the value area. So value area is just an area in the volume profile where 70% of all trading happened. So this is what we're going to say where the market found value or a fair value within any profile, whether it's the regular trading hours or whether it is a candlestick. And this is going to be very important for the strategy because it gives you levels called the value area high and the value area low. So now that you understand the basics of the volume profile and balance and imbalance, let's hop in to understanding the condition of the market. And this comes down to one simple question. Did yesterday close outside of value or did today open outside of value? If the answer is no, then the market is likely to just be balanced and you're just going to sit out because we don't want to trade in choppy markets. If the answer is yes, then we are expecting imbalance and you're going to look for trades. Very simple. Now, why is this important? Well, remember, if we are talking about balance and imbalance, obviously we want to be in markets like this. Now, the way that you're going to determine how to identify the market going from balance to imbalance is very simple. When the market is in balance, you can see which sides of the range are forming. It's pretty easy to mark this out. Now, the Volume Profile does this for you with the value area, but you can use this concept on any bit of price action. And we'll go over some pretty cool examples later in the video. But when the market reaches one of these edges of value, this is where the market shows its hand because the market can do one of two things. It can either get rejected and pop back into the range. And this is what we call a failed auction. You may have heard that term before. It makes it sound complicated. But really what this means is that there was a balance inside this range, but sellers tried to push the market out. They tried to form an imbalance of sellers and take control of the markets and push it lower. However, they were not successful. So it's a failed auction. But when the market hits into the edge of a balance or value area and the market just kind of stays there, well, the market then is likely to shift to imbalance because what this is telling us is it's the beginning of an imbalance forming. Because if the market's moving sideways because there's a balance and the market shifts to one side of it and it just stays there, then the market is now accepting that higher valuation. So think of these levels or think of any balance like the top is premium or expensive pricing and the bottom is a discount. So let's just say if the market is rushing down to a discount and buyers step in and buy it, well, that would tell you that there is some buying interest in that market. With a premium, let's say if the market rushed up here to the highest price that everybody agreed was fair and now the market is, you know, quote, expensive, but the market's not selling off and people are willing to buy it higher. Well, then that's the definition of bullish because the market's finding higher valuation. And we can now see that in order for this to happen, there had to be an imbalance of buyers in the market to push out of this range. So when we understand this, we can spot huge opportunities in the market and know when to sit out and when to execute. Now, to tie all of this in, let's take a look at some examples. So let's say the market closes outside of the value area right at 4 PM. Well, we know that that session closed outside and got accepted because the close is a very important time of the day. And if the market just hung out past that value area high, past the area of where the day found balance, well then we could say that there was an imbalance of buyers that caused that. So if we're looking at this, uh, chart example here, and this is one of the trade examples we're going to go over later where I was able to make $52,000 in a single trade, and the reason I was able to do this was because I just woke up this day. So this is 9:30 right here where you see this start. So we'll just say that's 9:30. And this is 4 PM. Well, I woke up this day and I just looked at the previous day, and I could easily see the market closed outside of the value area. So what this does is it instantly tells me that the next day I'm expecting the markets to move fast, and I'm expecting there to be bearish price action. So when we look at the markets like this, it becomes rather mechanical, and this process kind of makes the decision for us. Now let's look at an example where the market opened outside previous value. So right here we see that there was the value area. I'm going to try to draw this line as long as possible, but you can kind of see right here the volume profile started on this candle. Now, yes, the high went up, but the market opened right here, so we opened below the previous day's value. So in this example, we're going to be bearish, and look at how the market reacted from that level. Now, what this is called is value rotation. So right here we had a value area that formed and we said, okay, cool, this is where the markets found balance. This is a fair price for that trading day. But the market moved under that area and is now opening up a new trading session below what was determined was a fair price from yesterday. So that's the definition of bearish. And you're not guessing this. This is literally based on actual data. So as you can see, the market ended up selling off from that level and gave a pretty nice setup. Now, what happens if there are conflicting signals with this system? Well, you're always going to default to the open because it's more recent. We want to always think, what is the market doing right now? And that is always going to outweigh what the market has done in the past. It's a very important concept you need to apply to everything in your trading. A lot of people get hung up in old price action and they don't pay attention to what's going on in the market they're actually trading, which is now. So if we notice in this example right here, we had a value area high that was right here and the market closed outside of value like right here. Notice we closed lower than value. So that would give us a bearish signal. But then we opened higher right here. If we look at where this, this profile started, which was right here in that candle, it opened higher than that area. And as you can see, as the market traded into the previous value area, we then rebounded off of it. And this is another one of the trade examples that I actually took that I'm going to break down with you later in the video. I made this cheat sheet to make this process a bit easier. So if we had today's open and it opened outside the previous day's value area, and then yesterday closed outside, well, that's going to be our highest probability day. Those are A+ days. We're going to expect Really good trading. Now let's say yesterday closed inside the value area, but today opened outside. Well, then that's still a high probability day. We're still going to look for trades. And the same for if we opened inside the value area from yesterday, but we closed yesterday's price action outside of it. So you see, as long as we have one of the two, it's still high probability. If we get both, that is an A+ day. But if we get neither,, then you expect chop and you just don't trade. And understanding this alone will help you avoid so many losing trades. And I guarantee that if you had just added this into your trading, what you're currently doing, you would be a lot more profitable than you are. And that is the exact process that I use to determine whether or not I should trade and my directional bias for the day. Now, if you want to get access to that and a full market plan where I post the exact trades that I'm looking for and a lot more cool stuff,. I post that for free every single day in my Discord. So if you want to join the free trading community, I left a link in the description. Now this brings us to our second decision that all trading concepts come into, and that is where do I actually look for the best trade setups to appear? So in other words, what zones are we going to look to take trades at? Well, if you haven't guessed already, we're going to be using previous day's value area high, the value area low, the point of control, the VWAP, which stands for volume weighted average price, which we're going to go over in a second, and then low volume nodes. So basically all the levels from the previous day's volume profile other than high volume nodes. Now let's take a look at some chart examples to tie this in. So in this example, you can see that we opened up lower than the previous day's value area. So we're going to be looking at the previous day's levels to look for zones to get reversals from. So as you can see right here, we had the value area low and the market traded right into it and then moved to the downside. And then on this day, you can see the market opened up right here. So that was lower than the previous day's value area. But as you can see, we didn't just react immediately off of that value area low and we ended up trading a bit higher up into this volume weighted average price. And I'm going to show you how to mark this on your charts here in a minute. But for right now, I want you to understand that just because we have an expected bearish or bullish day doesn't mean we're always just going to hit right on the level and then move really immediately away from it. We're going to have to have a system for determining which level we're going to trade from, because sometimes the market can retrace further than others. Now, here was a setup from last week where I took a trade on Nasdaq. Now, I know this says 9/1, but for those of you who are newer, this is when the contract expires. It's a futures contract. But this was, I think, last Tuesday, something like that. And we'll go over that in the examples. But as you can see, we traded right into the previous day's VWAP right there and got a really sharp reaction. But as you can see, we had traded into the previous day's value area high and the market didn't really give any kind of actual setup. So in these examples, it's very important to understand how to map when the market's likely going to reverse. And understanding which of these levels to use is going to be based on something we just learned in the last step. But we'll get get back to that in a second. Now, this last example, which is the low volume node zone tap, is where a lot of traders are gonna miss because they're gonna expect the market to always come back into the previous day's value. But a lot of times when the market's really expansive and we've opened up way underneath the value area from the last day, like when the market's very, very bearish or very bullish and we're directional, you can see in this example the market opened up right here. So this was kind of where that candle opened up and we're really far from that value area low. So some traders will just kind of mark this level and then they're just waiting and they wonder why they miss out on the trade. But as you can see, there was a very low volume area in this profile. So those low volume areas are going to be areas where if we're expecting the market to be really fast moving, it's just going to kind of tap and go. So this is what we want to call a gap and go. And it's an opening setup. So the way that the yesterday closed and how today opened can actually tell you a lot about how the first hour of the day is going to go. The larger this gap, the more you're going to expect kind of just like a tap and go. Now, if this gap was tinier, you're going to expect kind of like a retracement into some of those levels like you saw in the other examples. And again, understanding these small little gems can make such a big impact in your trading and your decision making. And the cool thing about it is you're doing this based on data. These levels are marked on your screen. You're not having to guess about what or why you're doing what you're doing. That covers step number 2, which is what zones do we look for trades? So we've got condition, we've got zone, and now we want to get down to trigger, which is when and where do I actually execute and pull the trigger on entering a trade? And more importantly, how do I manage it. So I call this the CZT method. Now let's hop on some examples to look at when you are going to actually execute trades at these zones. Now, the first of which is pretty simple, and you're going to do this on a 2-minute chart. And I won't spend much time here because I want to get to the more powerful example. Now, as you see, we have a market structure shift. Sure, you guys have seen this before. So if you execute based on this, that's fine. And we will just always mark every single low or high, meaning any candle is a high that had a higher high than the candles beside of it, and any candle is a low that had a lower low than the candles beside of it. So we're not worried about like strong highs and strong lows, we're just watching market structure. And as you can see in this example, the market closed down below this low, and that is what we call the trigger candle. At that time, you would enter the trade, so you'd put your entry as soon as we ended up closing that candle, and your stop would go at the pivot point— not like the most recent one, but like the last you know, highest high if you're trading a reversal. And this goes vice versa if you're trading a bullish, um, you know, reversal. Let's just say if the market had been bullish and you started to get a move to the upside, you'd put your stop at the lowest low. But I want to show you guys something that's more powerful, and a lot of people think it's complicated, but it's actually really simple. And that is the concept of absorption. Now, big word that makes this sound intimidating, but really what this is showing you is that the market is being manipulated at a key level. So let's just say the market is moving into the value area high or any of our key levels and we are bullish on this day. Well, a lot of other traders who don't have the same edge we have because they're not looking at the volume profile, they're not looking at actual real data. They see the market moving down and they think, oh, let's sell. So they rush into the market and sell unknowing that we're at a level where yesterday bulls took control and a lot of those bulls are likely going to defend those positions. So these traders are blind and they're just aggressively selling. So when we say aggressive selling, you've probably heard this in order flow. Aggressive means people are market buying. So if there's a lot of market buys and there's an indicator I'm going to show you that shows this, by the way, if you're wondering. But whenever the market is, we're seeing a lot of people market buying and aggressively selling, but the market's not moving. That is what we call absorption. And we expect this to happen at key zones when the condition suggests it's likely. So if we're bullish and we're at a bullish zone and we see a lot of aggressive sellers trying to push the market down, but it's not moving, well, some passive buyer has put a limit right here and they are buying from all of these sellers. So think of it like, who's got deeper pockets? All these retail traders who are rushing to sell, or smart money who is looking to hold the markets? Now, I use the term smart money, not about ICT, But genuinely, like, if we know that yesterday there was a balance and the market made a huge move in a market like Nasdaq or ES or any of the major markets, that means that there was a lot of buyers in that zone and they had an imbalance. So if we know that there is an imbalance of buyers starting from an area, then we're going to expect that as long as the market's still bullish, if the market comes down into that area, they're going to want to defend it. So what are they going to need to do to defend it? Well, they're going to need to buy. And what do you need to buy? You need aggressive sellers. So they create these areas of liquidity. And this is sounding ICT adjacent because ICT and that whole school of thought had it right. They're just doing it blind, right? And this is why I changed and updated my strategy, because there's no sense in using these concepts if you're not going to validate it with data. So as you can see in this example, we have a lot of aggressive selling. To the downside here. And the way we're going to confirm this absorption is very simple. Just use candle closes. So I like to use a 5-minute for this, but let's just say if the market is not closing below the area where a lot of these aggressive sellers are getting in, well, that means they're not in control. So it's the same concept, right? Think of each candle like a little mini balance, right? If the candle pushed to the downside but popped right back up and it couldn't close lower, well then what's happening to those traders? They're trapped. So that was a failed auction on that candle. And then if we see right here that there was a lot of sellers that are getting trapped and we start to see bullish price action to the upside and candle closes to the upside, well then we can look to expect a reversal. So I'm going to show you this on a chart, that way you can get a better example. But one of the other things I want to go over is probably the most important part of this whole strategy, and it's something that a lot of traders could instantly become profitable if they applied this correctly, and that is that I don't use take profit orders. Now, a lot of people are going to think, what do you mean? How do you ever make money? It's because my stop loss is my take profit. So let's say I'm in a trade and let's say the market was up here, reversed. I have done my job. I have found a zone. I know the condition of the market is likely bearish. I found my zone and let's say I got my trigger. My job is not to predict where this bearish move will end, because I want to let my winners run and I want to cut my losers short. But what is a winner and what is a loser? Well, a winner is when we're in a trade and we know the direction of the market. Like, if we're selling and sellers are in control, we're in a winning trade until that changes. So a really easy way to mechanically do this is every time we form a new point of structure, trail up your stop. Now, you could do this on the 2-minute or the 5-minute. The 2-minute is preferably what I would do, and I'm going to show you guys how you can do this on a chart as well. But you just trail your stop to every new level. So what this does is like, let's say you had, you know, wanted to take profits at this level. Typically you might just get your 2R and you take profits and go about your day. But what if you could just move your stop up somewhere very close where the worst case scenario, which this will happen sometimes, it comes up and takes you out for like 1.5 to 1.7R. So you make a little bit less on some trades. However, on some trades, and I know you're probably thinking of some trades you've been in where you took profits too early, you get explosive moves and understanding how to capture those big opportunities is likely the difference between where you're at now and being very profitable. I mean, just think of like if you could have taken just half the trades that you closed early and held them for the full duration of the move, what would that look like? To your bottom line. My guess is you might already be a profitable trader and you don't know it. So it's these little gems that are actually going to make a big impact and why I updated my strategy to account for these. Now I'm going to walk you through a bearish and a bullish example on a live chart that are trades I actually took. That way we tie all this in together and you guys are ready to go out tomorrow and trade the CZT strategy. All right. So the platform that you're looking at right now is called DeepCharts. I have a link down in the description where you can get this for a discount.. But if you're using TradingView, that's just fine. Now I already have my volume profile set up and in the free community I post my full template and how you can apply this exact look on DeepCharts. But if you're doing it on TradingView, I'll give you a quick rundown of how to add these tools. So if you're on TradingView, there are two ways you can do this. Now, the first way, which is paid, and the second way, which is free. The first way, you just click indicators, you click the Session Profile HD. And what you're going to do is you're going to double-click this, you're going to hit Custom Session, and you're going to put 9:30 to 4:00 and make sure your time is on Eastern Time, because what this is going to do is mark out that cash session. So this is how we're defining what yesterday's day was. It's not the full daily candle. So after you mark that, you're going to keep everything else the same. You could change volume to total because it doesn't really matter. We're not trying to figure out buys and sells. And then what we want to make sure of is that we go on to this and we mark out the, uh, value area high, value area low. And on TradingView, it actually doesn't add the VWAP, so you'd have to add that indicator as well. But on the free way of how to do this, what you could do is you can go and you could just take this tool over here to the left, you click this button, and you go down to fixed range volume profile. And you would just go manually mark out and start at 9:30, and you would drag it to 4 PM. So this is going to do the same thing, uh, as the session volume profile. You just have to kind of manually do it each day. As you can see, it gives you the same exact stuff— the value area high, point of control, all that. Um, now I recommend using DeepCharts because it gives you better data. This is actually based on real volume data. TradingView is based on aggregate tick data, meaning on TradingView it's basically based on like every time the market moves 1 tick, meaning 0.25. So every time it moves, it's counting a volume, which there could be more than one volume in a tick. Okay, so it works, but your levels would be a little different. It's not the end of the world by no means. You can still use it. It's still very powerful. But if you want to get really, really precise to the tick data, uh, DeepCharts is much better. And if you're taking trading seriously, I recommend you use professional-grade tools. There's a reason I use it, right? I get asked a lot, should I use it? I'm like, well, I'd use it. But, um, anyways, so with DeepCharts, you're just going to make sure you have your deep profile set up. If you wanted to add this, you would just go here and you could just type in the Deep Profile— it's within right here— and then it would set it up for you. Now you would want to make sure you have the, uh, Point of Control and VWAP checked. So now let's go through this example. So on this day, we can see that price opened up right here at 9:30, right where that volume profile starts. We opened up right there at this 29800 level. Obviously, this is much above the value area from the previous day, so we could say that the condition of today is likely bullish and trending. So we're going to expect the market to trade back down into one of our levels and then look for our trigger. Now let's go in and put a really cool indicator called the Deep Trades indicator. It's going to take a second to build the chart because it's loading a lot of data that is extremely powerful. And what this is going to show us is where those aggressive trades were actually hitting the markets. And as we can see, as the market hit into this area right here, if we look at the value area high, where the market first hit into it was this candle right here. Okay, so if we're looking at this area, and, and this isn't a wick, by the way, this is just the volume profile. That candle ended right there. You can kind of look closer and see that there's a line through this candle. But once we hit into that level, the market had a lot of aggressive selling. So we saw this selling right here. And we saw this selling right here and here. And up until this point, the market was kind of rewarding that selling. So once the market had hit down lower, we saw more sellers get into the market, but we saw the market start to spring up. Then we see candles close above. Now what you want to look for is candle closures above those areas where those aggressive sellers were present. And this is going to get you a lot better risk to reward. This is how I executed this trade. So if we're looking at the difference here, like let's just say you executed once this candle closed right here and you can get much tighter stops as well with this. I can put them kind of under the candle close or under where the last area of the, the aggressive traders were trading. And I'm going to get a much tighter stop loss than if I use the structure method. But we can go through the structure method as well. So if we go to the 2-minute chart, so now we're on the 2-minute chart and we can just kind of mark out the VWAP right here because that's the level that we ended up reversing from. You can also mark out that previous day's value area high. So if we notice right here, what was happening on the 2-minute chart was that the market ended up— you still see the same stuff with this absorption, but what we ended up seeing was the market traded through this high over here. We didn't close through it, and the market didn't really close through any significant point of structure until all the way up there, right? So with this high right here, you closed above it, so the entry would have been much higher. Now that's totally fine, um, but you're going to get better execution and better entries when you execute with that absorption. And it's really simple. Yes, it will take a little bit of getting used to, um, but I promise you it'll have such a big impact on your trading. So let's go back over to that day's example. So I'm going to turn off the volume profile just for clarity, but as you can see, we hit into these levels as you started to close up above those areas, you would just enter the trade right here. And this is where it gets really important. So if we have our stops here, I'm not really setting a take profit. Like I'm looking at levels where the market might have some issue. Like I was looking up here at this high, you know, make a new high is always the easiest one to look at. You can also look at old volume profile levels from like multiple days ago. But what I'm doing in this example is I'm just kind of holding on to the trade and I'm going to move up my stops whenever the market forms new structure. So right here I moved up my stops and then up here I moved up my stops. I ended up getting taken out right here on this trade. Now, in this example, sure, like maybe I could have got a little bit more risk to reward, but you'll see why in the next example that this is so powerful because even in, you know, this example, I still got pretty good risk to reward. Like if we look at that, I still walked away with about 2.5 to 1 risk to reward, which is really good. Um, but now let's take a look at an example where I was able to get much more. All right, so in this example, we can mark out the previous day's value area. So I just draw this out. We ask ourselves, did the day open or close outside of value? Now, as you can see right here, the day barely closed outside of value. And then on top of that, we also opened outside of value. Now, a lot of people mess this up and say, oh well, that candle was inside value, but where did the candle open? It's bullish. So this candle opened right there. So now we're looking at this like, okay, this is going to be a very explosive day to the downside. And, you know, as you can see in the free community, I literally posted right here and said this is going to be an interesting day. And I posted a whole plan around this along with some other cool stuff that's in the free community. But in this example right here, if we put on those deep trades— so after we get the deep trades added onto this, it gets really interesting. So we can go ahead and mark a couple levels. On our charts. And you can see that not every time it's going to be perfect and just bounce off of, you know, the, you know, first level it hits. And that's why this important— or this is important to map out your triggers and have a clear process for knowing whether or not I'm going to sit out of a zone. So as the day opened up right here, the market started pushing up. You see it hitting into these areas, and we can clean up our charts a little bit so it's clearer. All right, so let's remove this profile so it's a bit clearer. And as you can see, the market hit into those levels here. We didn't really get any kind of reaction. Same with this one. Same with this one. So we're kind of wondering, okay, well, you know, we're not going to trade any of these levels because we're not getting a trigger. What do we do to enter the trade? Well, as we can see, we hit into that value area high from the previous day, which is this top level. You can see there were buyers here and here. And then what happened here? This candle moved extremely aggressively, like really aggressively. And we saw a lot of sellers and these sellers were in control because, look, the candle closed underneath these levels and it was underneath where all these aggressive trades are coming in. More aggressive trades came in and then buyers right here tried to push the market up and then failed. So I executed right after that happened. Now, if you go on to the 2-minute, you would see a market structure shift in this example. And we can take a look at that too. And as you can see right here, we had this low that ended up getting closed through on the same trigger. So it's the same idea, but the magic here is understanding how to trail those stops. So look at where I executed the trade. So for me, um, you know, I'll probably put it somewhere on the screen, my exact entry. It was probably somewhere around this area. I'll just put it right here. And I had put my stop up above this high because it was the most recent high. Now you could have put your stop wider, um, I just put my stop a little more aggressive based on a little bit of discretion. Um, but now look at the market. If I would have just taken profit, let's just say at this low where a lot of traders took profit, That's a 2 to 1. That's cool. But instead what I did was I moved my stops up to this level right here, and then I moved my stops again to this level right here and right there. And then you can see right there, right here, right here, that high. And then I moved it again down to this level right here and then this level right here. And look at the difference. In my overall profit on this trade. We're talking almost 3 times as much money on this trade. If you're able to do this to a very small portion of your trades, it will have a massive impact on your average realized risk to reward. And this is going to have a huge benefit on your trading. I mean, think of it like this, like, think of it like you're a business and you were able to cut costs by 60%, or, you know, you were able to have some deal that happened a couple of times a month that you made 3 times as much money on. That could be the difference in a business being good or okay, or the business being amazing. So you could see that these small things are what's going to actually make a big impact. And again, this is why I optimize my strategy around this stuff, because trading is changing. There's so many tools we have access to now. And on top of that, I started looking at my data and realizing that I was leaving so much money on the table. So that is why I brought all this together and updated my trading strategy into something much more powerful, as you can see. So here is my my full checklist for this strategy. You can go ahead and take this. That way you have the full game plan and everything you need. But if you are still feeling like you might go out into the markets and not be fully clear on this, I actually sit down and trade live with a small group of traders. I also mentor them directly. This is not your typical cheap Discord where it's a ton of people in there just being stupid. It's a very professional environment where we're actually sitting down There are 10 live trading sessions every week. We're reviewing every single trade you take. You're getting access to my AI software, which is the Smart Trader AI, and a ton of other stuff. And I'm so confident in the system that if you're accepted, because we don't accept everybody, that I guarantee you will become a funded trader in 90 days or we will trade with you for free until you are. So if that sounds interesting to you, go ahead and click the link in the description to apply for my mentorship. And regardless if you do or if you don't, I am rooting for you to win and I'm going to continue posting free videos here on YouTube that give you information. The idea of my mentorship is just execution and implementation. So I'm always going to post stuff here for free and teach you everything that you need to know. Hopefully that a lot of you guys go out and do this and win on your own. So make sure to subscribe to the channel. Thank you guys for watching the video, and I'll see you in the next one.