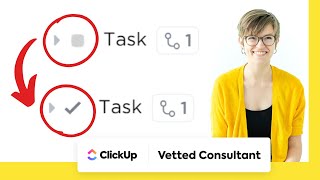
A ClickUp tutorial explaining the difference between check mark and box status icons. The speaker shows how the icon type depends on how many statuses you've set up and offers tips for managing them effectively.
So if you've ever wondered why a task in ClickUp might have a checkbox instead of a regular box to keep track of the status, this video is going to hopefully answer that question. Here, inside ClickUp, I have a task with kind of that simple check mark icon. And then I have another area that's almost an exact copy that has the box. Now, if you want to flip between one or the other of these, you need to understand statuses in ClickUp. Now, I can get to statuses in a few different ways. I could go in here, click on Manage status. I could also go into the actual list and manage the statuses there. But the important thing to keep in mind about statuses in ClickUp is that if there are more than two of them, you are going to see this little box. Doesn't matter if there's 5, 10, 3, if there's more than 2, you will see a status box. If you have only two statuses, no matter what those statuses are, you will see the check mark icon. So if you want to easily change between the check mark icon and the box inside ClickUp, just manage your statuses in any of the ways I've already showed you. Go inside here and add an additional status. So here I changed the status type, clicking save. Now you see that the check mark changed into a box because we now have more than two statuses. So rather than a toggle between a check or a not checked, we now have a multiple options. We have a dropdown here of different statuses available. Now, of course, in the reverse scenario where you want to actually go from the box into the check mark, just do the opposite. Manage your statuses, go into here and delete the extra status. So that way you only have two. Again, it doesn't actually matter what these statuses are called. Just make sure that there's only two of them and then you will go back to having the checkbox. There's no fancy click apps, no fancy features that are causing the box or the check mark. It's simply the number of statuses. The reason I like to keep my statuses in this check mark format, in this very short yes or no format is because one, a check mark is a lot easier for someone who's not me to understand. So if I delegate tasks or I have other people in my team maybe just aren't as ClickUp savvy, having the check mark is straightforward. It's a lot like asana. We know exactly what we're. If we're done, we check the darn box this applies to subtasks as well. But if I had more than just two statuses and I have that box icon and someone's in my workspace who's not used to using ClickUp, it can be very confusing to know, wait, what is this box supposed to do? Am I supposed to adjust this? What exactly is happening here? And it's just a bit more of a learning curve which when you're dealing with ClickUp, things are complex enough. I am in favor of keeping things simple wherever possible, so I personally try to keep almost all of my statuses in either the yes or or no category, meaning there's only two options and we flip between them. If you'd like to learn more about using statuses in ClickUp, I suggest you watch this video next where I talk about simple statuses versus having a dropdown field for your status. So this is actually a status field here, but some people you'll see will have actually stages where they'll have step one, step two, step three in a separate dropdown and they'll separate the status from the stage. And if you'd like to learn more about that, watch this video here. The second resource I'm going to point you to if you'd like to learn more about statuses in ClickUp is the blog post linked in the description People don't realize, but we actually make a blog version of every video we put out here on YouTube. And in the blog version, not only do we recap the video in a very skimmable way, we also include bonus resources from time to time. And in this particular blog post you can find a bunch of example statuses, including the ones that I use in my own account, inside that blog post. So if you're stuck trying to figure out, you know, what should my status say, when should I add complex statuses, what should I do if I have a CRM and ClickUp, what should the statuses be there any of those questions, check out the blog post. But otherwise that is it for this quick video. If this was helpful to you, please do give it a thumbs up, click subscribe and leave a comment below. All of those things help this video perform in the YouTube algorithm and they cost you nothing. So why not? Thank you so much for watching and until next time, enjoy the process.