THIS AI Automation Lets You Repurpose Youtube Videos Into Social Media Posts!
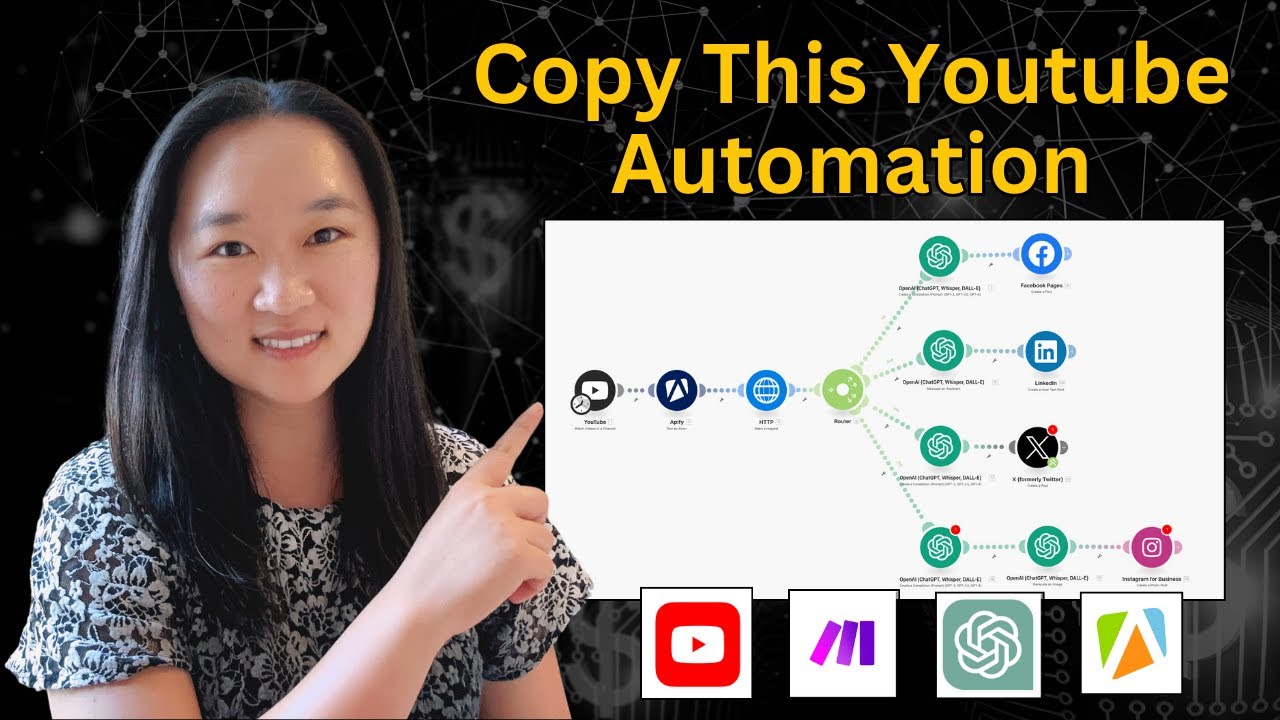
Helena Liu builds a Make.com automation that grabs YouTube videos, extracts transcripts, feeds them to OpenAI, and posts platform-specific copy to Facebook, LinkedIn, X, and Instagram. No coding required. The same workflow works with any long-form content source.
Chapters
One of the most popular and effective content marketing strategies out there is what I like to call the repurpose multiplier strategy. Using this strategy, you will create one form of long piece content like a blog post or a YouTube video, and then repurpose it for all of the other social media platforms. So essentially, you only do the work once and you got content for every single platform. And today I'm going to show you how to set this up on automation so that you don't have to pay someone hundreds of dollars to do this work for you. What we're going to do today is we're going to take your latest YouTube video, get the transcript from it, and then turn the content of that YouTube video into social media posts. So let's dive into it. The first thing that we're going to do is we're going to hop over to make.com. Make.com is an automation tool, and you don't need to write one single line of code. And once you register for a free account, you can go up here and click on create a new New Scenario. This will take you to a blank canvas where you can start dragging and dropping over the different modules that you want for your automation, and you can see in a visual way what your automation looks like. Oh, and by the way, if you want to learn more about AI and automations, make sure you sign up for my free course below. All right, so for our trigger here today, we're going to search for YouTube, and the specific trigger that we want to select is Watch a Video in a Channel. This trigger will allow this automation to detect whenever a new video has been uploaded to a channel and automatically turn that new video into posts that you can post across all of your social media networks. Once you have selected YouTube, the next thing you're going to do is click up here to add. If this is the first time connecting your YouTube account to Make.com, you're going to click on Sign In with Google, put in your credentials, and you're good to go. I have already done so. So in Make.com, you can see the fields that you had to fill in for each of the modules. When the text is bolded, that indicates that this field is a mandatory field, and the non-bolded ones are optional fields. So you can see here we have to fill in what our channel ID is. To find our channel ID, we're going to click on the ID helper and put in our handle. So mine is just my name, so I'm going to put that here and press OK. And within a few seconds, the ID finder is going to find my channel ID, which which is a string of letters and numbers. And I'm going to go down here and change the limit to 1 so that it triggers 1 new video at a time. I'm going to press OK here. And then it's going to ask me when do I want it to start, I'm going to select since a specific date. And the reason I'm choosing this is because I want a few videos from my past to be able to be pulled into this automation so that I have some test videos that I can run to see if this automation is working expected. So I'm just going to go about 3 weeks back here. And then I'm going to press OK. Now next, I'm going to press Save. And I'm going to right-click on this module and click on Run This Module Only. So I have a green checkmark here, that means that this module has been connected successfully to my YouTube account, which is perfect. And next, what we need to do is to scrape the YouTube transcripts from the YouTube video so that we can repurpose it into the various different types of social media posts. And to do so, we're going to use Amplify, which is a marketplace of different web scrapers. And the best thing is when a web scraper is inside of Amplify, it automatically is able to connect to the Amplify API, which allows you to use it automatically inside of your automations. So I'm going to search for the Amplify module. And then for the actions, I'm going to select Run an Actor. After this step, we need to actually go into Amplify and configure our actor. And by the way, Amplify defines an actor basically as a scraper. So don't let those terminologies mess you up. You can sign up for an Amplify account for absolutely free. And once you have signed into your Amplify account and got your free account, you will have $5 that you can play around with to ensure that your automation is working properly. So once you have signed up for your account, you'll be taken to the Amplify store. And as you can see, there are already more than 2,000 prebuilt actors that you can use for your web scraping and automation projects. Likely, if you have a web scraping task, there is already a scraper that's made, so you don't have to go out, find a developer, and develop something custom, which can cost you thousands of dollars. You can see here Amplify already have Google Map extractors, website extractors, TikTok data extractors, Facebook post scrapers. It also has Twitter scrapers, Reddit scrapers, LinkedIn job scrapers. I mean, the use cases for these are just absolutely endless. So if you have an upcoming web scraping project, I would recommend looking at Amplify first. Alright, so what we need to search for is the YouTube transcript scraper. So I'm going to type in YouTube transcript, it's going to return to me all of the various providers who have developed YouTube transcript scrapers. I can look at who made these scrapers, I can look at how many people have downloaded them. So this one has been the one that I found that worked the best. So I'm going to select this. And you can see that this one is free for 3 days, and then it's $20 per month if you choose to use it. Now, the the way that you can use it is you just type in your YouTube video here and then press Start. And after I press the Start Run, you can see the console log is running. And after a few seconds, I'm going to be able to see the output. It's been about 30 seconds later. And then when I go to the output, I can see the transcript for the Mariah Carey music video. So this scraper is working as expected. And now I need to connect it to my make.com account. In order to connect this scraper to my make.com account, I need to go back to make.com and I need to link my Amplify account to my make.com account. The first thing I'm going to do is press add and I need to put in my API token. To find your API token inside of Amplify, go down to settings and go over to integrations. This is where you'll be able to find your API key. Simply copy this key and paste it back into this this field right here. I have already done so, and as you can see, my Amplify connection has been successfully connected to my make.com account. Now, once I do my dropdown inside of Amplify, I'll be able to see all of the actors, aka scrapers, that I have connected into my account. For this demo account, I only have the YouTube transcript scraper linked, so I'm going to click on the YouTube transcript scraper, and I'm also going to select yes under run synchronously. And then we need to put in the input JSON. So the input JSON is what this specific actor needs in order to run. This is the input data that you need to input into it so that it knows what data it has to work with. In this case, it would be the YouTube URL that you want to transcribe. So in order to find the data structure for this specific actor, we need to go back into Amplify. We need to go back into our actors so we can see ours here. We can click on it and we can look through the information. So we can go over to the Inputs tab and we can see the data structure that it is looking for. Another way that we can find the input structure is to go to our test runs, look at any of the test runs, and then look at the input for the specific structure that's being used. We can go ahead and copy the structure and go back into make.com and paste this in. Now what this JSON is saying is to call this specific actor instead of Amplify and transcribe this video. So it's going to be this video every single time, which is not what we want. Now we need to change this static video into a dynamic one, and we do so by removing the video ID here and replacing it with the video ID of the video that we just got from our YouTube channel. So I'm going to fill in the value that we got from the previous YouTube module. And then I'm going to press OK. Alright, now that we have obtained the transcript from Amplify, we need a way to actually extract this transcript. And we can do so by using an HTTP module. So we're going to search for HTTP in our search bar here. And we're going to go down until we find make a request. Essentially, this Amplify module creates the transcripts you will need, and you will need to access it through a web page. We can also expand on the chat bubble, which has a 1 in the middle, to see the detailed results here. When we look at the outputs, we can see that the way that this specific API has been set up, it doesn't actually return the exact transcript to us. So what we need to do is actually to get this dataset ID and then put it into a URL and scrape the information from this URL. It's just basically one extra step that we need to do. And you need to put in the Amplify website in order to extract the information from this URL. I'm also going to pre-fill in the default dataset ID. I'm going to tell Amplify here is to get this dataset ID that we just scraped that includes the YouTube transcript that we have just test script. And all we need to do is select Yes on Parse Response and then press OK. Now before we continue, as always, make sure you save and run once to ensure that everything is working great. It's been about 15 seconds later. And when I expand on the HTTP module, and I go to the outputs, I expand on the data, expand on the one, I can expand on the transcript. And I can see the transcript of my latest YouTube video. Now that we have our YouTube transcript, we now need to transform it into our social media post for Facebook, LinkedIn, Twitter, and Instagram, and then post it onto all of those platforms automatically. So to do so, we're going to press the plus button again. And this time, we're going to look for a router. We need a router because we want it to be posted on 4 different platforms automatically. And before we can post it onto these platforms, we need to actually write our post. And you can use any large language model to write your post from OpenAI to Claude, Perplexity, or whichever platform that you like best. Today I'm going to show you how to set up OpenAI and OpenAI Assistant. I'm going to show you how to use OpenAI first, and then we're going to set up an assistant so you can see how to use both methods. But just keep in mind, you can absolutely use Claude or any other large language model for this. So I'm going to search for the OpenAI module. In order to just use the regular OpenAI ChatGPT, all you need to do is to click on the Create a Completion action and put in your API key. I have already done So, but if this is your first time connecting to the OpenAI module, click Add up here and put in your API key. You can find the OpenAI API key for your account by going to platform.openai.com/api-key. You do need to put in your credit card information in the billing section before you're able to generate an API key. So the API key is what allows OpenAI to link your credit card to your make.com account so that they can bill you for all of the usage of the word generations. And if you're wondering how much these words cost, it depends on the model that you are using, but it is super affordable at the moment. Currently, you can probably generate between 4 million to 5 million characters on OpenAI's latest model, which is GPT-4o, for about $15. So it is pretty much free. All right, so once you have put in your OpenAI key, you're going to select Create a Chat Completion. For the model, you can choose whichever model that you want ChatGPT to use. I'm going to use the GPT-4o system, and I'm going to press on add a message. The role will be the user, and the message content part, this is where I put in my prompt. Here is a sample prompt that you can use. Let me read it to you. Generate a Facebook post to announce the release of my new YouTube video. The post should highlight key topics about the video, and how it can benefit my followers. Make sure the tone is enthusiastic and engaging. Include a link to the video. Also add in the relevant hashtags to boost visibility. And then I can now add in the specific information about that video. So here's the transcript of the video, and here's the URL link to the video. To fill in these 2 sections, all I need to do is to click, and you can see Make.com gives me all of the information that was just generated from the previous modules. From the HTTP module, I'm going to expand on data, and I'm going to select on transcript. This is what the transcript of the video is going to be. Now next, I need the link. And to get the link, I need to scroll down until I find the YouTube ID. And I need to fill in the section that comes before the YouTube ID. Which I have over in the Amplify module, and it's just in this portion right here. So this is the portion that goes before the YouTube video ID. Now that I have all of my data filled out— and by the way, GPT-4o can access the web in real time, which is amazing. That is the model you want to use if you want the GPT to be able to access and read any URL that you have in your prompt. So now that we have done that, for the maximum token, I'm going to put in 1,000. The maximum number of tokens will tell GPT how long they need to make the post. A rough rule of thumb is generally 1 token equals about 4 to 5 characters. There is some complex math algorithm to calculate the number of tokens, which we are not going to get into in this video. So I'm going to press OK here. Before we go on to the next module, we just now need to connect this to our Facebook account. Now if you don't want this post to be automatically uploaded into your account, you could press Add. And you could add something like a Gmail module or a Slack module so that you get notified whenever this post has finished generating and you can review it first, then post it yourself. But another thing that you can do if you're happy with your prompt, you've tested it a couple times and you're happy with the output, you can just get this automation to post on your Facebook account automatically. In order to do so, just search for Facebook Pages and then select Create a Post. If this is your first time connecting your Make.com to your Facebook account, you need to press Add and then Save, and then it's going to prompt to log into your Facebook account so that Make.com has the permissions to post onto your Facebook page automatically. I have already connected and I can see the list of pages in which I am an admin. And once I select the page that I want to post on, now I need to put in the message. So when I click on the message field, I can see all the data from the previous modules. And what I want is to expand on choices under the OpenAI module, expand on messages, and select the content. And just like this, I am done. Now let me show you the second method that you can use to generate these posts. And that is by using an OpenAI assistant. So in order to create your own assistant, you want to head over to platform.openai.com/playground. This is where you can design your own OpenAI assistant, you can give it a name, give it some custom instructions. And you can also toggle on file search and give it some additional files that you want this particular assistant to learn. For example, if you're creating a social media assistant, you can create a file with examples of posts that you like that you want AI to learn the tone, style, structure from in order to generate new pieces of content. So I have already created a LinkedIn agent, I have put in my prompt in the instructions section, I am using GPT-4o as the model. And I have also added in in some additional files including the style tone of LinkedIn post that I like. Now in order to link this LinkedIn agent back into my Make.com automation, I'm going to search for OpenAI. Now instead of selecting Create a Completion, I'm going to select Message and Assistant instead. Because I have already filled in my API key, OpenAI automatically knows which account is mine and it's able to associate all of the assistants I have made to my account. Now I just need to select the LinkedIn agent that I have just created. Now in the message section right here, this is additional data that I want this assistant to know in order to generate the LinkedIn post that I want. And what I want to put in here is the YouTube transcript as well as a YouTube URL. Using the same steps that we did earlier, I have filled in the YouTube transcript script as well as the YouTube URL here. And I'm going to press OK. Okay, now you may be wondering, when should I use the OpenAI Assistant versus ChatGPT complete a chat completion? Now, you would use the OpenAI Assistant when you have hundreds of pages of data that you want this particular module to learn about before it generates the chat completion. If you just have a couple of social media posts, examples that you want OpenAI to learn before generating your post, you can go ahead and just use create a completion. And even after this prompt here, you can add in all of your examples right here. But if you have hundreds of pages of information that you want this module to learn before it generates the text, then OpenAI Assistant is the way to go. You can turn on file search. And as far as I know, there's no size limit to how much data you can upload here. Just upload all of your files. And you can also use OpenAI Assistant to configure the temperature and top-p as well. So the higher the temperature, the more creative the model can get. The lower the temperature, the more it's going to stick to the training data. I suggest that you keep it between 0.3 to 0.5 because it will also lower your chances of hallucination. All right, so once you your OpenAI assistant linked up here. Now we need to connect this one to our LinkedIn account. I'm going to look for LinkedIn, and for our action, we want to select create a user text post. And again, if this is your first time connecting your LinkedIn account to your Make.com account, you need to give Make.com the permission to automatically post onto your LinkedIn. And to do so, just press add and sign in to your LinkedIn account to grant that permission. I have already done so. So if I want this content to now be posted on my LinkedIn account, I'm going to click on the content field here and I'm going to select on the result field from the OpenAI assistant. And here I can select my visibility, whether I want it to be public, only visible to my connections, or viewable only to logged-in LinkedIn members. Once I am happy with with all of the settings here. And I'm just going to now repeat the process for X and Instagram. Okay, and this is what your automation will look like once it is all completed. Now let's suppose you don't want to post anything on Instagram, it is absolutely okay to just right-click, unlink, and not have this complete branch over here. So it is really that easy to repurpose your YouTube video for all of your other social media post. And if you don't like the result, again, just go into the ChatGPT module and modify your prompt. You can also use another language model like Claude. Now you have an automation system that will run automatically whenever you have one large piece of content that you have posted. And by the way, you can totally replace the YouTube trigger here with a WordPress trigger. So whenever you have new blog posts coming in, this whole system is going to work as well. Really, it's about learning the basic building blocks, and then you can create any kind of automation that you desire. Thank you so much for joining me for today's tutorial. And if you got any value out of this content, please hit the like and subscribe button. Also remember that I have a free AI and automations course that you can sign up for below as well. Thank you so much for joining me, and I'll see you next time. Bye for now.
More from Helena

How to Use Claude Code to Get UNLIMITED Leads in 6 Mins | Best Lead Scraping Tool


These AI Videos Has 21.5M Views — Here's the Exact System (Fable 5 + Higgsfield)


NotebookLM 2.0 Update: Analyze Your Entire Business in Minutes! (Full Tutorial)