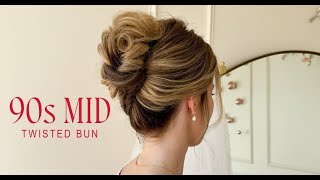
Marissa Brennan shows how to build a soft, textured 90s mid bun. She teases half-inch sections at the roots, twists the hair into two diagonal sections, secures it with U-pins and bobby pins, then adds face-framing curls and a veil.
Questions this video answers
GHG 1 inch iron.
Long barrel 1 1/4" iron (Bio Ionic).
Ulta.
Be styling a soft textured mid bun together. I forgot to film the prep, so sorry. But I did use a GHG 1 inch iron to curl the whole head because this is the look we're going for. And the first thing I did was break up her curls by using glow. It is to hydrate the hair. I really want the hair to be super hydrated before I start styling again. I just need movement in the hairs, so I quickly curled going in alternate directions. Next, I'm going to be teasing. And the section we're going to be teasing is the top of a crown to the end base of the crown. You're going to be multiple sections all the way through. You want your teasing sections to be about half an inch in width. You don't want it to go heavier than that. You're always going to take your texture powder and place that at the root of the hair and comb back. This will allow for extra control and extra hold. Because we are going to be placing all of our pins in this section. And as you can see, this is exactly all the sections that I did for teasing all the way from the top of the crown and on the side. So you could see this is a lot of teas because again, we need something for our pins to hold on to, otherwise the style will just fall out. So here I am again, and I'm going to the front. I like to do all of my teasing at once to get it out of the way. So I'm going to do the fronts, the sides as well as the back in the crown area. And again, another visual for where I'm teasing on the sides. I did about one to two sections on each side. Rules of thumb for teasing. If I can touch your tease and it falls out, it's not strong enough. Go back and add more product. And also where you are placing any kind of bun you want a tease underneath again, so that way your pins have something strong to hold onto and they don't slide out. And that way this hairstyle actually lasts all night. So teasing is super important for the style. Next, before I actually start pinning the style into place, what I want to do is actually visualize what it's going to look like and start getting my shaping right. Because with this kind of a bun, this shape is pretty important. So I want to visualize it. This is the shape we don't want to do. You don't want it to be too wide in the back and go out too far on her ears and create a little harsh straight lines in the hair. Instead, what you want to do is to have it narrow down by the nape of the neck and always have a twisted curved line in your styles. Let me show you what I mean by always adding a twist to your section. You will add a curved line. And when I am visualizing I'm taking a big brown upin that I got from Ulta to hold it into place again. Cuz I don't need it secured, I'm just holding it into place until I see the sections that I want to take the twist I want to take. So if you can see, see over here by going out on the section, by pushing that out, it's going to make it too wide. That's why I'm taking it up and over and I'm trying to see what I want to create. So these are the lines that I want to see in the style. I want them curved back towards the bun and I want them curved in the bun itself. If your lines in your bun are coming out too flat and too straight, add a twist within your section. Taking an open U pin and holding it into place so that way I can visualize and see the sections that I want to take. So, so that way when I go to secure, I know what I'm going to do with the section. This top section, that's the one that's going to be visible. She didn't want to see it from the front. So for that style, for that top section, you can fluff it out by using texture powders which we're going to do in a second. So I was visualizing how long I wanted the style to be. And then once I felt good with my shape and knew how I wanted it to go and knew the twist that I wanted to flow, I just took it out from the upins and now I can start securing my bun. For this style, I like to work in two sections. So I'm splitting from the top of the crown down all the way to the nape on a diagonal back section. And I'm going to work in one section at a time. So I'm clipping that out of the way. And next I'm going to grab my thrill fiber gum because I want to add shine as well as control to this section. That way on the sides when I am bringing them back and I am connecting them because I'm working in that entire section, I'm working with the sides as well as the back and I'm raking that thrill fiber gum all the way through to get the shine. And what I'm Doing is I'm taking that top layer and I'm pinching and pulling it out so that way it can accentuate and add more texture and depth throughout this hairstyle. Because this is more of a soft textured look, you want to pull out the texture so it doesn't appear flat. Next, you're going to grab the entire section, and I'm twisting it up. I'm being super loose with this because it's more of a loose style. So I'm being super loose with my twist, and I'm twisting it up and over to the left. So from right to left. Next, again, I am taking my big open upins, and I am placing them on the bases of the hair where it's heaviest so it doesn't fall out. Next, on that top section that's going to be visible from the front, I'm taking my dusted texture powder because she's super strong and secure, getting that all over the lengths of the section, taking my fork, comb, and backcombing that section. What this is going to do is add height as well as width to that section of hair you're working with. So from the front, it's going to add that width that you want to see as well as height that you're going to need for this look. If it's not sitting as high as you want, go back and add more, dust it. Now I'm working on the second section, and as you can see, I'm working with the entire section in one. Doing the dusted again and going through with my four comb and activating that dust it. Next we're going to go with the Thrill fiber gum to add that that shine and control back because the hair is going to start to look dry. I want it to look shiny, and I want to get rid of the frizz. So that's why I'm going in with the Thrill fiber gum, and we're going to add that texture back in on the top layer so the hair doesn't appear flat in this style at this time is when I'll typically start pulling out the hair from the front just to make sure that it's not secured up in my section. So that's what I'm doing right here. Working with this whole section in one is going to prevent a lot of lines in your style that you want to avoid. So I'm taking the whole section. I'm twisting it up and over to the right, so up and over to the right, and I'm putting it side by side on my other section and it's almost going to be forming like a donut, which I'll show you in a second. Taking my big open upins and holding it into place. And as you can see, it's forming more of a circular shape because I want some height in the middle. Goal is to keep your height in the middle like this. This is what you want your section to look like. Next I'm going to be going in with my silhouette spray and I'm just going to be pinching it out with my for comb and securing any of the base of the style where it is actually heaviest. So gravity is going to pull that ha down. So I'm going to go in with regular bobby pins, keeping them closed and placing them right on the scalp, touching the scalp as soon as I am securing a pin and as you can see pushing it in there. There is a lot of teas under there. Next I'm pinching and pulling. Make sure your client's head is straight, otherwise your shape will get messed up. I'm pinching and pulling in opposite directions to create fluff and air it out. I'm placing my pins inside the bun, not on top. Cuz you will mess with with your shape and you will flatten out your bun. Once I'm finished and it is secure, I'll take out all my U pins and I'll place in bobby pins along the scalp. I'd rather my sections look tight and then air it out and add texture later. So that way I know it's going to be secure. You also want to make sure that you're leaving the lengths out. We're going to deal with the lengths at the end and this is more of a loose style so you're going to be leaving them until the end and pinch and pull. If you see any lines that are looking a little bit too straight, take your fork comb with the ends and the lengths that are left out and you're just going to flatten them out and make sure that nothing is super curly because that's not what this style is supposed to look like. Before I secure those lengths, I want to make sure the front is looking okay. So I'm going to go to the front and do a security check and make sure that I have a rounded shape. While I was doing a security check, I was taking my 4 comb pressing it into the hair to see if anything was moving too much and it actually was. So that's when I took another bobby pin and pressed it in the hair. So to secure that section even more Again, from the front, what you want to visualize is almost like a half moon. If it is looking too much like a donut, you're looking like too much like she has a sock bun in her hair. We need to break up those lines. We need to break up those lines and add something else. Envision a half moon. Then you're going to go through and secure that section with bobby pins. You can even press bobby pins into your sections. If it's looking too thick, you break it up and add even more texture. Once you feel go with the front, you can go to the lengths. And I'm taking my four comb and just breaking it up and adding more, more width to the section by just fluffing it up and making sure that I'm covering any holes in the style. So that's what I'm doing with this section right here. I'm fluffing it up with the 4 comb, making sure there's no holes, no gaps in the style. Then I take an open U pin because I don't want to flatten the section with a bobby pin, so I press that into the hair instead. With this style, you can really flatten it out by adding too many bobby pins. So that's what I didn't want to do because you need the height with this style. So again, take that open new pin and you can press that into the hair because it's not going to mess with the height or flatten out your section. Once I have my length secured, I want to go back around and make sure that everything is looking frizz free. So I will take my silhouette and I will spray a section and go back in with my four comb and tuck it into the hair. So if you have any frizz sticking out, that's what you want to do. Next, I'll take my 4 comb and if anything flattened out, I'll push it back up in the hair to bring back out any volume that got lost. Now we're going to work on our face frame. Her face frame was super dainty. This is the face frame that we picked out. We picked it out from the top part line as well as just by the ear. You don't want to pull out more hair by the ear. Again, do not pull out more hair by the ear. That is the least amount of hair that you want to pull out. You want to pull out more by the hairline, the top of her part. If you pull out too much by her ear, it's going to be giving, like, manly sideburn. And that's not what we want to do Next. I'm doing my Oasis this volume up which is essentially going to add shine. You want to shake it up, activate it, spray it onto the hair, come back with your four comb and tuck in any frizzes and it's going to add a beautiful shine to the hair. I like to do this at the end as well as throughout my styling. Here's a visual of the face frame that we did. It was super soft, so I wanted the curl to start right below her cheekbone. So what I did was I took my long barrel, 1 and 14 in iron. It's the bio ionic and I curled starting at the lengths like all the way at the end. I didn't go all the way up because I just needed a bit little, little bit of curl. Lastly, I will hit them with a setting spray cuz I want them to freeze in place. And I love to use the got to be glued. I'll take it right along her hairline and I will fluff out each one of these curls. If you don't take a four comb to your face frame and you leave it in its sausage formation, I'm going to come for you. The last thing you want to do is go around 360 view, look at every side angle and go in with a shine spray like Oasis volume up. It's not heavy on the hair so you can spray this a lot. But actually, I'll tell you a little secret. I was getting some B roll and I was actually spraying the air. So that's actually what I was doing here. One of my favorite ways to get content is to do what I like to call touchups at the end. So I'm adding the shine spray and then this was fake, I didn't need to do anything. But this was actually for B roll, so I'm sharing that with you. Once you feel good with the shape. It's not too wide, everything's secure. This is what your bun is going to look like. She's not too wide, she's twisted. Here's the front and then this is how we secured the veil. I put it in the middle because if we put it on top, it will crush your beautiful bun. I hope you give it a try.
More from Marissa



7 Lessons I Wish I Knew In My First Wedding Season (I’ve Now Grossed $728,000)