All Back Clean High Bun Demo
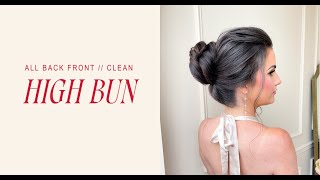
A step-by-step bridal hairstyling tutorial (YouTube) demonstrating how to create a clean, all-back high bun. The host (Marissa Brennan) covers prep (crimping and curling for direction and volume), sectioning and teasing the crown for a strong base, building a secure padded ponytail and wrapping/pinning the lengths into a rounded bun, then finishing with shine, face-frame curls and hairline touch-ups. Tips on face shapes, product choices, and troubleshooting (volume, visible padding, baby hairs) are included.
Okay, we're back. I just deleted that post because the WI fi went out. So let me guys know if this gets paused at all in the comments and if this is working for you guys. I'm sorry, connection issues. Okay, we're back again. This is my friend Evan. I prepped half of our hair, so the bottom half underneath. And we're going to be doing the bridal tighter circular bun up at the top. So I'm going to prep this with you guys. I'm going to start with my crimper and so if you're doing it along with me, you can pull out your crimper. And I'm going to start crimping the front area. And remember, the crimp is just to get out your client's natural wave at the root and also to add some volume. So I'm going to crimp and then I'm going to curl on top. Okay, so I'm going to start out right at the root. You want to make sure that you're starting out at the top of the head. You don't want to take your section starting down and below. So crimping right in at her root. You want to make sure that the sections are see through. And kind of like when you were in beauty school and you're doing highlights, that's how thin you want your section to be. I don't know. Okay, so I'm taking it horizontally and this is going to add elevation. If we remember, always keep your volume in the Mohawk section. So I'm only doing these sections over. Direct it up until her high recession. I'm gonna sound like a broken record until I drill it in your guys heads. All right, so this is my last section right at her high recession, where the hairline recedes right there and then right here. I don't. I already crimped it. So I'm just going to crimp these ones just to get a smoother root, but right by her ear. Remember, majority of your clients tuck their hair behind their ears, so you want to get any kinks out that's around that area. Okay, so we have that front section. I'm gonna clip that out of the way. We'll do the other, other section. If you're crimping, if you're seeing your crimps, you're probably pressing it too tight. So you want to make sure that when you're crimping, you're lightly opening and tapping it. You're not like pressing super hard on the hair or your sections might be Too thick. So if they're too thick, it's going to show the crimp. We want them to be invisible and really only visible when they're like have bright light over top of their head. You don't want to see the crimps taking it up to the higher session. And I already did the crimping by her ear over here as well. So I already cleaned up her hairline. And I'm just going to smooth this out right by the root. If your client's hair is curlier down in the lengths, and maybe you don't need to use the crimper for any volume, what you can do is close the crimper and just act as a flat iron to smooth out the root. So that's kind of what I did back here. And now we'll work in the crown area and we'll put that one out of the way. So your crown area is most important because we want to make sure that we have volume in our crown area. So I'm always going to be over directing these sections coming right in at the root. And I'm only crimping where I know I'm going to be pinning my section. So I'm not going all the way down to the lengths of the hair. I'm only going about midway. I'm staying in line with the mohawk right here. And then I'm going to do two sections on either side. Perfect. And then when I'm over here, they're going to be like diagonal forward sections. So a diagonal going forward towards the face. I prefer to crimp and then curl on top. I feel like you get a much smoother result. Rather than taking your iron, like your curling iron and smoothing out with that. I don't find it gets as smooth for the hair. So that's why I like to crimp first. And this will be my last section here. I'm going to turn off my printer. Okay. I got my 1.25. So grab your curling irons. Or if you have a 1 inch, that's totally fine. I just actually just love that iron, so I love experimenting with it. Cute. Okay, so when I'm curling the hair, this is where I want to know the direction that I'm going to be ending up for, like my curl patterns all underneath here. When I was curling it, I was just kind of curling opposite directions, always around the hairline. You want to curl towards away from the face, towards where your bun is going to be. So this is where it's important to know the type of bun you're doing and the direction that. That you want the hair to flow in. So I know my end result. I'm going to be ending up here, like with my bun up here. So this hair all needs to be curled, going in that direction to start creating those swooping lines for that. So all of this hair is going to be curled away from the face. This hair up here, I need volume because I'm going to create like a short part line or no, we're doing all back. So all back. The direction of the hair is going to be going all back towards the bun. Right? So all of this hair, I'm actually going to curl it and set it so that way it's going in that direction. So it's going to be a horizontal hold, and then on the sides is going to be a vertical hold going away from the face. So that's why this section is pretty important. It's kind of like a half moon shape from, like the top of her ear all the way to the other side of her ear, if that makes sense. The way that I make this easiest for myself as like a guideline is I'm gonna take out, like from the theory, I take out the top part because I'm doing all that, and I'm gonna set that so that way it's kind of a guideline of right behind it. I'm gonna curl that and set it in place. And then the sides, I'm gonna going to go away. So that's going to be my guideline. So I'm going to do that first. So I'm right at her high recession, and I'm creating like a U or like a V. I just want to show you guys to see if you guys can see. So that's what your section should look like. So it's like a V. Okay. So it should look something like that. Starting like here, going back towards the center. So that's what my section is going to look like. And I'm going to curl that into parts depending on how thick your section is. If your client has thicker hair, do it in two sections. If it's not that thick, you could do it in one. So I'm going to split this horizontally like that. Hit it with my wet spray. We're already dropping stuff. Love that for us. And it's a horizontal hold. The curl technique that I do is not a twist wrap. I don't know if this is called a flat wrap. This is just a traditional curl to me. And that's the kind of Curl technique that I took throughout the entire section. Again, I'm not looking for a specific curl pattern when I'm doing a higher bun. It's more so just to get roundness in the shape of your high bun so you don't have to be particular. I'm just setting this with a little clip just so it stays out of the way. The reason that I like to do this in a almost like a V U pattern in the front at the higher session is because when you add this over top for an all back look and then going to be the most blended. If you do it too boxy of a section and you bring that over top, what it does is it creates too much width on the side of your client's face versus when I do the V back towards the center. It creates more of the volume staying within the mohawk of your client's face or like of their head. So it's going to set. The volume is all going to stay here and it's not going to go outside of that guideline. I'm gonna set this on these and then these are going to be the last sections that I deal with. So I really want to just like secure them up and out of the way. And I'm going to curl the rest of her hair that we have down. Now that I know the direction that we're going, I'm going to section it out and curl. So this is what my sectioning looks like. I'm going to start in the back and just curling away from the face. I know some of you guys were saying that you don't like the bio ionic curls because they're not. They don't have as much tension, which is true. The most tension you're going to have is right by the base of the barrel versus when you go up higher, you're going to lose your tension because it is so long. That's normal. It's not anything wrong with your bio ionic iron. Spray underneath and on top and then comb. So that way you can distribute your spray evenly throughout the hair. You can start curling on base once you get to this point in the crown area so you can start reinforcing that volume into the hair. So when I say on base, I mean it's like level, it's over top and it's. When I'm done with my curl, it lays on top her root area. These curls don't need to be perfect. This is my last section in the back crown and then I'm going to move to the sides. I find that the 1.25 inch is that one and a quarter. Is that one and a quarter? Yeah, one and a quarter. I say 1.25. That's 0.25. Is a quarter. Is a quarter. Reasons I did not go to college and I'm a hairstylist. I find that it adds such. It adds such a softer curl and I love it. As opposed to the. Since I've been using it, I typically always would use the one inch iron, but the one and a quarter adds that more faux blowout, not as tight. And I'm just here for it. So these ones, I'm holding my iron vertically and I'm going up to get that direction. When you're holding your iron this way, you're going to get the curl direction to go up in the swooping motion for the high bun, versus if I was to hold my iron this way, the direction of the curl is going to go that way towards the face. That's not what I want. So that's what I mean when I say you need to know the direction that you're going to be going. My sections are all about a half inch. About like a half inch. Typically like two to three sections on the side to really get that swoop. And same thing on this side is going to be two sections going back and my last section here. And remember, when you're curling, you want to leave the hair on the iron until you feel it's warmed through. So when it's warm to the touch is when you can release the curl again. I don't need to hold these up, these curls, I don't need to be perfect. It's not a glam wave. So we don't need to be that particular with our curls. Okay, so now we can start finding our base placement. So there's two types of ways that you can do this. Remember in the demo I said you can do inside the crown, outside the crown? I'm going to do inside the crown. So my base is going to be here inside the crown in line with her cheekbones. So here the. The way that I like to do this, I've seen other people do it. I find I mess up if I create like a little circle and then you do a little ponytail and then you bring all your hair up on top of that ponytail. What happens for me personally that I mess up is when I'm bringing and connecting the back. So when I'm bringing all this up, I always get so much disconnection when I start my base too soon. So, like, it just Looks, it's not all uniform, all one. You can, like, see the split in the hair and the tea starts getting exposed. So I don't love that. So what I like to do instead is I'm going to split this in two sections. And my first base is going to be in the mid crown, but it's going to be all the hair from mid crown to the nape. So I'm creating a half moon section. I'm at her mid ear on both sides, and I'm going to create a half moon section so I can start creating my first base. I'm going to try to work in clean sections so you guys can get a good visual. Okay, so this is my first section from mid ear to mid ear. Half moon is what we're looking for. This is the middle of her crown, and my end goal is to bring all of this hair up in a ponytail so it's going to look like that. So that way, when I'm working in one section, I can keep it a lot clearer, cleaner, my lines can be cleaner, and I'm still going to be able to get that volume here. So this isn't going to be flat. I'm going to be able to get a nice rounded shape to go up into my bun. Does that make sense? Okay, so I'm going to bring it a little bit closer. So typically, your client's hairline around here, they have all these little bits of hair that'll fall out. So we want to secure those. We want to add shine. We want to add texture also within this area before I pin this up into a ponytail. So this is going to be my end result. I need to add some kind of structure in here for a veil. So for a veil, you want to make sure that you have some teasing. Also, if you don't add teasing or anything in this section, it's going to be really flat once I pull it up. Once you start manipulating that hair, it starts to flatten out even more. So we need to add that teaser and structure into the hair first before I just pull it up into a ponytail. So the way that I like to do this is I'm going to add my texture, powder and teasing first because powders make the hair look dry. After I add the powders, then I can start adding that shine back in the hair. Okay. So I'm going to take my Stronghold pack powder, and I have just a whole vertical section. This tease does not need to be perfect. And I'm kind of splitting it not in pie sections, but, like, I'm just splitting the hair vertically, all the way down. And I'm going to be teasing vertically, not horizontally. So I'm just getting my texture powder in there for all of my sections. Okay. So my teasing is going to look like this. This is the middle and it's split. So I'm just adding a light tease in. This is my cutting comb. So we're just adding a light tease. So I have about three sections on each side. 1, 2, 3. This is the last one by the nape. So this adds a lot of grit and volume into the hair and it'll give us that nice rounded out shape. Now I want to add some shine for the parts that are going to be visible. So I'm going to grab my tan wild grab a generous amount. This part isn't going to be showing, so I don't really need to add any product to that. What is going to be showing is all this underneath. So we want to start taming down our client's hairline and adding that shine in so that we can have clean texture. So I'm just combing it through with my fingers and then I'm going to start working it up into the shape that it's going to be going. So just working that hair up. If I want more texture in this section, use your fingernails and comb through. It's going to add more texture and to the hair. So if I wanted it to be more smooth, I would take my comb and make it more smooth versus more texture. Kind of comb it through with your fingers. And to secure any of these little bits that are falling out, take your wet spray, spray along the hairline and comb those up in the hair. It's okay if your volume flattens out because we can always pull it back out. Let's start working it up to the mid crown. Don't start pulling out your volume yet. Remember, always do tension first. So this might all look really tight to you, but we're going to pull out that texture later and create our rounded shape later. And you're going to grab your elastics and create your first base. I tie it around like three, four times, and that's what your first piece should look like. Something like that. So it's sitting in the mid crown. Now, again, this looks pretty flat. So I'm just going to pin this hair up. And with my index finger and my thumb, I'm just going to start pinching and pulling that volume out to get a more rounded shape because it looks more rounded here than it is here. So I'm going To start pinching and pulling right at the elastic line. And I'm going to clean up any of the hairline that is falling out. So clean any of that up. And then I'm going to just start pinching and pulling right here and rounding out my shape. See, when I do it this way, it just feels a lot more blended to me. I can get all this blended versus the other way. You can add in more texture if you'd like with your fork comb. So with your fork comb, hold it, and then you can pinch and pull pieces out. Just like how we add texture in our low buns. That's what we can do here. Just add a little bit of texture. This doesn't need to be perfect. Now I'm going to go back in and touch it up and do more later once my whole bun is done. But what I'm looking for is, like, a rounded shape. Like, that's looking more rounded. So that's what you want to see within your bun. This is probably going to sit up even a little bit higher once we connect the two sections together. But right now, this is kind of what it should look like. So I'm liking that shape. Perfecto. So now this is just going to hang back, and that section is going to chill. Now I'm going to work on this section, on shaping it and adding in, like, my texture powder tease, adding the shine in. So what my sections look like when I'm adding the texture powder and teas for these sections is going to be. I'm going to pull it out, and then I'll clip it away to show you guys. It's going to be three sections that we're splitting this crown area up into. So there are three sections. So we have one here, which is the side that's going to come up this way. This is the middle back. So I'm going to be working here and then this side going that way. So the direction that I'm going to be teasing is the direction that my hair is going to land at the end. So this hair is going to go that way. So my teasing is going to be vertical or a diagonal front section. So it's going to be about, like, 1, 2, 3 sections going this way. This one is going to be about 1, 2, 3, 4, going back to the middle. And then the section is going to be 1, 2, 3. Oh, there we go. 1, 2, 3, going back towards the middle. So that's what my section is going to look like. I like to start in the middle as my guideline. So I'm going to start in the middle. Depending on how much volume you want is gonna determine how much teasing you do. So texture powder right at the root. That's my guideline. I don't want a crazy amount of volume. So I'm only going to be going up the head about half an inch, like right there. If you want more volume, if you want the hair to sit more, like, higher on the head, like how we do with the Hollywood wave, that's when you take your tees up higher. Tease. Okay, so that was four sections in the center, and then we can just lay it on top like that. And then these sections. Now I'm going to start working on this side. I'm doing more. This is a vertical tease. So tease behind your section, and then place the hair over top. So now it's going to go in that direction. And then my last sections for the sides, I don't really want to add a lot of volume, otherwise your shape will come out too round. So it's really just a light tease, like one, two times that I go to down. I'm not really creating a crazy cushion, especially by the ear. It's more so for when I create a texture. It's going to add more depth and structure for my style, not necessarily volume. Perfect. Okay. So in those same sections, I'm going to add my tame wild to add more hydration to the hair. Remember, if the hair is looking dry, especially after we apply all of our powders, you want to go back in and add that hydration to the hair so that way it starts looking nice and shiny, especially around the hairline. So in each section, I'm just going to go through and add some tame wild, picking up that whole section, starting right at the root and just working the product all the way through, like the lengths of the hair. Last section here, make sure you get it a lot by the hairline. Okay, now I'm going to start shaping my sections in place. I'm going to secure this whole top section before I start creating my bun. So first thing you want to do is make sure all along the root area that's going to be showing that none of your teas is showing. So I'm going to go in with my fork comb, and just make sure that my sections are super clean. Still leaving this area out, and we're going to do deal with it later. So just cleaning up my section and then still working in those three sections in the back area. So what I don't want to do is leave this Flat and then just connect the section. I want to make sure that I add a slight twist and pinch and pull any texture out that I want right now. So I'm just going to lightly twist and place it on the side. So that's kind of what it looks like right now. Like that for the center. Then I'm going to bring in the sides. So for the sides, what you want to do at this point, if you're leaving out any pieces around her hairline, you want to pull those out now? Yes. I use a shine spray at the end to really polish it off. So if you want to leave any pieces out by, like, her ear or at her high recession, you want to pull those out now. So I'm just going to pull some out. I can always save them for later if I want. So I'm grabbing that whole section. What I used to do that was a mistake is the direction of the hair. So pulling it straight back. See those lines going horizontally? You always want it to be a swooped line down by the ear. So swoop that line out. Pinching and pulling just like that. So swoop that whole section to make sure that it's swooping down by the ear. You don't want it to go straight back. Hit it with some wet spray. Clean up any frizz you can detail out any texture that you want. Connect your sections using your fork comb. Detail it out. When I'm working with dark hair, I like to add more texture, so that way it shows up more on camera. So what I'm doing is I'm pinching this section out and with my 4 comb going underneath of it to create depth in between, I like to create about like 1, 2, 3 rows of depth. So that way it'll start showing up more 3D on camera. This is where having that good teasing base comes into play because it's going to hold my texture up. Once I start feeling good about that, I'm going to take my bobby pins and place it in the depths so this stands out a little bit more, my ridge. So placing your finger right along the depth to kind of press it down. And then place your pins still. Leaving this hair untouched. I just place my section right over top, and I'm going to work on my side section. Same thing with here. So I'm not going straight back like this. I'm gonna add a light twist like that. So that's going to create really nice swoop by the ear. Taking some wet spray, pulling out your face frame. So remember, we want the least amount of hair by the ear here. I'm not going to go straight. I'm just going to pull out, going in like a C curve. Just like a nice C curve. The least amount of hair should be out by her sideburn. So it's literally just like the smallest amount of hair. And then the second most should be by her high recession. So I'm just going to pull out a little bit now because I want it for later. And then this section is going to look pretty flat until we pinch and pull using these two fingers and pull your section down to get that sweeping motion. What you don't want to do is secure everything too soon. We need to add our shape in. Don't worry about securing it now. We're going to secure it later. We need to add our texture tension, pull it down. Pinching and pulling this out, Taking my fork, comb right behind it to create more depth it. And then once I feel good with the depth that I created, taking my bobby pins and just placing it right along the scalp. So I'll get a little closer. So right here, pressing, placing it right along the scalp so it just pops out a little bit more. So about like 1, 2, 3, get a little bit more depth. So this is what your section should look like in the back. So it's just kind of sitting on top of that first base that we did. Now I'm going to take down my top area and pull that over top. So these top sections, I'm pulling them out and I'm going to tease them like that. So again, depending on how much volume you want is how far up you're going to take your teas. I'm going to take it up to about here, here. Because we are going to be manipulating this hair to add a lot of texture in it when we're coming back. Meaning I'm going to be playing with this hair a lot. So I want to add a good tease in just in case any of it comes out when you're shaving the hair. So I'm going slide off the head, Slide off the head like three times like that. So where I see people go wrong, a mistake with this section of the hair, when you're doing an all back style, is keeping it all in this shape instead of fluffing it out to round it out with the shape of your client's head. So you don't want to keep this section all back. Take these two fingers on either side of the front and air it out so it creates like a half moon shape. So we're looking crazy right now. Wow. It was my first glance. I was just texting. Curling. Like, how do I look? So what you don't want to do. So this is rounded out with her head. It looks crazy right now, but it's going to be flatter. So this is what it looks like when you keep that hair all back. That looks like. Like a little Q tip head. That's not cute. So you want to take these two fingers, pinch and pull and go round, like with the round of the head like that. And then also what I don't love either. What I don't like to do is to leave this all like, they call it looking like a helmet head when it's all too flat here. So what you want to do is always take a product. So I'm going to take my tame wild and I'm going to get slightly closer in your face. Dev. Sorry. So like that. So I got the tame wild on my fingers and I'm just taking my fingers and combing through the hair. Break up that line so that it's not all flat. So I like to break it up. That's why I like to add a good tease in here and just rake it through with your fingers so it looks more natural, more effortless. And then I add a light twist going back like that. And then you want to do that. And what I'm doing is pinching and pulling right at the root and pushing it forward. When you push it forward, it's going to make it look not so stiff. So where'd she go? Take my fort comb. And then I'm going to start adding in texture. So I want it to look PC. I want it to look natural. I want it to look like she took her hands and just brushed it through the hair. Her hair is dark, so I don't know if it's showing up for you guys, but it's looking really pretty for me. You can see it from the side. I'll show you guys on the side. You see that texture and like the depth? Yeah. I'm gonna take some wet spray. Also, while I'm doing this front, I want to talk about face shapes because I just looked at those forehead and I was like, in my head, I'm like, she has the perfect. That is so weird that you just said that. She goes, you have a nice forehead for a bun. She literally does. She has the perfect forehead for this bun. Like, first of all, I slip like that. Let's do forehead comparison. Deb has like a forehead. She has a short. We do not. She has a short, cute little narrow forehead versus mine is tall. I have a very tall forehead. So when I wear my hair all back my face, it accentuates the forehead. If your client sits in your chair and wants something like this, I would say no because it's going to accentuate their far their big forehead. And if they're showing you something like Bella Hadid, my friend Fi, she just posted something. If you black out that like Bella Hadid's face or Hailey Bieber's face, all you see is the style and that might not look great with your face shape. With the client's face shape versus when you have a shorter forehead and it's a little bit more natural narrow that like her hairline comes forward. It shades the face really beautifully and it's not gonna, you're not just gonna see forehead. So if your client sits in your chair and is like hey I want this style. You have to be like hey, let's talk about the forehead. You don't need to come out and be like you have a five finger forehead. But we need to have a conversation. So I'm gonna hit it with some hotspray. Ideally you want somebody who has a shorter forehead or a hairline that comes down a little bit further so that way you can start. The ideal face shape is oval so you want the oval face shape. That's why I do love creating a little bit of a face frame with this style. So like this one all pushed back and kind of shading the high recession where the hairline recedes, it's going to shade and shade shape the face really beautifully. So that's just a little bit on face shapes right now. That's really my biggest pet peeve about my hairline is like the two corners and all the baby hairs all the way up. I corners to grow in better. I consider getting my hairline lasered but everyone's talked me out of it. Lasered? What is that? To get like rid of these little baby hairs but everyone says don't do it. Oh yeah, I've been feel like when it looks too, too perfect. Yeah, yeah. Then it looks face tuned. You could just face tune the hairline. Well that's why, that's why I don't bother. Cuz it's like whatever. I can just like slip it back or hide it. Yeah. I just think I have like multiple cowlicks on my head and like baby hairs go one way and idle hair goes the other way. She does have a lot of little baby hairs so that's why I keep hitting it with wet spray. That's what we're talking about. So this huge insecurity I picked her to talk about. Okay, perfect. So I want to show you guys what this looks like in the back. So what I did was I added a light twist here. You don't want it to come straight back, because when you add the twist here, you see the movement in the hair versus when it's all back, you don't see the movement. So, see, I added that light twist here. So what I'm going to do is take an open U pin and just place it right there just to hold it for later. And I'm going to pinch and pull out more of that texture. And I'm going to do the same thing that I was doing on the sides with my 4 comb just to add more depth and the hair. And then once I feel good about it, taking some bobby pins and placing it in the depths of the hair. So, okay, so I feel good about this section. So I'm going to place it down. If at any time you're doing this and you're sitting in front of a mirror and your client is like, like you're unsure how they feel about volume or like, you can see it on their face, at this point, before I start pinning, I'll say to my client, how do you feel about this volume? Before I secure it, how do you feel? Because I don't want to get to the end of their hairstyle and then say, this is too much volume. Because if they feel like it's too much volume at the end, we can't fix that. So even if you're midway through, if you're with a client on location, pull out your hand mirror and say, how do we feel about this volume? If they're like, it's good, then proceed. If not, take it down a little bit, because you won't be able to fix it later on. And I'm just securing the base a little bit with some pins. I love adding depth in the hair just using pins, pressing it in. Also before I move on, at this point, I want to make sure that I'm really round it starting at the base, and I want to do some side checks or always check your work before you move forward. So I want to make sure that I feel good about the hair that I left out. I feel really good about that hair, and I want to make sure that my texture, my height, my volume is all sitting at the same points. So I'm going to go on the Side always have my fork, comb, and going in the directions that I need it to go to the front, press it down. If it's sitting up too high. So you check the front, I feel like that's sitting pretty good. This light is throwing me off. But, yeah, this one's. This one's sitting a little higher. So I'm gonna press it down. That feels better. So I'm just taking my four comb and just, like, stretching it into place. You can do this later. But I just like to check as I check my work as I go. Get in that habit, because then you can fix mistakes before they become unfixable. You kind of want it to sit higher and then get lower to round out, like, this little guy. What's happening there? If you took it down too low, you can always pull back out with your little fingers. Or if you have big fingers, big. I feel like a crab claw when I'm doing that. Okay. I feel good about that. So now I can start my bun. If you guys haven't noticed, I usually like to secure my whole crown area, and then I do my buns. Okay, so for your bun, how I like to secure this style of a bun is instead of using an elastic, what I like to connect this section with is actually my padding. So this is a donut padding. So I'm going to cut it open and create my padding. There's two types of way you can make your padding. If you want your bun to be big, if you want it to be smaller. I typically don't like big buns, and I cannot lie, but I like smaller ones. So if you wanted a bigger bun, what I would do is take this whole thing, pull up my whole section, and wrap it around the hair like this so it would look like that. But what I want to do to create a shorter, cuter bun is I'm going to cut this about, like, 1, 2, 3. It's about in half. And I'm going to roll it up so it's nice like this. And then I'm going to use this as, like, my elastic ponytail holder. So gather your whole section like that and wrap it around two times. Ah, maybe one. Just the ones. Just the ones is good. So it's gonna look like that. Now I'm gonna secure the base with bobby pins. So I'm going to do, like, 1, 2, 3, 4, and just go all the way around. So taking my bobby pins, keeping it closed, picking up a piece of the padding, and touching the scalp. So picking up a Piece of the padding, touching the scalp and working my way around. In total, it's probably about eight bobby pins to hold this down. You want to make sure that this is super secure because it's the base of your entire bun. So that's why you always want to make sure you're touching the scalp when you're placing these pins in. Okay. I feel like that's good. You want to move it a little bit, and if it's moving too much on you, that's. That's not good. We want to re Secure it. Okay, so now we have all our lengths to work with. Guys, I'm really, really impressed with how quick I'm doing this. Pretty impressive. Okay, so this is what it should look like. So with your lengths, you could do a couple different things if you don't want to have a lot of texture in your bun. I honestly do these the same way that I do my low buns. If you don't want to have a lot of texture, take it all in one. So take it all in one, add a light twist, wrap it all the way around, and that's going to be a beautiful, cute bun. Like, I'm going to come a little bit closer and talk these out. So this isn't going to be a lot of texture. This is going to be more of a cleaner bun. If I want to add more texture, I'm going to add more sections. More sections, equal more texture in your bun. So I can split this into two, twist this up. Remember, the heaviest parts of your bun always stay low. So twist that low, and then wrap it around so you can do that as one. And then this section going to go in the same direction, but it's going to lay on top, not around. It's going to lay on top of your donut like that. So it'll lay like that. So that's another one. And that's probably the one that I'm going to do today. If you did a lot of curly texture here, you want to match your curly texture with your curly texture in your bun. So the way that I love to do that is splitting my ponytail in two and then splitting this into. And then rope braiding my sections and then pulling this up, that's going to add a lot of really nice texture. And then doing the same with this rope, braiding it and pinning it up. That's going to add more texture. So again, more texture, more sections. The one that I love to do is splitting this in two and then wrapping it around. The mistake that I See, a lot of people do with the high bun that I used to do as well. That's why I know is. Okay, so we have this one section, right? Is pulling it up so high because you want to cover the padding. So you instead of keeping this low and going around the padding like that, you pull this first section up high so it looks like this, and it sits too high on the bun. So then it looks like that, and it sits too high on the bun. And then you want to cover all of this padding that you still have showing. So what you wind up doing is taking this section, keeping it low around here and going around the bun like that. So you're creating width when you're going around the bun like that. When you instead, you want to create volume and projection coming from the bun. So that's not what you want to do because this is going to fall. It's too heavy. So instead, what you want to do with your sections that I want you to focus on my hands when I'm doing this bun, keeping this section low so it covers under here. So keeping this low, placing it on top and around the bun. So the parts of your padding that should be showing is on the top, not on this side. Right. So that's going to cover my bun. Remember, this isn't visible from the front. This is a bun that comes out this way. This isn't one that goes up that way. And then your second section, instead of placing it around that's not what we want to do. Is going to make it too wide. Take this section, and it's going to go directly over top. So it's gonna build a better bun shape. So it's gonna go over top like that, not around. So it creates more of a shape coming out. So that's what I'm gonna be doing today. Okay. I just thought of a really good TikTok. We'll do a rat around videotape while you do it. Wrap around, wrap around, soft texture, powder, light tease with my fork comb. Team Wild. Work it through my whole section. Now I'm gonna crack up. Now we're gonna do a wrap. All right, so you want to twist this section. When I'm twisting it, I'm not twisting it up in the direction that I do with a low bun. I'm twisting it down. Just twist. Light twisting it down. Not too much tension. And then we're gonna wrap around like that. So just a nice wraparound, keeping this base that's super tight to the nape. Then I'm Gonna do my open pins to place that so then I can fix it later, keeping it nice and tight. And then this section, I want to see where it places first before I start securing and adding any texture there. Just working more tame wild through these lengths. If I wanted to leave any pieces coming out from my bun, I would probably do it in this section. You do a twist, and then you pinch and pull small pieces out, and then stretch the hair and pinch and pull small pieces out. So then when you pull this up, the hair comes out really beautifully from the. The insides of the bun like that, if we wanted to do that. Okay, so I'm going to lightly twist, stretch the hair, twist, stretch the hair, twisting it down. Then I'm going to hold this down and pull it up, and it's sitting right on top of the bun like that, like a cute little circle. Open new pins like that. And then we're going to fix all those pieces into place. You don't want to worry about covering your. Any exposed padding too quick or pinning too quick. So again, the heaviest part of the bun is here. So what I like to do first is use that heavy part and push it down. Push it down to cover that padding that's still showing right here. I'm going to push that down. And then now what I want to do do is before I secure, I want to pull out any texture to match what I have going on in the crown area. I have a pretty clean texture going on, so I'm not going to be pulling out too much, but I just want to get you guys close. I'm going to take my silhouette spray, and I'm going to shape with my fork comb and press it into place. So I'm just pressing the hair into place. I feel good about what's going on there. So I'm going to take my pins and press the hair. Press my pins into the hair. I never go on top of the hair. I'm always pushing my pins inside of the hair. I can remove that pin. I like to do a lot of pins around the perimeter, so that way I know it's pretty secure. I also love using padding for this one because my pins can go inside the padding, and it doesn't hurt your client's scalp as much. I'm just securing pins around the top. Why I like to do it around the perimeter is because I don't want any gaps here. I don't want any gaps showing. So pinching and pulling. And I'm securing this first layer first and Then I'll do this one. This one's coming out a little bit too much, so I'm going to press it down. Leave your lengths. Don't secure them too soon. I see a little bit of my padding showing here, so I'm gonna push my top section down to cover it. I'm just adding a clip on these lengths because they're just in my way. So I'm going to press this down a little bit and add my pins in. If it's coming out too much, remember this is where I would want my highest point points. I don't want it. Crazy odd. At this point, you want to come to the side and make sure that it's in line with your client's cheekbone. I feel like it's in line with her cheekbone. I feel like it could stand up a little bit higher. So let's push it up a little bit. Push it up a little bit. Don't be afraid to pick up your bun. And then right here is sitting up a little bit too high. So let's push that down and then build our round circle shape. Let's secure these lengths. I take the lengths together, and then I'm going to take an elastic, and I'll show you guys how I pin those up. So grab an elastic. Grab an elastic, and you're going to elastic towards the ends. Not too high up, because what we're going to do is tuck these up into each other. So I'm going to loop it like that, and then I'm tucking it. I'm looping it and tucking it up like that. And then adding bobby pins it. I'm just checking my shape, making sure that I'm sitting proportionally, that all the gaps around the edges and perimeter of my bun are closed. Making sure that my height is sitting proportionally, that this isn't coming out too much so we can tuck it down. Making sure that I like my texture that I have going on. And then the last thing I do is add shine and curl up my front piece pieces. Wow. I am really proud of myself on how quick I did this. I'm gonna be honest. I like bun, though. Have you put your bun? I do like a lot of high ponies. Yeah, you do do high ponies. I feel like I like my hair up, but I'm really into the hard one at the moment. Wait, when is the next wedding you have? Because I want to do your hair well. Like the second style. I'm gonna go. I just like ice. It's. Oh, I'm going to be on my bachelor party. Oh, where you going? They won't tell me anything. Loki scared? Yeah. I'll find. No. Sorry I didn't tell you guys. I'm taking my volume up. Remember, we have to activate it. So I'm shaking it, spraying it really close to the hair. This is going to add that glossy glass effect to the hair coming right behind it. And using my fork comb to tuck in anything in place and bring out that shine. If your client has kinkier hair around their hairline, what I like to do use is a smooth control edge cream. So you take a little bit of the edge cream on a little comb. I got this on Amazon. Take a little bit and then you brush it up. Hers I feel is pretty secure. But sometimes around the hairline, the hairline comes out too long. That'll really secure it. Or around the front of their hairline. That's just a little trick that I like to use. If their hairline is too exposed, like their high recession, I feel like I might do it here. You can see through it. You can see her scalp through there. So I want to make it fuller. So what I'm going to do is take some root boost. What is this? This is. I don't want that color. I love this stuff. I use it all the time. Do you just. Oh, my hairline. Literally. Okay, so what is it? It's cover up. It's for like gray coverage. I use this on moms or I use it right there. I. Have you ever tested it at the gym? I have. It doesn't even sweat. It won't run. No, but I do notice, like, I don't wash my hair every day. So if I do it on a weekend, like five days later, it's still there. Yeah. And it doesn't get on my pillowcase or anything. Like, it doesn't. It doesn't run. I've never had an issue. Okay, so if you guys can sit on your face, you cover your face a little bit. Normally I'll cover, but looks like the freckle, like it's gonna get on your hand though. I don't care. Okay, so I'm gonna come really close so you guys can see the difference. So you could see her hairline there. I'm gonna take this and I'm just gonna spray. I need to come in a different angle. See that? Gone. Okay, we're gonna do the other side. Insecurities. I literally do this all the time. Okay. So hairline gone. Hairline full. Okay. You can take your hand Sometimes it disposes a little bit too much. Thank you. You're welcome. Also, I love to keep some Clorox wipes. I said that totally wrong. Clorox lights, that's like the Jersey brand in case it gets on it, because it'll get on your hands like this malfunction. I also keep little makeup brushes. It's. It's like a very dense one. I don't even know what kind this is. It's for your brows. It's like a brow brush just in case it deposits too dark or, like, too circular. I'm just going to press it into the skin just to blend it out. I don't want it to look like a harsh line. I don't want it to look like anything's there. So I'm just pressing it into the skin and blending it out. And look how much fuller that is. Gorgeous. All right. I'm just going to curl up her hairline, her face frames. I have been obsessed with the one and a quarter iron for face frames. It's just so much softer. It's been my vibe. When I'm doing the face frame, I'm on the side, and I'm just kind of checking all of my proportions, and I feel like we are. We are good. Wow. Wow. Okay, then for these fun bits, I'm gonna take. Remember our spray? This is our finisher. So I'm going to take this for the front pieces. Always pushing it forward. Same thing for the other side. Same thing. Pushing it forward. Just going to darken up your hairline. This one spot. Do you ever have clients who are, like, who just have, like, a fresh spray tan and it's dark, and then their scalp just looks so white? That's what it looks like. So you got to help your girls out, you know? Now, this is a brow powder. These are just brow powders. And I'm just pressing it into the skin just like this or you know what it is? It's my powder, my texture powder. Oh. When I do lip touches, when people come back to me and use the white texture powder, I'm always, like, taking my bronzer to the hairline. I know. Yeah. My texture powder got, like, on your. It's nail. No problem. Oh, my God. I love this on you. This looks so pretty. Okay, guys, I'm gonna show you the full look. All right? I'm gonna have you do a spin with your feet. Do a wrap around, do a wraparound. It's so pretty. So cute. Dark hair, too. I love it. Obsessed. Yes. Gorgeous. Do we love your profile skin, like the side. Like, it's so pretty. We love. Yeah. All right, this is our Bridal Bun demo. So we're going to take some pictures, and we'll be back with the Twisted Bun. Okay, I'll see you guys in a bit.
More from Marissa



7 Lessons I Wish I Knew In My First Wedding Season (I’ve Now Grossed $728,000)