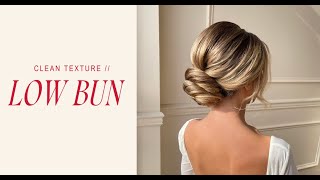
Marissa Brennan shows how to build a clean low bun on thick, long hair. She covers prep work like crimping and teasing, how to place and pad the bun, which pins work best, and face-framing details. The key is keeping pins close to the scalp and only teasing the sections people will actually see.
Hi, we're live. This is my friend Autumn. She's gonna be our hair model today. So I am doing that clean low bun. I'm just gonna show you guys the one that we're doing today, which is something like this. So I'm gonna be doing that on Autumn's hair. And as you guys can see, I found somebody who has thick long hair, so I can show you guys how to do that clean low bun, because it is possible. So we're gonna get started. I'm gonna turn you around like this. So she has some thick long hair. And I'm so excited to show you guys my low bun method on thick long hair. So first thing you're going to want to do is comb your client's hair out, and I'm going to start treating her lengths and start adding that hydration and shine into her hair. So while I'm combing her hair, I'm feeling it to feel the density, to feel her texture. And this is where you're going to do your consultation. So we're just combing. You're also going to want to discuss with your client what the part line is that they want. You have like a middle part, right? Yeah, yeah, kind of like a middle. She has a middle. So I'm going to keep it in the middle because I think that's going to be really flattering on her face shape. Next is I'm gonna pull out everything that I want in my move that a little bit further on my hair belt. So everything that I'm going to be using today, my products. So I have my team wild and I have my combs in here. So my combs, I have my rat tail, my carbon cutting comb, the YS park, and my fork comb. I have those in there as well as my texture powder, my non aerosol spray, and then I have a shine spray. And then I also have my clips on here as well. And I have this loaded with bobby pins. I have the 2 inch bobby pins in here. So I have that loaded, ready to go. Now I'm going to start hydrating her hair. I'm going to take a good size amount of the tame wild and just start putting it on our length so that it can start hydrating the hair. Yeah. And then when I let this sit on her hair, I'm gonna start heating up my prep tools with that low bun. I'm going to be doing a crimp prep. So this is my Sam doula. So I'm just going to turn that on and start cleaning it. Up. It has an option. My hands are so slippery. It has an option for the color treated, So I put it on that for the heat setting, and I'm going to comb that into the hair. So the first thing you're going to want to do to prep is you're going to want to section the front from the back. So if we remember from the blowgun principles, sectioning the front from the back, we're going to do zigzag lines. So that way it creates a nice seamless blend. So I'm going to turn it on the side. Let me just make sure you guys can see. Okay, so when you're sectioning, as you guys can see, people's heart naturally comes back pretty far. You want to come about 2 inches up. So when you're looking at the side of the face to find your sectioning, so you don't want to part here at, like, the back of the ear. So when you're doing, like, cutting, cutting, sectioning, you're going to be parting here. That's what we're taught in school. We want to come a little bit more forward, so that way we can start getting some nice height. If I stay here in the back, when I'm doing my height, it's going to be super flat here and then just like an egg shape here. So you want to go a little bit more forward. So you could take it from the. The beginning of the ear instead of the back. So right here, go up, and that's where I'm going to start my zigzag line to separate the front from the back. So this is what it should look like with your zigzag. So you're not going to have much hair in the front, and that's okay. Okay, so I'm going to clip this hair out of the way with an alligator clip. I'm going to do the same thing on the other side, just matching on the other side, seeing where that was, doing small, little zigzags. Okay. So I'm gonna start smoothing out the front first with my crimper. So if I pull her hair back, you guys, I want you to see her hairline. So if you guys can see her hairline, there's like, some natural wave pattern here. When you see that, you want to make sure that you smooth that out first. If you don't smooth out the hairline, it's not going to give it that professional touch. So that's always my first line of action. So is smoothing out the hairline and getting that super Smooth, but also adding volume with my crimper. So with your crimper, you want to take really small sectioning. Let me just bring it closer. So imagine you're doing like a highlight. So when you're doing a highlight, you take very thin slices and it's see through like that. So you can kind of still see through. So that way you don't see the crimp line. What's not on? My crimper's gone. I was. There was no crimp. First you want to make sure your crimpers on. Oh, that's okay. That's all right. We're going to wait a minute. So with the crimping, you want to make sure that you're doing very thin sections. I'll go over the mistakes first. So if your section isn't see through, if it's too thick like this, when you take the crimper to the hair, if you're holding it super tight, that's when you're going to see the crimps. You want it to be invisible. So you want to take small sections. Very baby fine, like see through, like a highlight. Then with your crimper, what you're going to see is I'm not actually opening it. I'm keeping it very closed like this, and I'm like lightly tapping it through. So if you're seeing crimp lines in your hairstyles, it's likely because you're opening it too much. When you're crimping, you want to keep that tension and keep it like lightly like that. So I'm going to go into the hairline now that it's on and you're over directing and then you're coming back. So if you guys could probably can't see the crimson, that's good. And I'm just going to take a lot of small crimp sections all the way to her high recession. So her high recession is right here. So I'm going to stop there. And then this way I'm going to go vertical. Sections here is horizontal. What this is going to do is add volume as well as smooth out any of her natural wave. Because I want my crown area to be super smooth. A lot of times my clients will say to me, like, oh, my God, I can't believe you're smoothing out the hairline. I never do that, or my last stylist never did that. I love that it's so smooth because they don't get as close to their root as we do. So it's a nice Professional touch to add. I don't need volume here, so that's why I'm doing vertical here at the high recession. So this is gonna give me some nice volume and then I want to clip this out of the way because I'm going to do the other side. So I'm just taking a little baby clip and clipping that out of the way and I'm going to do the other side. I always like to start with the hairline first. It just kind of gets it out of the way. Another reason, if you're finding that your crimps are really visible on the hair, it might be your crimper itself. I find the San Villa has really small crimp like wave patterns. If your crimper is too big or it doesn't close all the way like at the top, like if it doesn't close flat, it's going to add more pattern to your hair and it's going to be uneven. I find that like the TGI bed head one, that one isn't really a good crimper cuz it doesn't lay flat and it's too harsh of a wave pattern. We want it to be invisible. So again I'm taking it horizontal sections all the way to the high recession and then I can take fine vertical ones by the ear. You always want to do this. I do this for all my styles, up, down, whichever. I smooth out the hairline with my crimper, especially by the ear because that's where we tuck our hair behind the ear so we get that pattern. Bye Colleen. You're the best. Thank you. I'll see you soon, I'm sure. See you soon. Carly did makeup today. She's incredible. Look how beautiful. Stunning. Taking it vertically again because I don't need volume there. I just want to smooth out that wave pattern from like the tucks we get from doing it behind the ear. So now it's going to be nice and clean and I'm taking a little baby clip and now I'm going to start crimping on the back. I'm going to keep her on the side so that way you guys can see the elevation that I do when I'm crimping. So I'm going to section it out. I don't typically section it out, but I want you guys to get that vid visual. I'm sectioning out her Mohawk section. So I want to show you where I'm going to crimp before I crimp and how far down I'm going to take the crimp. So I want to smooth out this whole section, but I'm not going to crimp every piece of it. So this is the section I'm going to be crimping right here, and then I'm going to crimp here. This is that top layer that when I'm styling, her crown area is possibly going to be showing in the bun, So I need that all to be smooth. So this whole layer, so it's from, like, the top crown to the bottom crown, is where I'm going to be crimping. When I'm adding texture in the hair, anything in this section is going to be visible in my bun. So I want it to be smooth, and I want to add that volume. I'm going to be sectioning. I'm going to be going horizontal in this section from the top all the way to, like, the middle base of the crown. And then these side ones are going to be my other sections, and I'm going to go diagonal back. So that's why I separated them. So that way you can start getting that visual. Okay, so I'm gonna start in the middle, and I'm just gonna do that. So I'm gonna start in the middle with her hair. And again, we're taking super fine sections. See, through this is how it looks when I'm holding the hair, I'm holding it like this. I'm not holding it 90 degrees. I'm holding it over direct it. I'm over directing it and crimping. See that direction? I'm coming back in like a C curve. So that way it starts adding that volume. See that volume right at the root? If you find you're not getting enough volume at the root, it's likely due to the elevation that you're holding your crimper. And once you get the hang of this, you can go super fast. When I'm crimping, I'm not taking all the way to the lengths of the hair. I'm taking it to where I'm going to pin it, which is here. So all this, I don't need to crimp. It would take me too long to crimp the whole head, and it's not necessary. My sectioning for my crimp doesn't exceed the length of my crimper. Do we see that? You don't want it to go outside of your crimping iron. That means your section's too big. If my client wants a more natural volume, this is something with crimping. You can get super Natural volume. It's not going to be like that Jersey Shore volume, where it's like super big. And then when I'm crimping, when I get here, when I want to open it, I just open my iron and let the hair go. If you see you're getting any kinks on your crimping section, like when you get here, typically if you press it really hard, you're gonna see the crimps like that. It's gonna add, like a kink in the hair. So if that happens, you could just completely close it and smooth the hair out. It'll act as a flat iron, which is really nice. Other ways that I like to use crimping is like, I forget if I did it in a glam wave class, but even if somebody's getting a down style, I will crimp the crown area of their head just to get that volume. So we're just smoothing it out. I don't really need to worry about volume right here because we're going on the down curve of the crown. So I'm not really worrying about over directing, just more smoothing at this point. And that'll be my last section. Okay. I'm just going to clip this out of the way. I typically wouldn't, but I want to keep my sections clean. Clean so you guys have a better visual. And if you're just starting out with crimping, this is an easier way to give you a better guide. So just clip that out of the way. So now I'm going to start on my sides, and it's going to be a diagonal back. I'm not going to go horizontal because I want to keep that elevation in for the volume. So diagonal back sections. This is going to bring it down into around the ear. And again, by the ear is where we have a little bit of, like, kinks in the hair or their natural wave pattern. Is your hair naturally wavy? Yeah, a little. Is this your natural hair color at the week? Thank you. I know I'm going more and more natural. Yeah. Like slowly. Yeah, I like that. Thank you. It's healthier. It's healthier. And it's also. I don't know, is it Hal Bieber who's doing it, but she's making everybody go, like, browner. I know it's crazy, but I like it. Okay, so we're right. I'm right by the ear. That diagonal back section. This will probably be my last section. Again, this is more so for smoothing right here, because in this area, remember, we're going to keep it pretty tapered, so I don't need volume there. So I'm just going to bring that section back out like that. I'm going to do this last section right here. I'm doing the same thing on the other side, crimping all the way. So remember, you're just lightly opening and closing. I'm not super opening my iron. Otherwise my crimps will be visible over directing the hair. When you're able to focus on the different layers of a style, knowing what's going to be visible in the style, you're able to work smarter, not harder. So I don't need to crimp the whole head. I only need to crimp what's visible. If I was curling her hair, I only need to curl what's going to be visible in the style. So with these sections, I'm going to keep them, again, super clean for you guys, because within the same sectioning pattern, I tease the hair. So in these same sections, diagonal back on both sides, and then horizontal back here. That's how I'm going to start teasing the hair and really adding in that foundation so that my pins have something to hold on to. So right here is where it's going to be important for you to know where you're going to be putting your bun. So what's the height of your bun going to be? For me, I want it to be about, like, mid ear, like by her cheekbone. That's where I want it to be. So knowing that visual is going to be really helpful. So a mistake that I used to do is when I didn't visualize that first, my teasing would stop around here, like around the mid crown. If I stop my teasing there, I'm going to pin it up super high because again, your pins need something to grip onto. So if my teasing stops there and I pin super high, then my bun would be sitting up super high. So if I want my bun to sit lower, I'm going to take my tees all the way down to create more of that curve shape to go along with the curve of the head. So now that I know that, I'm going to know that I need to take my teasing from the top all the way down to the slope of the crown. Okay. So for teasing, I'm going to take my ys part comb, going to take the small teeth of it, and my sectioning is going to be about half an inch. It's bigger than when I did the crimping. And your section, you don't want it to overwhelm your comb. So I don't want it to go outside of this area. You're going to take your texture powder, anything that has a pocket pump on it. And I'm going to use the pump as like a guideline. So where I put my texture powder is where I'm going to be teasing. So I like to take it about an inch off the scalp. So my texture powder is here, here down. That's where I take my texture powder. That's where I'm going to tease. Now when I'm teasing, I'm not starting out here and bringing it down. I'm going to start low and keep it close to the root. You're going to hold your section over, direct it, and you're going to keep your comb behind the hair. I'm not going to push my comb forward. I'm pushing it down and touching the scalp and I'm keeping it super low and it's going to be able to stand off the head like that. When you are teasing, you don't want. I forget what I was gonna say. I'll be my next section. Can you tell? We're live, guys. Okay, so I'm gonna do this again. So I'm gonna take my texture powder, use it as my guideline and. Oh, this is what I was gonna say. You don't want to hold your hand so far out. You want to keep your, your hand kind of close and with tension. So that way you don't unintentionally bring your comb up too high on the head. So you want to keep your comb pretty low and going back. You don't want to take your comb up high and go down. That's going to create a tease here. So when you let the hair down will be teased here and not at the root. So it's going to make the give the head a funny shape and make it look like there's an egg sitting back there. And we don't want that cuz that's not cute. We want rounded, rounded, half moon shapes. The tease that you do on those first two sections is your, like, very important te's. So that one, you want it to be strong. I go up the head about two or three times versus when I start getting a little bit lower. I don't need as much volume because this is, this is like the higher point on the head where the head rounds. So we don't need as much height coming off the head at that point. So texture powder staying really close at the root area. And I'm sliding Down with my comb touching the scalp and then I'm sliding off the head. I do that twice and then I lock it into place. If your section is too thick here, you're not going to be able to get your, your teas close, close to the root. And again, it's going to be behind the hair. So you're going to have a flat root. I probably take about 8 to 10 sections down the head when I'm teasing in the Mohawk section. And then this is going to be my last one. I'm right around the occipital, right where my pins are going to be laying. So I want to give them a really good base to be able to hold my style together. So it should look something like that. At this point, you can probably see some of my T's and that is okay. But look at that volume and where it's starting. It's starting right at the root and it's curving with her head. This volume does look a little bit crazy right now, but that's okay because we're going to tame it down with our fork comb in a minute. And then I'm taking those diagonal back sections right here. So this is a diagonal back. By doing this, I'm going to be able to create that half moon shape. Keep your comb behind. I'm not pushing my comb all the way through like that. When I keep it behind with a half inch section, it's really keeping that tease in the hair versus in the front. It keeps my section clean. So see, it's pretty clean on this side. It's not. I got my tease behind it. That's because I keep my comb behind the hair when I'm teasing, not in front. So keep your tees behind. And this will probably be my last section here because remember, I don't need volume going down that way. I'm just kind of trying to create my shape here. This is going to give me that half moon shape. So I really only do about three sections here. And I'll look something like this. I'm going to do the other side. Taking about three sections here. Slide down, slide down and then lock it into place. I'm doing about three to four pumps. You don't need much. Taking your comb halfway through, sliding down until you touch the scalp. Slide down till you touch the scalp and then lock it into place. And this will be my last section here. Slide down, slide down, just like that. Okay, so now when you have your tease, the hair kind of looks a little bit separated. If you guys can see, I'M it's still separated here. So now I really need to make that. See how this is like staying here in the Mohawk. I really need to create more of that shape. So even by just like taking these two fingers, pinching and pulling it out like that, see how it's creating more of that half moon shape? That's what I'm going to be doing with my fork comb. You don't want to leave it in this shape. You want it because it just looks a little bit off. So I'm going to be taking this and really connecting those sections to create that half moon shape. Any tease that I see at this moment, I'm going to start cleaning it up. So if any tease is visible here at the hairline, I'm taking my four comb, the back of my four comb, and. And I'm not going in the hair. I'm just laying it on that top layer and kind of brushing it down so that way I can start getting my shape into place. This is also why your teasing is so important, because when you start, like playing with the hair and getting your shapes and using your combination combs, you're going to be taking a little bit of that tease out. And that's okay because this was a little bit much, so we're taking it down a little bit. But also you don't want to. If your tease is starting to really flatten out at this point when you're shaping it, you need to work on your teasing. So go back in and re tease. You don't want it to fall completely flat. You still want it to be kind of visible. Like if you're flattening out too much here, go back in, pinch and pull it back up. If it's not coming back up, then you really need to work on more teasing. Okay, so what I can see now is like a really nice shape that that's super rounded here and we got that half moon. So now I know that I'm good. If my shape was still looking disconnected, then I would go back in and reconnect it with my for comb. So now what I want to start doing is adding that 3D texture in. So I want to hydrate the hair even more. So I'm going to take more tame wild, taking about like a dime size like that and just placing it on the hair. Don't be afraid to use this product again. It's super hydrating and it's not heavy on the hair, so it's not going to make her hair look greasy or oily. Now if I was taking, like, a Moroccan oil to her hair. It would be a different story. I'm taking more for, like, the mid shaft to the lengths and just really starting to add more shine into her hair. And I want to comb that product in. So I'm not combing it in like that to disturb my teeth. I'm just staying on the top layer. If there was any frizz present at this moment, I would take even more. But I don't see much at this moment, so I don't need to. To create the 3D texture, there's a few different ways you can do this. Again, when you're creating a 3D texture, it's basically you want to be able to show the highs and the, like, the depth of the hair. She has a really great color, so it's. It's great. When your client has good color, it's going to show the 3D texture more. So she already has depth in her color like that. It's going to be very easy for me to show this 3D texture. So I'm going to show you guys one of my favorite techniques. I'm taking the Thrill Fibergum. I put it on the back of my hand, so I'm taking a little bit. I'm going to put it on both fingers so that way I can get these fibers to open up onto the hair. I want to add some control for these 3D sections to stand up, but I also want to add some really nice shine to her hair, so that way when the sunlight hits it, it just is super shiny. I'm opening up the fibers, which is going to give me that control, and I'm just taking my fingers and pushing it into the hair. You can take this on the root, which is what I'm doing. I'm taking it on the root to about here. So now I'm going to start shaping my crown area into place again. She has thicker hair, so I'm going to be splitting the section into two. But first, I want to add a little bit of 3D texture into the hair. If you're feeling like your crown area, like here on your brides, if they're saying it looks too bridal or. Or it looks not done and, like, it just looks too stiff, this is what you're going to want to do. If it's looking too stiff, take it like that. What you can do is take this top layer section. I'm creating, like, a rectangle shape on the high points of the head. So, like, right where you were doing the crimping and I'm taking like a rectangle that's about this thick on that top layer. You could take that out like that. If you disturb your teeth, that's okay. Take that out and save that for later. And then you can pull that over. Create your half up base like that. Put your crown into pins and everything. You can take this and lay this over top. But what you're going to do is air it out. So pinch and pull and really create that texture up at the top so it's not straight and smooth back. But I'm going to keep this all in one today. Okay. So I'm gonna add the 3D texture. So what you're going to want to do is take a fine tooth part of your comb on the cutting comb. And with this hand, these two fingers, I'm pinching and pulling the hair up, starting at the root area. And then with your comb, I'm brushing it down. So I'm like pulling, pulling it out, brushing it down just like that. And you're like kind of pinching and pulling it out. And I'm gonna do about six of these, like six to eight. I always start in the middle as like my guideline like that. This is going to create a really nice depth because she has a highlighted blonde color. I'm really trying to pick up those highlights. Highlighted pieces that go up a little bit higher because that's going to create a better depth by using her hair color. See how it's coming out like that? So again, I'm using these fingers pinching and pulling and then using the comb to flatten it out. Hi, my friend Caroline's here. Here. She's taking photos today. How are you? Thank you. Make yourself comfy. I have Alani News Waters snacks. Wait, wait, wait, wait. Look what I have in my bag for you. She brought me an Alani new. It's my favorite flavor. The mimosa. I love it. Oh, my gosh. This is so beautiful. I'm just hitting it with some silk silhouette spray just to kind of set it in place. So just like a light. A light spray just like that. So depending on how prominent you want your 3D texture to be, you can leave it in the shape if you don't want it to be super prominent. Like in this visual, it's not crazy amounts of 3D texture. So for this, this kind of a visual in your crown, you would actually go and brush these out. And then you can pinch and pull it back out later. But I want to give it a little bit more of A prominent. So I'm going to leave it in this shape. When I leave it in this shape, it also diffuses that harsh line at the crown area right there. That's a lot of volume right now. I love it. Hi, how are you? This is Autumn. I'm Autumn. It's nice to meet you. You're so beautiful. Thank you. I love my hair. Thank you. So like I said, when I'm pinching and pulling here, it diffuses that line here so it's not so straight and like bridally less. Well, I don't know what kind of word to use, but somebody asked me a question like that. So I want to make sure I covered it for you. Okay. So I'm going to leave it in that shape. So it already has these lines. Now remember how I said with the crown area, you're gonna wanna. The sections that you take is gonna be dependent on your client. The thickness of your client's hair. So she has very thick hair. So I'm gonna split this into two sections. If she had fine hair, this is what I would do. I'm taking it at the ear. At her ear, like mid ear right here. I'm taking my finger and I'm drawing a line. So I'm kind of splitting this in half like that. So I'm taking. I would take this whole section if she had fine hair. Take this whole section and then I would do a light twist like that. She has thicker hair again. So I'm going to split this in two. I'm literally taking it half an inch over from the middle. And I'm just going to draw a line here. I'm going to split that into two. So at the crown area again, I'm right at the mid of her ear. Right here. I'm going taking this whole section for your crown area. I see a little bit of frizz, so I want to hit it with some tame wild. Take my fork, comb and really get that into place. It's okay. If you lose your 3D pieces, we can pull them back out later. So right here you want to. You don't want to keep it straight and flat. I want to add a nice twist so that I can put my bobby pin into it. So pay attention to the elevation of where your hand is. You don't want your hand to be coming out too far from the head. You want to keep it close. So my hand is super is touching her scalp right now. I don't want to bring it down. Keep it really close. So I'm keeping it close. And I'm basically, I'm gonna toss it to my other hand. So I got it here and I'm keeping it close with my thumb on top. Then I'm adding a light twist, tossing it over to this hand. There's a very light twist here. And that is where my pin is gonna go, right in the middle. So my pin is staying closed and I'm just picking up a little piece of her hair. Always touch the scalp with your pins. I can feel it in the teas. And it's just going to stay like that. I'm just going to check my shape on the other side. I'm going to leave this one for now. I want to bring this one over top before I start adding the pieces back, adding that three shape back. So with this one again, I'm at the mid of her ear and I grab that whole section and I'm going to do a little toss. So I got. I'm going to toss it over to this hand. So I got my palm and I'm staying really close on her scalp. And I'm just rolling it over. Pass it over to that one. And I'm going underneath here. So see that light twist my bobby pin? I don't want it to go here. I want it to go in the hair. So that's what it's going to look like. Always keep your ridges onto the scalp where my thumb is keeping my pin closed, taking the opening of the pin, grabbing a little bit of it and then flipping it so the ridges touch the scalp. And my pin is going up in my there. Now this shouldn't be a pin that is like forever and going to hold everything into place. It is still a little bit loose. You can see it's a little bit loose. So that way I can pull the hair up. The lengths need to be movable, so that way I can pull this hair up and start adding in my 3D texture. So right here is a of lot, a little bit of a hole. So I'm gonna pull that hair and cover it, and then I'm gonna start creating even more depth. So I'm gonna bring you guys a little bit closer. My depth. I'm gonna start here. So I'm taking my fork comb, and I'm going to be pinching and pulling some of that depth that I already created and just pinching it out, Pinching it out and then using my comb to create even more of that depth. And I'm starting pretty low. When you're pulling it out, you're going to notice that you start to get a little bit of frizz. So take your non aerosol and come in and just smooth and clean that out again. I'm staying here because that's where I want to create my volume. You can do this is kind of where you get creative with it. If you want to create more depth, if you want to create more texture, you're going to take finer pieces. You don't want it to be too much. Make it a little bit not as thick like that. I want to create a lot of depth. I feel like that's looking pretty nice. The lighter, like the more highlights there are, the easier this is going to be. So I'm not going to lie. This is pretty easy to create depth in her hair because of her hair color. When I'm pinching and pulling, I'm pulling out. I'm not pulling down, I'm not pulling up. If I was pulling up, I would expose the teas in the hair and that would make it look messy again. Keeping that pretty close, keeping my teas nice and tucked and clean. I'm on the side and I'm checking my shape. So I got a nice curve going on here and I'm keeping this nice and tight. If at this moment I don't like the curve that I'm doing or it's not coming out how I want, if the 3D texture isn't looking right, I'll take it out and do it again. You don't want to keep going if you, you don't feel good about it. If it's looking too flat here, you can always pinch and pull that back out to create your curved shape. And I'm on the side and I'm checking to see where my height and volume is to make sure that it didn't get pulled down too much. And once I feel like that's looking good, like I'm feeling like that's looking pretty good, then I'm gonna take my little pins. So these are my baby bobby pins. They're about one. I just threw one. This is a two inch pin so you can see how tiny they are. I'm going to take these little pins and I'm going to accentuate this depth even more. So I'm going to take this little pin, I'm going to take my finger, press down where I want more depth, and then I'm going to place a bobby pin right along the scalp. It's going to create even more depth. So that way it picks it up on the camera. Something I learned is that when you're taking photos, it's two dimensional and when you're. Well, that's why we call it a 3D texture. I'm getting. I'm gonna get a little scientific on you guys. That's why we call it a 3D texture, because when you're taking the photos, it's 2D, but we want it to show up 3D, right. So that's why we need to over accentuate so that it shows up on camera, because it's all for the photos. Again, I'm taking my finger and I'm drawing along. This is super creative. I don't really have a process of where I pick it, but you're going to be able to see the depth that you want to create. Kind of like see this line, line here and a line here. And then I can see more depth here. It's flowing really nicely. So that's how I kind of put my depth of choice. As you can see, this is kind of flimsy. It's been falling a little bit. That's okay. I kind of want it to. But now that I'm feeling pretty good, pretty secure about how this is looking, I'm going to secure this spot. If I don't secure it now, when I do my bun, it's going to fall all over the place. So I'm just taking a pin and I'm picking that section up, touching the scalp and pushing it in. You always want your bobby pins to touch the scalp. If they're not, they're just floating around in the hair, there's nowhere to go that's looking super pretty. So there's two things you can do at this point. I don't have the front pulled in. In. Depending on what you want to do with your style is what you're going to choose to do with this right now. So I can either. If I want to have a nice swoop by the ear, I'm going to put this in last. After I do my bun. If I want it to be a little bit tighter by the ear instead of a little bit higher, I would do this right now and put it in. I feel like I want to do a swoop by the ear, so I'm going to show you guys how I do that. So I'm going to do my bun first. You can take an elastic or sometimes I like to take two bobby pins on a rubber band and just to get a little bit more security because she has thicker hair. So that's the bun that I'm Going to be doing today for you guys. So where, again, I want my bun to be in line with, like, her cheekbone. So I want the highest point of my bun to be in line with her cheekbone. So because I know that I don't want to do my ponytail low on her nape, I'm going to have it sit up a little bit higher, if you guys can see that. So I'm going to secure my ponytail, pushing my bobby pin in horizontally and taking my rubber band underneath, and I'm going to stretch it around two times. Oops. Is that too tight? No. Right by your clients. The nape of the neck, when you're doing a ponytail, that hair gets pretty tight. So you kind of want to pinch and pull it back out. You don't want it to be tight. Tight on them all night long. It could get uncomfortable. So that's going to be your ponytail. So if you can see it's not sitting on the nape, it's sitting a little bit higher. So that way, when I go and do my bun, I want my highest point to be in line with her cheekbone, which is right here. Do we see that kind of exactly where this clip is? Actually, you guys, that's such a good idea. I can put a clip there. That's such a good idea. I just figured that out. I put a clip here as, like, my guideline, so that way I know where to put the height of my bunny. Look at that. Such a good idea. Okay, okay. So she has really thick hair. Can't believe I'm even gonna say this. I'm not gonna use padding. I know, I know. I always use padding. If you are a newbie, use padding. I'll use padding. Just to show you guys, we're gonna do a little. Little itty bitty piece. She doesn't need a lot of padding, but as a guideline of where to keep your bun in place. That's why I like to use padding. So I'm literally taking an itty bitty piece. Itty bitty, like this. If she had less hair, I would do a way bigger piece. But I'm just going to use it as a guideline of where my bun is going to go. So I want my bun to sit here. So that's where I'm going to place my padding. I'm going to take two pins on either side, picking up the padding and touching it to the scalp. I'll get a little bit closer so you guys can start to see. Picking up the Padding and touching it to the scanning out. You want your padding to be nice and secure. You don't want it moving around. Cuz if that's moving around, your bun will be moving around. Okay, so she has a lot of hair. The heaviest part of the hair is about 2 to 3 inches from the ponytail. So here, this is the super heavy, heaviest part of the hair. Right, right here. So this hair, I need to keep it close to the nape. If I take this up at all, this is going to fall and just fall throughout the night. We don't want that. The heavier the hair, the closer to the nape. We need to keep it. So I'm going to keep this super close to her nape like this. And then I'm going to use these lengths to work. This is also where you get super creative. Depending on how you split this, how you twist this, your bun shape will come out different every single time. That's why I stick to some key tips, some key, like bun shapes, because I like to know how to recreate that for my clients. And that's what you can do here. So if I twist this all and hold it down like this and then pull it up, it's going to look different versus if I hold this and twist up as I go, it's going to look different again. If I keep this all in one, like one ponytail, it's going to look different versus if I split this in two, I split this in two and pull that up and then use these lengths again, it's going to look different depending on which way twist it. If I twist them in the same direction, it's going to look different. So depending on where you want your. How you want your bun to look is how you're going. If you want it to be cleaner, not really textured, take it in one, it's going to be not really textured, take it in one if you want more texture, even though it's clean and to kind of match what we got going on here, split it into two. So I'm going to split hers and into two just like that. And I'm going to be keeping it super close to the nape. I'm going to put that over here just so you guys can see. I'm not going to lift this up like that because this is just naturally going to fall even you're going to over overcompensate with a lot of bobby pins and we don't want to do that. Okay, so that's what I'm going to do. I'm Going to take my soft texture powder. Soft texture powder for the lengths of her hair. Why do we need texture powder for the lengths of her hair? So that we can have control of the hair. If we don't, it's going to be too silky, so your pins won't have anything to hold on to. So I'm taking my fork comb, and I'm just lightly giving that something to hold on on, too. The finer the hair, the more you want to add tease to it. I'm not sure if you guys can see, but it makes the hair pretty dry when you add the powder. So if I'm adding the bun, you can see how shiny and pretty it is here. But the lengths aren't shiny, so you want to add that shine back in. That's why I always take some tame wild to the lengths of her hair. Hair like that, add that shine back in. And then I see some teas here popping out. Clean it. Attack it as you see it. So now I've added the shine back into the hair. So when I'm twisting, I'm going to keep. Since I want to keep it low to the nape, I'm going to twist down here like this and then pull it up versus holding it up like this. She had fine hair. I would twist it up like this. Light twist, but she has thicker hair. So I want to make sure that I keep that the heaviness close to the nape. So when I'm twisting, I have my fingers open like scissors, and I'm gently twisting the hair gently. What you don't want to do is this. Do this and then air it out. Now it's going to make your shape really big. It's going to make your texture not clean. It's going to expose the T's. It's going to mess up your shape and make it look super funky. So remember, keep it really tight first, and then we can add that texture later. So again, scissors. Gently twist. Gently twist. Gently twist. And then I'm gonna hold it, push it on the nape, and then I'm gonna flip it up like that. Can we see the lines? We don't want to pin it at first. So I'm going to take my open U pins and place it in the hair. Then I can air out for my texture. And if you can see my fingers, I'm holding the heaviest part of the hair and I'm holding the ends. So my thumb is on the ends and my middle finger is on the heavy part of the hair. So I'm going to place my Open pins on the length so that I can drop it just like that. So this heavy part of the hair, I'm gonna add a pin. Your pins always go in the hair, not on the side of the hair, not on the top of the hair. In the hair. I'm gonna leave this one here, and I'm gonna decide what I want to do with this one before I start airing that texture out. So I'm going to work with these lines, add my texture powder. Just activate it a little bit. If she has little layers here, like, here's a shorter piece, but they're not really short. Let's just say your client has, like, really short pieces here. What I'll do is add a lot of texture powder, tcs. Lift up all those short little pieces, combine them all together, and tuck them up. Get them out of the way, because they're just going to fall out the entire time. I'd rather fix it now and get them out of the way than be fighting with them later on. Take my team wild. So now with this piece, you can either go in the same direction like that. That actually looks really pretty. I'm not gonna lie. I'm just trying to see how I like it before I pin it, if that makes sense. So you can either do it in the same direction, or you can flip it up and do it in the opposite direction. That's what you probably see me do most of the time. So same direction, Opposite direction. I feel like I really like that same direction. That looks pretty. Let's do that. Okay, so again, I'm doing my twist down close to the nape, and then I'm gonna pull it up, keeping it nice and tight, and then hold and pull that up. And that looks really nice. I'm gonna add a pin here, push it into the hair, and touch it with the padding. And I'm holding it on the heaviest part. And on the length, I'm going to add some big open pins. If you feel like your twist starts to, like, get horizontal on you, and you want to add that diagonal line back in. So right now, it kind of went horizontal on me. I want to just push it up and accentuate it again. So now I feel good. I want to start adding some shape so it's looking kind of flat on the side. So I want to pull my texture here, and I want to add and create. Create the same texture I have going on in the crown in the bun. So I'm going to take my non aerosol spray, hit that section, and work on this bottom One first, and then just start pulling out gently. It's best if you work in line with what you're doing. So I'm working in the back of the hair. I'm not worrying about this right now. I'm not worrying about the lengths. I can pin those up later because I kept the hair so tight and with tension, you can't even tell she has thick hair. If you saw this bun, you'd be like, what? She looks fine here. Sorry about that tummy. So this little hole right here, what I'm going to do is I'm going to pinch this hair over here, and I'm going to try to pull it and cover that up the same that I did here. I'm pinching it, and where I want the depth to be, I'm going to take the back of my combination comb and push it in. Can we see that? So I'm pinching it out, and I'm pushing my comb to over exaggerate that again. I haven't pinned anything yet. The reason I use these U pins is so that these lengths are still movable. When I'm pinching and pulling for my texture, you can see the length move. That's what we need. There you are, right here. Oh. I could see the height of my bun is starting to get in line with the cheekbone. My clip right here, so that's good. I don't want to go any higher than that. So I'm not going to pull out this way. I'm not going to pull out this way anymore. I'm gonna. I'm good with my height there. So because I'm good with my height there, I'm gonna start taking my bobby pins and pushing them in the hair where I have my open pins. So I could take this pin out. And I'm gonna put my bobby pin there to hold that in place. If I didn't feel good at this point, I would take it out and do it again. But I'm feeling pretty. You want to make sure that you put majority of your pins where the heaviest points are and where the lengths are. So I put about 1, 2, 3, 4, 5, 6. I'm gonna do the same thing here. One again. My pins are always going inside the hair. Like, I'm going in. I'm not going on top. Top of the hair. This is looking a little wide right here. So I'm going to take my fourth comb. It's looking a little wide over here. So I'm going to take my four comb and tie, tuck that in Tighter, so that way it stays in line. That's why you want to pull your volume mainly from here and not from the sides. Okay. It's looking pretty. So now with these lengths, what we're going to want to do is take out the bottom one first. Add your pin. So I'm going to add a pin where my U pin was, and I'm going to connect these. These lights together. I know this is what scares you guys the most from when I do my classes. It's okay. We're going to connect these. So I'm literally taking these two, Taking this one and connecting it. So I connected it right there, if you guys can see. So I'm keeping it super close to the nape. Super, super close. And I'm going to add a pin. Taking my pin, picking up the hair, and I'm going inside the bun like that. Whenever you have a lot of hair like this left over, always take an elastic, and you're going to tie the ends up. So what you don't want to do when you have this hair left over is one not use an elastic and try to bobby pin it this way. Too much hair. The bobby pins are going to get pulled out. So you're going to keep the hair super close. And I'm tucking it up under the bun, and I'm not going to take this hair and keep it on the side like that. That's going to make your bun too wide. Instead, what you want to do is tie them together kind of closer to the root, about an inch off from the scalp. I'm gonna tuck them up like that. And then I still have all this length. So I'm gonna take this hair and I'm gonna pick. There we go. So I'm gonna take all this hair, and I'm gonna lift this piece of the bun up and tuck it under in there. Does that make sense? So keeping it close to the scalp and tucking it under your bun like that, be like a little craft sheet for everybody. And then you're just going to add some bobby pins into those pieces. But now it's invisible. Rather than laying it over top of the bun, you're creating another line. It's looking too wide. That's what we don't want to do. So I'm just adding a few bobby pins in like that, and now it's invisible. Those legs and your bun shape is still intact. So now I'm going to even it out over here, see how my shape is doing. And then I'm going to add in the sides See, that's looking really good. Pretty tight, clean bunch. Checking to see if there's any of like a gap under the nape and there's not. Okay, so now you can work on the fringe area. So you're going to want to pull out your. You're going to want to heat up your curling iron. So I'm turning my curling iron on because I'm going to curl these pieces is back. And now we're going to want to pull out our face frame. Actually before we pull that out, we're going to where the higher session is. I'm going to tease that whole section. So down by the ear I don't really need to tease, but at the high recession into the part line, I'm going to add my texture powder and tease it up. So take out your texture powder. Powder. Got my whole section again. Same teasing that we did here. It's like a half inch section. Definitely make sure you take your texture powder to the part line over. Direct your section of. Really get that height and volume at the root. This is super important for the fringe area. And you want to see like a pillow cushion about half inch from this scalp. So can you see that pillow cushion? That's when you know you're good. It's a pretty good tease. This is going to be about two, maybe three sections. It's not that much. And here's your third section. Then you don't want to keep this in line going back. Remember you want to keep your front section. I'm going to take these two fingers and push and pull it forward each section. I'm going to bring it down that I teased and pinch and pull it forward. Take this down, pinch and pull it forward. That's going to start creating that forward motion in your hairstyle. I'm just taking my 4 comb, staying on that top layer of hair and starting to create that shape of going forward and also taming my tees at the same time. So now I can pull out my face frame. I'm gonna do a typical face frame that I do. So to show you guys, I'm gonna pull out her hairline. I'm taking my comb right here and I'm coming in at like a C curve. Remember, least amount of hair is right there. So coming in at a C curve like that, going at our high recession, second amount of hair right here. And then I'm going to do a pretty romantic one. So I'm drawing in like a C on the scalp at the part line. Yeah, she has like some shorter pieces. So that's why you saw it super thick. And then I pulled out a finer piece because I wanted to pull out these shorter pieces that she kind of already has. And I feel like that looks really pretty. Okay, so now we're going to add some tame, wild. Add that hydration, that shine back into the hair, taking it on this whole section. So something that will create founding father vibes. That's not super cute is keeping this section in front of the ear. So if I take it like this, it's going to create like a founding father vibe. Instead. Instead, what I like to do is tuck right behind the ear and then take this hair over top. It's like at the high recession, pinch and pull it forward, and then connect those two sections. It's going to create a lot less width here, so it's not as thick and heavy as a section. And then I can create a nice drape over the ear, and it's not super heavy. So with this section, I like to pinch and pull it to make it a little bit more of a nice swoop by the ear. Depending on how much you want, your swoop is going to depend on how much you pull that section forward. So keep that tucked, pinch and pull that forward. And then I'm going to take this hair and put it right underneath that bun part right there, hitting it with some non aerosol spray and tucking in any short little layers. I'm going to check this side from the front, and that's looking really good. I'm using my fork comb to kind of draw that back where I want it to go. And that's looking super pretty. So then along here, I'm going to add in some bobby pins just right along the scalp. If they have shorter layers, then they're sticking out. This would be a good time to add in some bobby pins. And then I'm just going to add a bobby pin right on top of here. I'm gonna. I want it to be down in here, and then I'm gonna pull this back over top. Does that make sense? I'm gonna do the same thing on the other side. So pull out my fringe area. This is also where my belt comes in handy, because if you guys can tell, I really like to layer my products. So having everything at my waist makes it really easy and saves time versus me, like, constantly turning around at my table or wherever I'm working. Okay, so we're gonna pull out our side it so we have our side. I'm going to add shine back in, man down. So I got My tame wild. And I'm just running it through this section again, taking those pieces by the ear, by the sideburn, tucking that super tight behind the ear so it's not super heavy, and then pinching and pulling for that added texture and placing it behind the bun. And then I'm taking my fork cut comb, and I'm just cleaning up any teas. I'm going to pinch and pull, and I'm just tucking it tightly. I want this section to be super tight. And I'm placing it on top of the bun. I'm checking it from the front. And I'm going to add in my pins right along the scalp. I'm going to add in my pins here, so that way it's super tight. I'm going to add in my pins over top. And then these pieces are going to go top tight underneath the bun. I'm just gonna. So this is where sometimes in classes I see people go wrong. If you guys can see, it's still pretty separate. This is those sections. So I want to make that super seamless. So I'm going to pinch and pull this over top. You don't want to leave that down. You want to pinch and pull it over top to cover that section. So I'm just gonna lift it up to cover, and that'll bring the height back into my bun. This is about the time where my hands get really slippery because I have so much product on them that I start, like, dropping things. So you've been warned. Okay, so I'm tucking in the sides over here so that way I can cover these pieces from the sides that I brought in. And then these little bitty lengths. These are super short, and they're super fine little lengths, so I'm not going to take a rubber band to them. I can honestly just combine these little lengths. I'm going to put the pin all the way through like that. And then I'm tucking them up inside the bun super pretty, making sure that everything is nice and tucked in. And then I can start to add shine back into the hair and curl up the front pieces. So that's looking pretty good. So I'm going to take my volume up and I'm going to add shine into the hair. I still see some, like, little frizzies. So you want to shake this and spray it in short burst. So I'm shaking it. This is what's going to give the hair, like, a really nice glass, like, glossy effect. It's a volume spray, but it adds the best shine. I don't know how. It's the best smelling thing, isn't it? Smells so good. It smells really good. But also, I have a lot of product on my hand, so this is, like, super slippery. So if you see me looking weird handling it, that's why. So we're keeping it. What I'm doing is I am. Did you just see that? Did you just see what I did there? My pork comb pulled that piece of hair out. That's good for you guys. Okay. If you accidentally pull a piece of hair out and mess up your bun, what you can do is you're going to take your comb, and I'm going to push it back into place. Take my four comb. Boom. I'm just going to tilt you up a little bit. Perfect. Bun's looking good. So if I'm seeing a frizz, like right here, I'm taking my comb and tucking it in. I'm touching that piece of frizz with keeping it pretty tight. You can take this product at the hairline as well, and it'll add a really nice shine, and that's looking really pretty. So now I'm just going to curl up these little pieces. I'm going to take some silhouette, comb that through. When you're curling the front, you always want to be behind, and you want to curl on a diagonal. So I'm curling at a diagonal, and I'm staying pretty low. I want the curl to start at her cheekbones, really open up her hair. The most flattering curl, I feel like it's like the pull like that where you leave the ends kind of flat. And this right here, even if you leave the ends out, I feel like that's just super flattering. So spraying it, combing it through, always staying behind on that diagonal, leaving the ends out, and then for the front on a diagonal and then twisting it, flattening out those ends. I feel like that's super flattering, and it's nice and modern. Okay. She's so cute. It's not even cute yet. I so in love with it. Okay, wait. Look at the camera one more time. So I want to show you guys. I'm gonna brush out this side and leave this one not brushed out, so that way I can show you guys what not to do. So don't leave your curls like this. We want to take your. Your small teeth on your cutting comb and brush it out. Look how much nicer that looks. So much nicer. Always brush it out. And then what you want to do is reinforce that height at the front and put that Tease back in. So that way you start getting this shape and again pinching and pulling it forward like that. And then you can come underneath and really add more width with, like, a light tease like that. How much prettier and softer is this? This one versus that one. Right? Okay, now I'm going to taste what I'm trying. Like, that's so much prettier and softer versus this one. Right? This is. No, this is. Yes. Looks so cute. I seriously love it. Oh, my God. I. So how do you do this? I mean, I asked myself that ever yet. So pull it out and lightly underneath tease to reinforce that shape. So pretty. You don't ever want it to be flat at the root for your face frame. Looking super cute. I'm just touching up and then adding my shine spray, and this is looking super bomb. And your makeup didn't even move. I know. I told Carly it looks so good. So this is the front. I feel like a princess. She's a princess. Okay, so I'm going to do actually. Whoa. Do a full check. I just saw something on the back. We were a little disconnected. So I'm going to add a bobby pin in right here. Okay. So I'm going to tilt you like that. Phenomenal. And then I'm going to twirl her so I can show you guys this finished look. So I'm gonna spin her around. So pretty. We love Gorgeous. I love it. It's actually really comfortable too. Look at that. It's comfortable, guys. Yay. Okay, I'm gonna take some photos, and I'm gonna be back and show you guys how to do some photos on this lovely bun. So we will be back in a few minutes.
More from Marissa





7 Lessons I Wish I Knew In My First Wedding Season (I’ve Now Grossed $728,000)