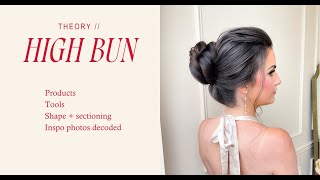
Marissa Brennan teaches high-bun variations, covering prep with curling and root crimping, base placement options, and proportional rules tied to cheekbone and brow alignment. She walks through two styles: a circular bridal bun and a vertical twisted bun, showing how to match technique to hair type and what shows from the front.
Hey, guys. Welcome to today's live. We're doing the high bun variations. I'm going to start like always. I'm going to do theory first. So I'm going to give you the rundown. We're going to do theory. I'm going to go over the products and tools. I'm going to be using sectionings, inspiration photos, and then I'm going to stop the video. We're going to do one variation of a cleaner high bun with an all front back. And then we're going to do another video of the twisted more 90s Pam Anderson it girl high bun. Okay, so I'm going to start with the theory. I'm going to turn my camera around so that way this isn't backwards. So give me one second. If you guys are here watching live with me. Hi. If you guys are going to be following along with me, you can start prepping your models now. I already prepped my friend Deb because I realized that it is pretty boring to just watch me curl hair when you guys like arm here. So I curled about half of her head. So I used my 1.25 inch bio ionic long barrel curling iron. If you guys have a 1 inch or a 1.25, use that. Start prepping your model or your mannequin if you're going to be following along and take it about halfway up the head. So right about her high recession, that's kind of where I stopped curling Deb's head. And again, you guys know how I love to curl. I feel like you've seen it in a glam waves video. I do 1, 2, 3 sprays with the wet spray. Then I comb it through with my cutting comb and then go through and curl. So you guys can start prepping from higher session below to the nape. So that way when I bring Deb out, we're at the same point and you guys can follow along with me. Okay, so I'm going to turn this around and we can talk theory. So. Oh, no. How do I do this again? I do this and then there we go. Perfect. Hey, Nicole. Hey, Emma. Hey, Lizzith. How you guys doing? I feel like that's good. Okay. All right, so first things I want to go over is let me do my tools and products that I'm going to be using first just in case you guys are prepping. I'm using my crimper, so my, my Sam Villa crimper. And the other tool is my 1.5 long barrel iron. If you have a 1 inch, that is okay. And then I'm using my Silhouette Wet spray today, my Volume up spray. I will also be using my Oasis texture powder and probably my Puff Me. So these are my strong texture powders. Pull out your strong texture powders and then my soft dust texture powder for the lengths, I'll be using that as well. Tame Wild. The OJ of I'll have alligator clips, these small ones for setting. Some of the hair elastics, we're going to need a couple elastics. So grab a handful of elastics and of course, two inch bobby pins, as well as some big open bobby pins. And then my typical combs, cutting comb, foil comb, and my rat tail comb or rat tail combination for. Okay, so those are the tools and products I'm going to be using today. And then I want to show you guys. Let's see if you guys can see that. Okay, so the, this is the inspiration for today. So the first one I'm going to be doing is called like a, I call it more of a bridal bun. It's a little bit more traditional. And then this is the twisted bun that I'm going to be doing second. So let me. There we go. So I wanted to show you guys and what I want to do first is break down the inspiration photo that your client gives us. Because you want to know your direction and work backwards. That's what's going to be easiest, I find with these kinds of styles. So the first one again I'm going to be doing is this one. So let's break both of those down. In my theory, you can see I have bridal bun and Twisted bun. So want you guys to reference bridal Bun. Twisted bun. Okay, so you want to know your direction and work backwards. So when your client sits in your chair and she might be showing you a couple different inspiration photos for the high bun, there are going to be different base placements. It's going to look different for your client in the front. So we want to know these key specifics and ask her specific questions. So, so that way we know the direction that we're going to need to take, the sections that we're going to need to take and the prep work that we're going to need to take. 8. Like I 100% of the time, the prep that I use. The prep tool is going to be my curling iron and my crimper. I always use the crimper to get in at the roots and create volume, especially in the crown area. And then I always use my curling iron to curl the whole head a Quick curl, it's nothing serious because you want to have movement in the hair and you want to have rounded edges. So that way when you get to the bun, you have all that movement up here if you want it. Like when you're doing the twisted bun, you have to look at the photo. What kind of movement is going on in there? So I grab this one and create more of a softer curl. When I grab a 1 inch iron, it's going to create a little bit of a tighter curl, more movement in the hair. So when you're looking at the photo, look at like the sides of the hair, look at the top of the bun, how much movement is going on in there? If it's a lot of movement, then grab your one inch iron. You if, if it's not so much and it's more of like a faux blowout, you just need the roundness on the hair so it's not perfectly straight. I would grab the 1.52 inch. So also when you're looking at it, when you're looking at that high bun, you want to see the direction that the lines are going in. So then you can be able to pick out your sections and you know where to place that base placement for the high bun. When I first started doing the high buns and I would overcomplicate it so much and I find that that's a big mistake. When I'm teaching this kind of a high bun is it looks super complicated and we over complicated in our heads that we like don't know where to start. Like, do we. Do we create like a little ponytail in the middle first and then pull all this up after? Do we prep like regular and curl and pull all this up and then create our bun? Like what is the best option to take? Honestly, the answer is you can do both. So I'm going to break down my base placements, but I'm going to first show you with the bridal bun, what the direction of the hair is going to be showing you. So that way the conversation you have with your client is picking out things in the photo of do you like this? Is this the direction you want to go in or you know, so you can pick out and understand what they want. So then you know how to work and do the hair. So give me one second. So. Okay, can you guys see that? Okay, so if your client shows you this photo, I drew out the lines that I'm seeing in this picture. So there we go. So this is the bridal bun. So the direction of the hair is going up into the bridal bun to create, like, a swoop. It's also going up here and going up here. So when I'm seeing it swooped up like that, I know that my section is probably going to be from, like, the front of the ear and back, and I'm going to need to swoop it up to get this direction and get that movement. I know that the hair needs to be curled. That's why I was saying you have to make sure that there's movement within the hair. Also, when I'm looking at this style with my client, I'm going to say, do you like how it's a little bit cleaner in the bun area? Do we like how she has, like, some roundness and some height and volume? Do we want to have a face frame around the face? Those are the questions that I'm going to be asking my clients and make sure that she likes this particular kind of style. Also, something very important with this one is it may look as though you'll be able to see this bun from the front, but this one is actually not visible from the front. So I'm going to show you guys what the front looks like on this one. So this is what the bun looks like in the front. You see maybe the tip of it right here, but you're not really going to see this bun visible from the front. So I'm going to go back here. The reason why you're not going to see this one from the front is because it's in line with her cheekbone. So that's the proportion of where we're going to keep our high buns in. In line with the cheekbone. When it's in line with the cheekbone, it sits lower on the head. Her chin is pointed down, so it's raising the bun up to appear higher in this photo. That's how I like to take photos of my high bun. Also with the proportions of a bun that I see stylus go wrong, or where I went wrong in the beginning is pay attention to the outline of the bun. You want to make sure that it's all proportional. You don't want to have flat hair here. You always want to make sure that it's rounded and that it's rounded here. You don't really want this flat. You want to make it in proportion to this bun shape, which is more of a circular bun shape. And you should be able to draw a line through the middle of your bun to the cheek. That's where you want. That's how you can find the proportions of your bun. If she's showing you the twisted bun, this bun, let's find the lines and the direction of the hair that it's going. This one is swooping down, so this one's swooping down. We have a little bit of roundness here and a little bit of height here, but it's sitting more on top of the head. And the proportions are it's in line with the eyebrow bone. So when it's in line with the eyebrow bone, it's therefore sitting up higher on the head. So this one is going to be visible from the front. So you can see it's pretty visible on the front. She didn't have crazy long hair, and I took out the extensions at this point. So if she had longer hair, I would be able to pull it up higher on her head. So that's why it's not crazy amounts in the front. But if she wanted it to sit higher on her head and she wanted it to be visible from the front, I would do a bun shape like this. This one is also more of a vertical. It's like a. What is that called? A rectangle? It's like a rectangle shape. It's not a circular shape. So if at her console, I'll be asking her things like, do you like the shape of style, how it comes a little bit longer, or are you looking for something that's more of a circle type of a bun? So then we're going to know the sections that we need to take and the prep work that we need to take. Also with this one, it's a little less volume in the front because it says so high on the head. The part line isn't going to be able to be as long. So you're not going to have crazy amounts of volume here. If she wants to have a lot of volume right behind her part, she would probably more so like something like this. But again, she's not going to see a lot of it from the front. So those are the two styles that I'm going to be doing. So let's talk about our face placements. So now that we know kind of the direction from our clients inspiration photos that we're going to be going. Now that we know the direction that the hair is laying and we're able to visibly see that in the inspiration photos, we can break it down, find those sections, and find out where we're going to be placing our base to start creating and building that bun. Right. So base placement and ideal hair type for each of These buns. So the first bun, the bridal bun, I always will do. Actually, no. So I always do a ponytail for that kind of a bun. The bun, the base placement is going to be a ponytail. It's going to add more structure for when you're bringing up all the hair. The ideal hair type for the bridal bun, where it's a little bit cleaner and the circular kind of a bun is somebody who has finer hair that you're going to be adding extensions to. So if your client has shorter hair, like maybe it's at their shoulders, maybe a little bit below, we're going to need to add extensions. You need length with this hairstyle because we're elevating the hair and we're bringing it all the way up. So you're going to be losing that length. And you need to have a lot of hair to be able to go around that kind of style of a bun. For the circular, circular bun. So that's usually the ideal hair type. If she does have long, thick, heavy hair, typically I would probably do the twisted style bun because it sits lower. And when you're pulling all of that hair up, you can do it. It's just not what I would choose as the ideal bun style for that hair type. So, like medium length that I'm like adding extensions to, that's the ideal hair type for the bridal bun. And I use the ponytail. So with the bases that I use, let me just make sure that. That. Okay. I just want to get a little closer for you guys. So the base that I use for the circular bun is usually going to be within the middle of the crown. Inside the crown. When I say inside the crown, I'll show. I just want to make sure you guys can see. So here's the crown right where the occipital starts. And at the top point of the head, when I say inside, I draw out a circle like this, like that. And then you can place all the hair on top. So that can be one way to do your base inside the crown. Another way that you can do the base inside the crown is you can split it. This is the one I'm going to be doing today. You can split, section this hair out of the way, pull all of this hair up, and this becomes your base. Put your all this hair in a ponytail. This is like from ear to earth, and it's like a half moon section. That's one way that I like to do it and the one that I'm going to be doing today. So this would be My base, put this in a ponytail, and then I'm going to work with all of this hair to come over top, gather it all together. And then again, that's the second part of my base. So working in, like, two sections. The other way that you can do it is outside the crown, so it sits higher on the head. When you're inside the crown area building a base, it's likely not going to go outside of this area, your bun. So otherwise it's going to be unproportional because you don't want your bun to be coming like here. That's a huge bun. That's really not proportional. It's going to make your client look like they have, like a basketball in their head. And that's not cute. We're looking for more of like a. Like maybe like a mango, I don't know. I don't know what kind of fruit. But we don't want the basketball. We don't want that one. So you don't want it to come outside of those proportion areas. You want it to stay more so inside the crown area. So if she wants to see it, she still wants the circle bum, but she wants to see it higher on her head and visible from the front. You can do your base sitting outside the crown area. So it's going to be sitting like, right at the top. So what that will look like is pulling up from, like, the front of the ear, pulling up that whole section. And it's going to be in line with the eyebrow. Where's your eyebrow? So right here, coming up like that. And you're going to start your base here, and then you'll bring all this hair up to meet that base. And then your bun will sit up higher on the head. So then when you meet all that hair together, it'll be sitting up like that, like higher on the head. And you can still have that circle shape if that's what she's looking for. So for the twisted bun, my ideal hair type is typically longer hair, heavier hair, because it's a little bit of a more elongated kind of a bun style. And it also sits in lower on the crown area. Remember, people who have heavy hair, when you gather it up in that ponytail, it's super heavy, and gravity is just going to start pulling it down and pulling it out. So once that starts happening, the higher you pull that ponytail up on the head, naturally throughout the night, it's just going to start falling and dropping out, which we don't want for our clients. And then what we start doing what I notice I start doing. If the hair keeps falling out, I just start over compensating with pins and putting more bobby pins in. So they have like 1500 bobby pins in their hair and their scalp is hurting. So to avoid all of that, if they have longer, heavier hair, but they want this high, cute knot, I would probably try to persuade them into going into the twist it bun again, because it's going to sit lower on the crown area and then you're going to pull it all up. So when you're doing these kinds of base placements, if it's heavier hair, I'm going to gather it all in a ponytail because that's going to give the most structure and hold to the hair. Or if they have shorter hair, you can do pins, you could do elastic and pins. And I'll show you guys what I mean by those. When we get to the twisted bun and then the. The base is typically going to sit in the low crown. You're still going to be able to see it visually from the front. You could keep it lower in the back and. But it does typically come up high on the head where it's going to sit in line with the eyebrow bone. The other kind of base placement that you can do is the mid crown. This is ideal for somebody who has length that's like medium. So maybe like right at the shoulder, maybe a little bit below or higher, and it's going to sit even higher on the head. You can get this one to sit a little bit lower. Maybe she's like, I love that bun shape, but I don't really want to see it from the front. I just want to sit a little bit lower. Put your bum placement lower on the crown area. And then you bring these lengths up for the mid crown. Sitting it here. When you pull these lengths up, it's going to sit even higher on the head. So in my little drawings here, all of this hair, like that whole top section, you're going to pull that all into your base. And then here you pull all of the hair in the base. So let me show you the mid crown. If we're doing the mid crown, you literally grab all of your client's hair, pull out any face frame that you want, and then you're going to pull up that hair to the mid crown, which is about here, twisting that hair all up, so all in one section, because that'll make it really clean. And then you can always pinch and pull it out for your texture. And then you twist all of this. And you can, when you have lengths that are up this high on the head. You can pull them up really high, or you can tuck them down to sit a little bit lower. When it's on the low crown, it's going to be sitting like this lower here, and then your lengths are going to go up higher. So like I said, if she had longer hair, we would have a lot more hair to work with here. Okay, so that's the bun placements that we use for the high bun. And now let's go over proportions. I kind of just touched on this. So the per. If you go outside of these proportions of where you're placing your bun and it's ending up, it's just going to look a little bit off on your client. You're going to see it, and you're going to be like, that looks a little funky to the eye. So keep it in line with these proportions. You want to make sure when you're looking on the side, like, when you're placing, when you start going around, like, everything's finished and you start creating your actual bun shape, these are the visuals that you want to be checking for when you're checking your work. So that way it all stays in line. So you want it either in line with the cheekbone, not visible from the front when it's in line with the cheekbone. So when you're looking at your client from the side and you're checking your work, come to the side always and see. Okay, can I draw a straight line from the cheekbone all the way up to the middle of that bun? That's going to mean that it's in proportion. Or if you want it to be visible from the front, you want it to be in line with the brow bone. So checking on the side, make sure that you can draw a line from the brow directly up to the top of that bun. That's going to keep it in proportion for our high buns. Okay, so for. I want to go over the shape visuals that you guys should be looking for, so that way, none of your buns get funky at all. So I find when I was doing my high buns, they would look like pancakes and flavor flat and more like oblong instead of circle. And they're so exposed. I feel like when they're sitting higher on the head versus, like, a low bun, sometimes they. I don't know, you can hide imperfections a little bit more versus when it's, like, loud and proud on the top of your client's head. So I want to make sure that you guys know the visuals you want to be looking for. So that way you can correct anything if you need to when you're shaping your actual bunch, if that makes sense. So for the twisted bun, it's a vertical shape. So it's going to start right at about the top of their crown and go all the way down to the lower the crown. So the whole bun is going to be inside of that area. And you remember from our bum principles, we want to keep all of the volume inside of the Mohawk area. So if I'm keeping all of my volume inside the Mohawk area, I know it's going to be proportional and I know I'm going to be able to end up with this kind of a shape. The highest point of your bun, you want it to be in these areas. You don't want to be pulling out here for a higher bun. Then it's just going to make your client's head appear smaller and the hair look too big again, more so like putting a football on top of their head. We don't really want to do that. You want the hair to be in proportion with your client's head shape. So stay inside those guidelines and keep the highest points of your bun. Like when you're fluffing it out, airing it out, adding that texture, adding that volume, still staying in the Mohawk section. But make sure you're staying inside here where you're pulling it out its highest. You don't want it like coming off your client's head and looking like, wild, like Teresa whoever from the Real Housewives. I know you guys know what I'm talking about. Her hairstyle, where it was like all up and then she had it down, it was so high on her head, it made her look like she had this itty bitty face and like she was wearing a wig. We don't want that for our clients. So keep the volume inside the Mohawk. Then for the bridle bun, it's a circular shape. So that circle, you want to keep it inside of the crown area. We're not going outside of the crown area. So this is the whole crown area right here. I'm not going to take a circular shaped bun and do an entire circle inside that crown area. That's way too wide for your client. And it's just going to look gigantic. So you want to keep it inside the crown area. So, right, this is the whole crown here, whole crown. So keep it inside there. That's the guideline for you. And then the height of your volume, you want it to kind of be in line with like the middle of the ear. So the middle of the ear, that's where your bun is going to come out the highest. And so like on these sides, keep that lower where it's closer to the root of the hair. And again that's a circular shape. So next what I want to go over is the sectioning that you're going to want to take and what it's going to look like for the front and like face framing of the hair. So I feel like there's three types of face frames that you see with the all back bunch of or with a high bun. So either all that kind of like how I have now. So where it's like all back like this and you got the bun on top and maybe they have a few pieces that's pretty popular or something with a shorter part where she has a little face frame. Or sometimes some of my clients like it their part to go back a little bit further so it's a longer part. So the part starts, stops, like way back as opposed to a shorter part in the front, if that makes sense. So the face frame and sectioning is just going to be a little bit different for each of those. So the first demo I'm going to do today is going to be the all back. So what the sectioning is going to look like, make sure. Okay, so this is what the sectioning will look like for that one. Imagine you're looking down at the top of your client's head. Okay. You're standing over top of your client. This is that visual that I tried to give you. So you're looking down and you can see like their mid eyebrow is usually where their high recession is. So that's like right here. Their high recessions. The sectioning that you're gonna do to create that all back front is like a U or a V shape. From high recession to high recession, you're going to section that all out and you're gonna, you're gonna see me do it. I'm gonna roll it all up and keep it out of the way. And that I'm gonna curl it and pin it and set it on the head. Keep that out of the way. And it's gonna be the last section to secure for that all back. You want to make sure that it's rounded because that's going to create the most bl when you're pulling that into your bun. And that's going to go last. So that way you have that volume. You can create texture there for the all back style. So this is what the sectioning looks like. It's like a V or like a U shape from high recession to high recession, and that's going to go over top last. When your whole bun is done, that goes over top left. Then the next one is the shorter part. So what the section is going to look like is you're going to have, like, when you start, you're going to section out the front to the top part of the ear section out with your little zigzags, and you're going to keep all that hair out. Pull out your face frame, all of your volume, you're going to be able to get volume here. When you have a shorter part, you're going to be able to have a volume behind and then build your bun. The front section is going to be secured last. All of this, you'll pull out your face frame, and then you'll bring that over top. So after a whole bun is built, then you're going to bring that section up over top for the longer part. This is for your clients who want, like, a longer part that extends back further into the bun. You're not going to be able to get as much volume if they don't want a lot of volume. And then they just want the bun very, like, 90s inspired this one would be for them. So you're going to take that part back longer. You're not going to be able to build any volume. Your sectioning is going to look behind the ears, you're going to do zigzags. Then that front section here, you're going to take that back. It's going to be the last to get secured for all three of these. And then this one is going to go underneath, and then you can pull those bits up into the bun, if that makes sense. So the ones that I'm going to be doing today, the twisted bun, I'm going to be doing this one. And then the bridal bun, I'm going to be doing this one. I think that is all for theory today. That seems to be all. Okay, perfect. Okay. Wow, that was a quick one. Okay, so those were the theory pieces that I wanted to go over with you guys. Pop any questions into the chat box if you have them. I'm gonna wrap this up so we can get right into it, because I'm excited for today. These are like my favorite styles to do do. So. Yeah, I will see you guys in a couple of minutes.
More from Marissa



7 Lessons I Wish I Knew In My First Wedding Season (I’ve Now Grossed $728,000)