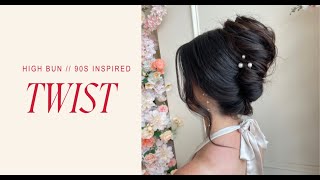
Marissa Brennan shows how to build a high twisted bun by teasing at the low crown for structure, then working opposing twists through the length and securing with pins. She refines face-framing pieces and checks the shape from all angles for a soft, blended finish.
Questions this video answers
Deb
Okay, we're back. And we're gonna do the twist it high bun demo. So I took Deb's hair out, so we are ready to go. I also parted her hair for. I actually didn't even ask you. Do you like the middle part? Okay, cool. That's what I figured. Yeah. So the. Where you want to start with the twisted high bun for the second look for today is start with pulling out the part, and then I'm going to separate the front from the back. So this style, we already have some prep in it, so I'm just gonna mock the prep that I would do. And then we're just going to start shaping the bun. So. So first thing is pull out your parting. You can do this with a side part, middle part. I just feel like a lot of my clients like the middle part. So I have my part pulled out, and then I'm going to section out the front from the back, so using my rat tail comb. And I'm going to section out to the front of her ear. So doing small zigzags all the way down to the front of her ear, and I'm going to section that out. So this is going to be me mock prepping. So if I was starting from scratch, I would do my crimping here, crimping here, and then I'm going to section out on the same side. I'm finding my section over here doing small crimps all the way down to her ear. Small crimps. I like to go to the front of the ear. I find when you go to the back of the ear, this section is too thick, which is just going to give you a different look. I just find it's harder to blend. So section that out, and then I would crimp here, and then crimp my sides, starting here. Then the next thing that I would do is start curling the entire head. So I would curl the entire head kind of the same way that we did it for our other bun. And then what I would do is start adding in my tees. I would start teasing at the root here, go down. So for this bun style, since it is vertical, and it's going to start from the low crown and go all the way up where you're putting your pins and where you need your structure for your base to hold is all in the Mohawk section, all on, like, the low crown. So my teasing is mainly going to be in this area. So this whole section, I'm going to have a lot of teasing here. I already have teased from the other style. So I'm not going to do it, But I just want you guys to know your teeth has to be here so that your bobby pins have something to hold when you're creating your base for this style. So with this style, I actually work in one section. So I pull out my face frame, and then I gather up all of the hair. So that's what I'm going to do now. So that was just, like, my little mock prep. Also, after I do my teasing, I would probably add more Team Wild. She already has a lot in her hair, so I don't need to do that. So we're going to pretend that I just teased this whole section, and now I'm going to start shaping the style into place. It's actually a really simple, easy style once you have all that prep work in. And again, you're going to be curling crimping everything that we did in the previous one. So I'm gonna pull out her face frame for this section. So I just want to show you guys. So she already has shorter pieces. That's what I like to do with my clients. Brush back their hairline and kind of shake it to see what shorter pieces fall out. I feel like that's really pretty. I'm gonna do just the two pieces by her top part line right there. I think that's going to be really pretty. So I'm gonna clip that out and pull it out on the other side. I'm just making sure that it matches on both sides. Okay, perfect. So I'm just going to add a small little clip and hold this out of the way so that way it doesn't get in my section. Okay. And now we're gonna work in this whole section. So for my base, there's a couple things you can do. Deb doesn't have crazy heavy hair. She has long hair, but it is finer. So I don't feel as though I need to gather this up and do that blunt base that I did in the theory for the twist, which was you can gather this all up, put it in a ponytail if her hair is really heavy, and then take. Take that entire thing up, twist, and pull it up. So what I feel like I'm gonna do is not use a base and just twist the hair up. I'm going to use a bobby pin base to hold everything down. So you want to gather your section. I'm taking my fingers and brushing it through the hair to create the direction that I want the hair to go in. For this style, you want to take your Fingers and brush the hair down so that it swoops down this way. And then it's going to go up. So you don't want to brush it back and expose the hairline. You want it to be nice and soft by the hairline. So that's what I'm doing. Now if you find their hair by their sideburn is to low, you can always tuck it back that way it doesn't get too wide by their hairline or by their ear. And I'm just gathering all this hair up, holding it like a ponytail, like right here. And I'm right at where her occipital starts and her crown ends. It's okay if it's a little tight now. So then what you're gonna do is I have my hand, my fingers right on her scalp and I'm gonna take it, wrap it up and twist up with the hair. Doesn't matter which way you go. You can twist this way, you can twist the other way. One is going to be twisted in like a French roll and the other side is going to be a little bit smoother. I find if you keep your tension first when you're doing this and then pull it out later, you'll have a more blended style for the sides, for the front of the back. Okay, so I'm gonna twist up that way. So twisting up like that and just place the hair on top of the head so it should look something like that. And then I'm going to take a clip and hold this hair up and a clip here and hold that hair up. So my bobby pin base is. I'm going to be taking my bobby pins, pinching and pulling some of this hair and touching the scalp with it. Because I have so much teasing there, I don't need much. If she had heavier hair, the ponytail elastic would be showing a little bit here. So you would be able to like pinch and pull the hair to cover it. But I'm gonna do the bobby pins, so taking some of that ha. And I only do about three to four bobby pins. Make sure you get one at the base and it's gonna hold. Then before I start securing this area, I'm gonna work on my sides and just making sure that it's really blended. Add any texture that I want to add in there. If any pieces are sticking out, tuck them back in. If it got too flat, pinching and pulling that volume back out. So basically, I want my whole crown area to be nice and secure and how I like it before I start working on the lengths and Creating my bun shape. If you feel your base moving at all, you can just start adding more pins. Then I'm going to come around to the sides and make sure I do a thick 360 around to check to see what's going on with the front. Make sure we're sitting in proportion with our crown area. And I think our shape's looking pretty good. Then I'm going to turn on my curling iron to make sure that it's heated up in case I need to touch up any of these pieces and for my face ring. Okay. So now when I'm here for the lengths, I'm going to stretch out the hair. I like to do this in two sections, so I guess I'll show you on the side. Okay. So I like to do this in two sections. So I'm going to split this up and to. Since this one is going to be showing from the front, by splitting these up, I'm going to have more texture in this style. What I find is it looks funny and like one of you guys was saying it looks like a, like a basketball player or something or like an athlete from the front and it just looks like flat and weird and funny. So what I find happens and why it looks like that is if your section is just flat, if your section's flat and you don't have any twists in it, it's gonna appear funky from the front. It's gonna look like an alien shaped bun. So we want to add some texture in there. So by adding a tool twist just like that, I do one going in the same direction. And then this one I'm going to go in an opposing direction and place it on top. So we're going to add some soft texture powder so that way it has some grit to the hair and our bobby pins have something to hold on to. And then you're going to lightly twist the hair and push it up high on the head. So I'm going to use my open pins to hold it up until I find my shape like that. And then the second section, I'm going to go in the opposite direction. So this one is going to go over top. So this section is going to fill in any gaps going on here and start creating more volume and height in this area. By going in opposing directions, you create more texture. Using my open U pins to hold it in place, your lengths are going to be out, but that's okay. Leave them for last to secure. And then you're just going to want to double check your shape from all angles. Before you start adding in your pins, it make sure that you're cleaning up any frizz that you see as you're going with your wet spray and your fork comb. Because if you leave it for later, it's still going to be there. You can't fix the frizz at the end. You got to fix it as you go. I'm going to start placing my pins always inside the hair. And keep your pins closed. Once you feel good about your shape, you can remove your open pins and place bobby pins. It might start looking flat in this area when you're manipulating hair and adding your pins, but it's okay because you can always pull your volume back out with your fork cone. I want to add more movement here, so I'm just going to curl these lengths back up. If you want it more curly texture in the top of this bun, then I would go in with a 1 inch iron on this. And then just checking your shape. I want more volume here and create a little bit more roundness. So that's why I'm pinching and pulling these sections out. I'm literally taking these fingers and just raising up the hair. Because you have texture powder in the hair and in that whole section. Don't be afraid. It's gonna hold like it's not gonna move. I promise. You can bring out your volume up and start adding some shine. And then I'm just going to curl up the front. Curl her face frame. Always hold your iron vertically going away from the face. And then remember, we always want to brush out our face frame. So I'm taking my four comb and just stretching the hair out and pushing it forward so that it's nice and soft. Gorgeous. Do the same thing on the other side and you can add a little bit of finishing spray and then go around and check your bun from the front. Oh, so pretty. I'm just perching up. I don't know which other. I know I just spoke a different vibe. I think you like the piece. Yeah. Do I like the shorter pieces? Do we like just those pieces? I like when you have a lot in the front. But that's just, I mean, a mean thing. I don't know what's like. Yeah, I do like the hat too. I was seeing if I liked just the short piece or both with the long. And I kind of like the long. If her hair was any longer. No. Yeah, like, that would. I would leave that in the long. It adds like more of a romantic feel. Yeah, it's more like whimsical. Okay. I'm going to turn her around. Cool. Jeez. Who am I? That was so pretty. Okay. I need a husband tonight. Wow. Who am I? She's so cute. All right, I'm gonna have you do a spin so we can see the full thing. Oh, my gosh. Gorgeous. I feel famous. I feel like Kim K. All right, so this is the Twisted High Bun. We're going to take some videos of this, some videos and photos. But that's going to end our live today. I hope you guys had so much fun. I'll see you later.
More from Marissa



7 Lessons I Wish I Knew In My First Wedding Season (I’ve Now Grossed $728,000)