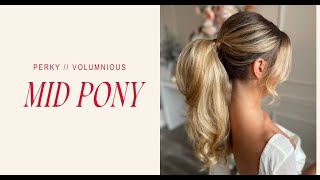
Marissa Brennan walks through how to create a mid-height perky ponytail with volume. She covers sectioning, teasing, curling, and securing the style, keeping it simple and elegant for bridesmaids or everyday wear.
Hey, we're back. We're gonna be doing. I took out her low bun because like I told you guys, today is special and I'm giving you two for one. So I'm gonna be doing a mid height pony and I'm gonna start exactly where I would start, as if she showed me a ponytail inspiration photo. So I quickly took those out. The only thing that I did that I wouldn't have done is she had a beautiful face frame. So I'm gonna do a ponytail with some face frame. So. So what I did was I just kind of clipped that out of the way. So that's already out of the way for me. We're keeping it with the middle part and I'm keeping my height exactly where I would do for the middle pony. Okay. She just has beautiful ponytail hair, guys. Like, I couldn't help myself, to be honest. I just, I couldn't help myself. Okay, so where. Where I used to go wrong with ponytails is over complicating it. We don't want to over complicate a pony. It looks really simple because it is. So keep it simple. Okay, so ponytails, if you're feeling like you have a saggy ponytail at all, that's likely because you're not adding enough volume in. So I'm going to show you the technique that I like to do. It is two ponytails. So I'm going to start out with the first one. So first thing you want to do when you're doing a ponytail is deciding where you want your ponytail height to be. So I'm going to turn her on the side and and show you the four most popular heights on where you can put your ponytail. So the most proportional again is you're going to want to keep it in line with something on your client's face. For a super high pony that she wants to see from the front, you want to keep it in line with the eyebrow. So draw it up. The second place that you want to keep it is like a mid height. So that would be in line with like the corner of her eye, like where you would do like a wing liner. Keep it in line there or keep it in line with the cheekbone. So going a little bit lower, kind of like mid ear or keeping it low on the nape. So those are the four points that I'm gonna put a ponytail. It's gonna be most proportional, most balanced. Today. I'm gonna keep it in line with like the top of her ear, so her cheekbone. It's gonna be like a mid height Pony. I don't want it to be a saggy pony. I want it to be nice, perky pony. And I'm going to curl the lengths just up a little bit. So now that I know where I'm going to put my ponytail, I'm going to create the first one. The first one, I call it, like the anchor pony. And then what you're going to do, what I used to do was create, like, do my half a base like I would for a bun, and put all these pins there and then build my pony. But what happens is you get all these lines and you get all these depth marks. I want this to be super clean, super smooth. So to keep it super clean, super smooth, I'm not going to be using any bobby pins. I'm just going to be doing ponytails. So now that I know where my height is, sectioning out my first ponytail. So I'm literally dividing this hair in half horizontally. So dividing it in half horizontally like that. So sectioning out the hair halfway. This isn't a super clean line because I do have a lot of product in her hair from the bun, but you guys get the idea. So I'm going to clip this one out of the way. My ponytail is going to be like, this is where all the volume, my teasing, all that is going to be within my ponytail. And this is going to be basically, like, where I'm gonna keep the height of my ponytail. So it's the anchor. So I'm gonna get all these little hairs out of the way. So remember how where you pin, you need to have a little bit of teasing. So I want to have a nice, clean base, and you can kind of use it as like a. A guideline of where you're going to put your bobby pins. So I'm going to take a soft texture powder, and I'm just going to open up the hair a little bit and add a little texture powder right where I'm going to be placing my elastic. Then I'm just going to lift the hair up and tease it a little bit so it has something to grip onto your ponytail itself. Your elastic. You're not going to want to use a regular elastic like this because it's too short. You're not going to be able to stretch it and wrap it around enough times that you need to. So I actually like to use a rubber band with the two bobby pins on either end. You can use a bungee like. Like this, A little bungee. But I personally don't know how to use this. I'm the problem and it's me. I just mess it up every time. So I don't use them. So I just keep it with my tried and true. I'm gonna use two of them. One is a smaller in length and one is a larger in length. The larger one, the longer one, I'm gonna use it to wrap around more time. So I need it to be a little bit longer. So that's why I'm going to use this one on this ponytail. So you're going to gather up your hair and you want it to be super clean. So gather up your hair and you want to place it exactly at the height of where you want your ponytail to lay. You could take your silhouette spray non aerosol and clean up the hairline like that. Now, the most important part for your ponytail is how you hold your hand. So watch how I hold my hands. I don't want to hold it like this where my palm is on her scalp. You want your thumb to be on the scalp. So also, if you notice your ponytail is sagging, it's likely how far away your thumb is from the scalp. See how far my thumb is? That's going to cause my ponytail to sag. If I want it to sit up, I'm going to need my my thumb to be touching the scalp like that. So if my thumb's touching the scalp, my ponytail is going to sit higher. It's naturally going to drag down if I'm hold the way that I'm holding it. Okay, so I'm just gonna dip your head back a little bit. Put this up. Yeah, that's perfect. Thank you. So because I am short to get that stand on my tippy toes, ask your client to dip their head back a little bit. And I want my thumb right on the scalp. I'm taking my bobby pins and I'm placing it horizontally above my thumb. So I'm placing that in horizontally above my thumb and placing it into that tease. And I'm going to take it underneath like that, stretch it around like that. Then you can drop it. The second bobby pin you can place on top of top of your other one. Again horizontally. It's more comfortable for your client if it you're putting your pins in horizontally versus vertically like that. So now underneath, you don't want it to be completely smooth. You want to round out the shape of the head. So right along the ponytail holder, pinch and pull it out and release any tension. And this will give it a natural shape like that. See how it's already sitting up? Nice Perfectly pony. So now, as you guys can notice, even though I'm going to have curls on the length of my hair, you want to work smarter, not harder. So I'm just going to curl the lengths of these hair. Of these hair. It's been a long day, you guys, so I'm going to split this up into maybe two or three sections. I'm creating horizontal sections and I'm going to curl these lengths. If I was going to do a glam wave ponytail, I would curl. I would do my twist, wrap, curl, but I'm just gonna add like a soft, nice little bouncy kind of a curl. Just something quick to show you guys. She already has a lot of product on her hair, so that's why I didn't take any hairspray. So now to reinforce it being a perky ponytail, I'm going to start teasing right at the root about like an inch to 2 inches from the root like that. So I'm going to take a little bit of texture powder right at the root. This is a soft texture powder. This is my bottom layer. So I'm going to tease on top. If I teased underneath here, it's going to be all messy. So just like that, and then I can kind of curl it out like that. I'm gonna be creating the ponytail kind of as I go by, like airing out the shape and getting that nice long curl. So I'm going to do about two more sections in this first ponyt too. I'm just doing a full curl. This is a 1 inch iron. When I use. If I. If she was showing me a photo where there was texture in the crown area of the ponytail, I would have curled the whole head. But typically the ponytails that I see, it's a cleaner crown. So this is what I would do for that. If I was to curl the whole head and then do this, you're stretching and playing with the hair too much. So it's gonna flatten out your curls, especially on the lengths of the hair. And I feel like it takes a lot of time to curl the entire head just for those curls to flatten out. And then you have to go back in and touch up the lengths of that ponytail. So this is just a simpler, simpler way. Okay. So then I'm going to take this whole section and add some texture powder right at the root, and I'm going to tease that up to start reinforcing height in my ponytail and make it a nice, beautiful, perky pony. That's not going to be a saggy pony. Later on like that. And then I got my last section. Yeah, I'd rather work with this ponytail and start curling it and teasing it first than connecting both ponytails, like bringing this one over top and then doing it all at the same time. Because I just feel like it saves me on time. And I'm able to get more height in my ponytail here. I'm just holding my curl up to let that heat release before I really drop the curl. You can comb it out a little bit. Nice bouncy curl. And then I'm going to pick up the whole section again, add a little bit of texture, powder. Honestly, if it's a. If it's a regular ponytail and not a glam wave ponytail, and I'm running short on time and a bridesmaid is sitting in my chair and she's like, oh, I don't know if I should get a ponytail. I'm like, do it. Do the ponytail. Because they really don't take me that much time. And it's just a good timesaver. And also I try to get my clients who have thick, heavy hair to do ponytails versus a low bun, you know, because they just look nicer and it's way quicker. So what you don't want to do with a ponytail is keep it all here in its shape. You want to take these two fingers and again kind of air it out and make that ponytail nice and thick. Taking my 4 comb on the lengths of the hair to make them look fuller. Nice bouncy curls. Stretching them out and then just kind of airing it back up, adding a little back comb. Beautiful. Already got my ponytail done halfway. See how easy that is? Okay, so the second ponytail, this is where I would section the front from the back. I would do the same thing I did in the blow bun and add teasing in my crown. Add some tame wild, some thrill fiber gum to get that shine into my ponytail. So I'm just taking my fingers and kind of separating the hair, adding some nice natural texture. I've already picked out my face frame pieces, and what I'm gonna do is now connect both ponytails together. So before you start doing this part, I recommend having this already together, having your rubber band and your two bobby pins. Because once you have this all nice and neat, going to want to go in real quick and secure it. So I keep this in on one of my pins right there. And what I'm doing is I'm taking my non dominant hand, placing my palm underneath that ponytail here with my thumb over top. And I want to add More of like an airy texture with a little bit of a swoop. So that's why I'm using my fingers to kind of pull this ponytail back. If I wanted it super sleek, I would do this with a comb. But I want, like, some nice, airy texture. And again, you want to have tension first, so it's going to look tight at first, and then I can pull out my texture and volume later. So we're connecting both of these ponies. I'm just going to tilt your head back a little bit so that way I can get my thumb on the scalp, keeping it super connected. Tippy toes. Thumb is on, Thumb is on the scalp. And I'm putting my bobby pin right, right over top of it. Just like that. Taking the rubber band underneath, stretching it, and then letting go, and then taking the. The bobby pin, putting it right over top, actually. Beautiful. So it looks pretty tight right now. Oh, my God, look at that volume already. It looks kind of flat right now. But I'm gonna pull out the texture in a minute. So what you're going to want to do is I want to pull it out now. If I was to to wait when I get up here, because I use so much teasing and product there, I'm not going to be able to really pull. So I'm going to pull it out a little bit. Now start a little bit at a time, taking these two fingers. And I'm going to show you guys just literally starting right at the root area, just like that, pinching it out just to add. What I'm looking for is to create that half moon shape here. So I'm just pinching and pulling it just to show you guys. Just like that. Starting small, but it's going to start creating that. See that height already starting to come out just like that. So I'm going to do that all over. I want to create a little bit of a swoop here. So I'm going to pinch and pull it out. Now, this wouldn't work if I didn't have any teas underneath there. So you definitely want to make sure that you do take the time to tease this out. And then you can come to the side and check your ponytail, looking super cute. And I'm gonna take it on the side over here and check. And that's looking really cut. Okay, so now I'm just going to quickly pick up all this hair from my top ponytail, section this out, and add our curls in here. So this is probably going to be about three sections. You don't want to Clip this hair on top of this hair too much. So I just kind of like to place it there. I don't want to disturb anything that I have really going on there. On the top where I pulled out my volume, these lines don't really have too much product on it. I can kind of feel it. So that's why I added a little bit of my hairspray. And we're just gonna add in our curls. For a bouncy pony like that. Bouncy, like lack of a better word, like Barbie curl pony. I like to just do the 1 inch and really get my ends tucked in there. And I'm curling in, like crawling in towards the center. So that way it's like away from the face. So I was like, I won't be sicken, but I'm scared. And hold it on for like 5 to 10 seconds until the heat is really through the hair. When you get up here, if you guys can see, these sections are a little bit on the side and my original ponytail is in the middle. So I'm not going to pull these sections together. I'm going to kind of work with them one on one when I start doing my teasing. So I'm going to lift this up, add in my texture powder, and just tease these sections not in one, but on the sides. It's going to add width. My pony. And make it super cute and full. When you're teasing on these sections, make sure it's really close to the root area. So that way your height again is coming from the root. I'm going to comb out my sections. I don't want to leave them in like these sausage curls. We want it to be nice and soft like that. Okay. And I'm going to do about two more. Like this section is laying on top like it's not split how the other one was where it was kind of laying on the sides. So I'm going to take this all in one and do it horizontally. This is going to add a little bit of volume. I start to get to these top two sections, I want it to nicely lay on top kind of in the center. So that's why I'm doing a horizontal curl versus a vertical. How I was doing here. Cuz this is going to lay really nice in the center and give me a good bump. Or at least that's what I'm envisioning. These GHD irons are great. However, they turn off so easily. My iron was off after like an hour. They turn off. Me in high school wouldn't appreciate It I burned so many rugs at my mom's house. Anyone else? Yeah. Yes. Okay, then we're gonna pick this whole section up. Texture powder as my guideline. So I want to tease this whole area that way. When this ponytail lays down, it's got height from here. So can we see that? So I want it to lay like this. So I'm going to need to tease all of that area starting really close to the root and tease that whole area. See that? I'm shaping the sides, cleaning up any teas that I'm seeing on like these side sections because we want our ponytail to look good from all sides. And then I'm going to work on this top section. In this top layer. Usually have like their shorter pieces from maybe an angle that they have or any layers. So I'm going to split this one up because I want to make sure that I get all those little pieces really curled and tucked. But it's also nice because it's going to add more dimension and more bounce in my ponytail for the top around, holding it horizontally. So that way it stays really nice in the center of my pony. All right, so I'm going to take this whole section and I'm going to split it in half so that way I get the most amount of volume. Volume at the top. I'm going to split it in half and tease in two sections. Cuz it was a little thick. And that's okay when I'm curling, but for volume I want it to be super high right here like that. And again I'm keeping it really close to the root and I'm teasing about 2 to 3 inches out so that way I can get that nice height. See, look at those short little layers. That's why I wanted to really make sure they were curled because they bounce up so pretty when it comes over top. And then this piece right here is kind of staying in the middle, but I want to pinch and pull it to create like that half moon shapes. And that's looking so pretty. See how easy that was? Now we're just gonna cover our rubber band. So I'm gonna take hair from the bottom. You don't want to take hair from the top because like I said, that's usually the shorter pieces. You don't want it to be too thick. Let's leave the thick hair bands in 2012. So I'm gonna take some of my non aerosols for right. And I'm going to hit that whole section to kind of smooth it down and clean up any frizz from it. And I'm going to just wrap this around my ponytail. Wrap it around? Yeah. When you have about an inch or two left, what you're going to do is push your pin through like this. Push your pen through. Then I'm going to take these lengths, wrap it around the pony, and then I'm going to tuck it. Tuck it in the opening like that. And then I'm going to push that in the hair. So that's what I'm doing. And it was at this moment I realized my piece was too thick, so I'm going to redo it. It's just a little too thick for me, so I'll just put that in here. Tucking that up. I'm just going around and checking my ponytail. My rubber band was sticking out a little bit, so I was just covering it, cleaning up any frizz that I see. And we're going to start to add some shine. So I'm just going to add a little bit of my shine spray. Shake it up. Lift your ponytail up and spray underneath so you can add a lot of nice shine. But wow. Don't be afraid to lift up the lengths of your ponytail and hit it with some shine spray. I'm just going to do one more check from the front to make sure I like my shape. And I do. That looks so cute. The face for a pony. Gorgeous. Okay, I'm going show you guys the front. Oh, that's fire. That's so cute. We love. Oh, wait, can I have you take your toes and do the spin around? Yeah, can you spin? Oh, there we go. Boom. Oh, we love that pony. That's so cute. And that is the quickest pony ever. So this is why I love to do this for bridesmaids. Super simple. Keep it simple. If it looks simple, awesome. We're gonna take pictures. I'll be back in a minute, and I'll show you guys how to take pictures of a ponytail.
More from Marissa



7 Lessons I Wish I Knew In My First Wedding Season (I’ve Now Grossed $728,000)