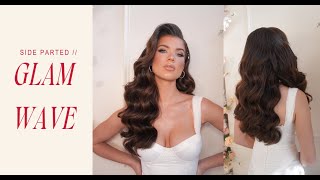
Marissa Brennan walks through creating a side-parted glam wave with clip-in extensions, using Bellamy 22" silk-seam clips in double layers. She covers sectioning into 2" structural pieces, curling with a 1" barrel clamp iron at 390°F, and shaping with backcombing and sprays. The whole look takes about an hour.
Questions this video answers
Bellamy (silk-seam clip-ins).
22 inches.
Dust It by Oasis.
Silhouette (non-aerosol).
Oasis 3 shaping spray.
Hey, we're live. Okay, guys, this is the demo part of my class. I'm gonna turn Gabby around. It's my beautiful friend Gabby. Hi. My friend Carly did her makeup today, so she's gonna be my model today. So first thing I'm gonna do is I'm gonna put extensions in her hair, and then I'll walk you guys through, like, the layers and sectionings of that. The extensions that I have today are Bellamy. I'm going to be using two different hair colors because Gabby has this beautiful natural brown, but it's a little bit lighter and darker tone. So I'm going to throw in a light color and a darker color, so that way they'll mix in her hair beautifully. And as you guys can see, she has super long hair. You would think, oh, she doesn't need extensions, but she does. Just remember that we always use extensions for a glam wave, so it'll get pretty sparse down here when I'm building up that glam wave. So I'm going to apply these extensions first. Get all my stuff. I was already brushing Gabby out. The instructions that I gave her, I kind of went over with you guys in theory. Like, I had her wash her hair the night before, so her hair is clean and dry and smooth. So this is ideally how I tell all my clients to arrive for their appointments. Whether they listen to that is up to them. Okay, so I like this. This is a. It's not a 10 piece clip inset because I believe it's only like eight pieces or no, it's five. These are the silk seam by Bellamy. So when I'm applying a five piece clip in set or ten piece, where it's just not one long section of hair. I'm going to start at the nape and get my texture powder. So I'm going to use a texture powder at the root. This is the Dust it by Oasis. You want to add more grit to the hair. Sometimes I used to just do a regular tease on the root and apply the extension that way. But I'm actually going to be doing two sets of extensions, so I'm going to double them on top of each other. So I really want to make sure I have a good base because I figured I would show you guys that fun technique. Apply these extensions. I'm going to start out with a two piece set or the two clips on the bottom of the nape. So that was my lighter color. Then I'm going to take my darker color of the two clips as well. And you're just going to place this right on top of that extension set. I'm not teasing that extension, I'm just placing it right on top. This is going to help me be able to put more hair in without it getting not enough space on. Like cuz if you have all these clips, we're not going to have enough space to put it on the whole head. So that's why I like to double. Just going to adjust this one right there. These are new extensions. So if you can see like this is the one piece and these are the other ones. So I'm just going to trim that as I go. These are 22 in extensions. Always have a pair of scissors in your kit that are like junky scissors that you can use just to cut extensions. And probably tell your client before you bring out a pair of scissors that you're only chopping the extension hair and not their own hair so they don't freak out. When I'm cutting extensions, I'm usually point cutting. I'm not going straight across. When you point cut, it's going to have a more blended line on the extension. So that's row one. I'm just going to take this up the head. Section two is where I'm probably going to. I'm going to use either a four clip or a three clip. You can test it out. I wanted to go all the way around the head so I feel like we can use a three clip here. Then when the head starts to get wider, I'll use the 4 clip. So we use it to gray. I'm just back combing right at the root, right where I applied that texture powder. I'm going to take my three clips and that's the lighter color. Then I'm going to do the darker color 3 clip right on top and I'm just going to trim those little bits at the bottom of the dark. In this next section, this is going to have a little bit of the front of the ear. So with a glam wave, the most important parts are the front. So when I say that like the ear is in it. So today's demo, I'm going to do tucks behind the ear on one side. I'm going to show you the front variations before, but I'm going to wind up with tucks behind the ear and then a section in the front. So I want to make sure I have a lot of extensions on that one side where I'm doing the hair in the front. So when I'm doing my set, when I'm placing my extensions, when I start Getting into the front of the head, I really like to go with the rounds of the head. So I'm going to apply my extensions all the way up to the ear to get in the front. So I'm going to be going with either the five piece clips or the four piece clips and I'm going to double them on top of each other. Typically when I'm working with like a 10 piece clip and set, I like to keep them pretty low. And so like I'm almost hitting the crown here, so I'm not going to take my extensions up that high. When you take your extensions up that high, you're going to start getting into where you're going to be teasing later on. So I don't want to mess that up with an extension. So I'm not going to be able to tease over top of my extension. Then it's going to be harder to hide them later on. So I'm going to be taking these right by the ear and clipping them on. I'm going to take my lighter color right over top of that. These are blending really nicely. And even though I place that clip in right on top of it, if I pull on it, it's still staying in the hair. So it is super tight. Because we know our brides be wilding out dancing. Gotta make those extensions tight. So can you guys see how much fuller the bottom is starting to look once we apply just those extensions, maybe cough in this whole class. I know it. I didn't even start with the spray. Okay, so my extension stopped right here. I'm getting into the crown area. So at this time I want to figure out where my part is going to be. So I'm going to turn her around. Now where I'm going to be ending up for this style is on the side. So I want to figure out which side we're going to go. If you want to figure out where your client naturally parts their hair, brush all their hair back and take your hand and push up the hair and see where it separates so it looks like hers is separating in the middle. So I can decide which side I want to go on. It looks like typically your client will tell you like if you were to go to the side, which side part would you go? This way. Okay, so we're going to go this way. Now if you guys remember in the theory, the easiest way to find the most proportional side part for your client's face is to use the arch of their eyebrow. So I'm going to find the art. It already went There. I mean, because her hair is perfect. So it's right at the arch of her eyebrow is where my side part is. So I'm going to keep it there. That's going to be most proportional for her face. Now, why do I want to know this? Because I don't need to up, like put a bunch of extensions more up here. I'm going to be focusing my extensions over here because this is the section that I'm going to be pulling to the front. So I want to be putting more extensions here versus here. So when I'm back here, I'm gonna do maybe one or two more layers of extensions, but it's probably not going to need any more of that. This will probably actually be the last row of extensions I use. You don't need to use the whole pack if you don't need it. So I'm just going to apply my texture powder. You can use a pump texture powder. I'm just using the dusted because that was all I had. You know, we're going into the end of wedding season. All my products are used. Okay. So then I'm going to take my four clips. This is the lighter color and I'm going right up on the side near to the face because this is going to be in the front. So if you're a client doesn't have a lot of hair and you really need the extensions for a lot of extra body, make sure you front load those extensions on the side that's going to be in the front. I'm going to take this one and apply it right on top. Okay. Now I'm just going to double check that these extends, extensions are all the same length and see if I need to trim anything. Now, likely when your clients, if they're bringing new extensions, they're fresh, so they've probably never worn them. So you need to trim them to your client's hair and get any little pieces that are longer out now. And that's looking pretty good. Then you want to kind of check it in the front and trim any little bits that are longer. Okay. Now that I have all of my extensions applied, I wanna number one, I want to apologize for be coughing for the entirety of this video. So I want to say that first because it just keeps getting a tickle in my throat from the hairspray. Oh, my gosh, I'm a trigger. Okay. So once you have all your extensions applied, then you can start to determine what products, tool and glam wave technique you're gonna do. So I want to first show you guys two different techniques. The one that I use for someone who has fine, virgin hair and also for someone who has thicker, coarser hair. So Gabby's hair, she has finer hair, but she has a lot of strands. So what does that mean? So the strands are finer in density. It's not coarse or thick, but she has a lot of those strands versus somebody who has a coarser texture. That means, like, it's a little rougher to the touch. And you typically, those people have a lot of hair strands. So I'm going to be using the technique for her that I would use on somebody who has coarser, thicker hair. So first thing you want to do is actually feel your client's hair. What does it have? Instead of, like, they show you the reference photo, and you just go right to work. You want to, like, feel the hair. Like, what kind of hair type, texture, density is it? That's going to determine your products that you're going to use. And also the first thing you want to do with a glam wave is figure out your parting. When you figure out your parting that you're going to do, that's going to determine the rest of the glam wave. So I want to show you guys those three different front variations. The tuft, middle, front, and the side part. What I would do in the sections, and then I'll get into the glam wave. So let's say she wanted to do the Kim K remix tucked behind her ears first. What you're going to do is she can do it with a side part. So I'll leave it on the side. You're gonna pull out that part line of what you want to tuck, and you want to put that away first. So I'm going to show you guys how I like to do that. So let's just say she's doing the side part. So you want to pull out what we want to tuck. So use the ear as a guideline. Right at, like, the middle of the ear, we're going to be drawing a line. To keep that line blunt, blend it. Do small little zigzags with the end of a foil comb so that it looks something like that. Just like small, small, little zigzags that will break up the line so it doesn't separate when you pull it back. So I'm going to tuck that out of the way. I'm going to do the same thing on the other side. So right at, like, the middle of her ear is where I'm going to go up and I can find it. On the other side and match it. I'm just doing small little zigzags. And the reason you want to do this first is because what I'm going to do, what I've noticed is when I first started doing this, I would just, I would do this first and just tuck it behind the ear. And I would use bobby pins like bobby pin this behind the ear. And what happens is those bobby pins naturally just push themselves out because it's too thick of a section and they show in photos. So instead you want to pull all this hair up and we're going to rubber band it underneath. So if I was to not do this first and do a beautiful glam wave, I would have to pull up that glam wave and mess it all up. So that's why you want to take care of the parting first. When you're doing that, tuck behind the ear. So I'm just tucking this really nice and tight behind the ear. Really nice and tight. And then you would take a small elastic. I usually do two elastics just in case one breaks later on. You got two. So take two elastics, bring it to the middle and just tie. So this hair underneath is going to be totally hidden by all this hair on top of. And then you would let it down. Now I didn't make this perfect, but it would look something like this. So this section is going to be blended and it might cover a little bit of the ear, but it's going to be really nice and blended. If I what if this was the end result that we were doing? I would have backcombed these sections a little bit, taking some tame wild to it first and then tied it. So now one of my sections look like when I'm doing this glam wave tucks behind the ear. So remember when I Talked about the 2 inch tall sections? That's what I would take here. And I just want to show you guys how it would look when I start weaving for this one. So you find your 2 inch tall section and then what I do is I split it in half because remember with the tucks behind the ear, it's going to go away from the face. So this section I'm going to curl this way and then this section I'm going to curl that way so it would look something. I'm going to twist wrap with my 1 inch long barrel bio ionic doing a vertical hold. And this I curled away from this shoulder. I'll just show you guys what it'll look like. And then this one is going to go in the opposite direction. And I just want to show you guys how I would blend this one. And I do the same technique all the way up the head. So that way it's nice and even on both sides shoulders from that front visual. So it's going to separate a little bit there. So how you would blend it for this is I'm going to take my wide tooth comb and just brush it out lightly. You're going to stretch the hair, and then you're going to come underneath with the small teeth of the comb and. And start gently back combing. And you can start to bring this section over top. And it'll look something like that. So it'll start to blend together. So this is the technique I do for the tucked behind the ear. Now let me show you my sectioning. If she wanted to do a middle part and keep both pieces in the front. So I'm going to take this one out, take that one out. So for a middle part, I'm gonna park it in the middle. So for a middle part where I went wrong doing that was going all the same direction. So a glam wave, right, is you're going all the same direction, or what happened is one is going to be towards the face and the other one's going to be away from the face when you pull the lengths in the front. So instead, you always again, want to go away from the face when you're curling. So what I wound up doing was I started creating sections that are more. So I'm going to pull out the sections that I'm going to keep in the front first, and I'm going to work in the back and on the front at different times versus staying in one section and going all around the head. I'm going to pull out my sections for the front pieces and just work in the back. So this is the hair that's going to stay in the back. I'm at the crown, and what I did was I just kind of created a triangle. So let me see if I can show you guys that you're gonna have three sections. Yeah. One, two, three. So if you guys can see, it kind of creates a triangle. And this is right at the crown area. So, all right, here is no extensions, and that's where you're going to be able to put the volume. So that way it blends on the sides. So for this, I can curl and do either a horizontal hold and hold my iron this way, or I can take my sections going up the head and do a vertical hold. Now for the fronts Here. What I'm going to do is you're still going to split these up and work within each section. Like this would be layer one. And then I always take a vertical hold when it's going to be in front of the face. I'm not going to take a horizontal hold, because when you do a horizontal hold, it's pushing the hair towards the face. So it's going to wind up wrapping around the face. We want it to open up the face. We don't want to close off the cheekbones. We want to open them up. So you're going to take your hair and go away. So we're going to go on the iron this way. So I would do this on both sides. So this is what my sectioning will look like. And I would work it all the way up the head that way. And then this piece would be in the front, and then the other piece would be in the front. Then I would take this down and continue my sections up that way. Typically, when I'm doing the middle part, two pieces in the front, I work in this section first, and then I'll go side to side. So that is how I do the middle part. And we did the tucked one. So what I wanted to do today is the side, so that way I could show you guys how I get that nice height in the front. So I'm going to rework my sections to do that one. I'm going to fix the parting like that. Okay. So once you have your parting again, this will determine your section. So a little trick that I like to do for myself to remember which way I'm going to hold the iron. So if this is our section that's going to be going in the front, we're going to want to all of our direction. Our hair is going to want to be over the iron this way versus this way. So you know when you're, like, going up the head and you're like, oh, crap, I forget which direction I was going. Maybe you started a new row, Start a new layer. What I like to do to remember the direction that I'm going to hold the hair on the iron is. Is right here. I'm going to pull out my fifth layer, which is the front face frame. So I'm pulling that out now and where it is. This is her high recession. Her high recession is kind of like here. So I'm going to go slightly above it and pull out all the hair there. I'm going to take this hair and put a clip here. So that way I know when I'm going in my sections. I just look for the clip so then I know oh, I want to go away from the face that way. Okay. So I'm going to be doing five layers up the head. So I'm going to start with my bottom layer. I'm in the nape. Each layer will have extensions except that top layer which is the crown. It doesn't have have any extensions. I'm finding my 2 inch section. A lot of hair, it just falls out. So this is about a 2 inch section. I'll be able to show you guys when we get up higher to make it a little bit more visible. So I'm going to brush my section out. Now remember, we need a lot of structural support in this stage. This is a our prep stage. So I'm going to use a non aerosol spray. I love the silhouette. So I'm going to use this one and I'm going to spray it on each section. My sections are about one inch. Once I added in all those extensions, the hair got pretty thick. So instead, like I said, when it's finer hair, you could take a half inch section. When it's thicker, do a one inch. So I'm going to spray. When I'm spraying it, I'm not staying in one spot and I'm angling my nozzle down. So you want to spray and move your whole hand and spray. You want to always comb it through so that way you can evenly distribute your product throughout each layer of the hair. Taking my 1 inch iron and I'm doing my twist wrap. So I'm twisting at the top and I'm keeping my sections really tight together. I don't want it to be too separated on my iron. See how they're all together? So if it's too separated, it's going to create too soft of a wave. Let it drop and you want to hold it until the heat releases. I like to bounce it up and down, let that heat release a little bit. Drop one inch section, spray. When I'm spraying, I'm spraying on the top as well as the bottom and I like to brush as well to help reduce frizz because it's going to be brushing down and taper taming any of those little flyaway hairs twisting at the top when I'm holding it on the iron. You want to make sure that your iron is parallel with the floor. So if you start turning it any kind of way, you're going to get a different kind of line in your wave. So if I was to hold it like this. I'm gonna get a different line at the top of the wave. That'll create a disconnection. We want that blended pattern, so make sure that it's parallel with the floor, and then release the heat a little bit within this bottom layer by the nape. It's usually about, like, four sections that I do. Just getting that on there. Twist wrap. When you're holding your curls on your iron, you want to be able to feel the heat through the curl. So I touch the hair to see how hot it is. If it's warm, that lets me know that the heat is going all the way through that section of hair. Because you have to remember when you're twisting, twist wrapping, you're twisting the hair, making that section thicker on the iron, so that way it gets more bounce. But you also need to leave it on the iron so that it gets hot enough through that section. Otherwise, your curls will drop faster. Because it's not heated enough, you're not putting that structure in the hair. And you want to hold it until it's pretty cool. You don't want it to be hot to the touch. And then release it. Otherwise, again, your curl section will drop very fast. And this is my last section. And brush that through with these ends. I tuck them up, and then I push my clamp on it to hold. Hold it that way it doesn't just drop out of my iron. Sometimes it happens, but when I push it up and my clamp is able to hold, just makes it easier. Feel that the hair is warm, and then I can release my clamp. So that was the prep stage of the glam wave. Now I'm going to enter into my shape phase. So the shape phase is when I'm going to need a shaping hairspray, something that has a little bit of a strong hold, but nothing that's like a finishing spray, because I want to reduce frizz, but I want to manipulate these waves to do what I want, which is create that S shape. I also want to be creating width within the hair, so I want to make these a little bit wider, and I want to stretch the hair. So I want to use a shaping spray. I use the Oasis actually, in this bottom layer, I want to show you the technique that I would use for fine hair. So for all the other shaping sections, I'm going to use the Oasis 3. Let's imagine this was fine hair. She has virgin hair. It's never been colored. She doesn't have extensions. It's difficult. But she still wants that glamoid Right. So that's where a different shaping phase is going to come into play. So this is the other kind that I use. So typically I would go in with my tangle teaser, but for finer hair, that's going to create too much stretch. So let's test the hair to see where it stretches. So how to test the hair? Pull up one of your sections and take your wide tooth comb and just gently brush through. Where is it landing? Like what's happening? Is it bouncing right back up? It is mostly extensions, but she also has really great hair. So extensions always bounce right back up. That's why I always love to use extensions. If it doesn't, if it's not bouncing back up and in between, each elevation is getting really stretched. And maybe it looks like that when you're brushing it. That happens with never been colored hair. It happens with finer hair textures. So you need to take a different approach with your sprays and with your brushing technique. So I'm not going to go in with a tangle teaser because that's going to stretch the hair too much and the wave is going to disappear. So instead what I would do is just use my wide tooth comb and I'm going to gently go through each section like that for fine hair and see they're all going to connect together. That's the purpose of this portion of the shaping, is to connect everything together. So to connect it together even more, I'm gonna lightly backcomb right at each ridge. So I'm going behind and I'm back combing at the elevations and it's gonna look a little frizzy. That's okay. So I want a stronger hold, but I want it to be something that I can manipulate. So I'm not going to use a finishing spray. I. I'm going to use a wet spray at this stage for finer hair. So I'm going to hit the hair with the wet spray. And I have time. It's not dry yet, so I don't need to immediately start brushing. It's okay. But I'm going to go in and just start gently stretching this hair out to bring it together. Finer hair really responds well for me with using a wet spray and this technique versus if I was to take the aerosol spray, it just kind of fall flat for me. So I feel like this brings the wave together better for somebody with fine hair. And then you can start pulling it to create even more width. Again, this is our foundational layer, so we don't really need it to look perfect because we have so many layers. That are going to go back on top of it, so it's okay. But that is exactly the technique that I would do all the way up ahead if it was somebody with fine virgin hair. This is really going to connect that hair together and not stretch it so much where you lose the wave and it disappears. Okay? So I am. So since this is our foundational layer, my other tip that I have for you that I like to do on this bottom layer. If the hair is more resistant into curls and waves, I'll do this up a little bit more. But I like to take the entire section and just where I tease, like right here, here, and here on those elevations, I'm going to take some texture powder. This is the powder cloud. Anything with a nozzle, like a nozzle spray, and I'm going to hit those sections underneath so that way it doesn't show on the top to give it even more structure, even more hold, so that way it doesn't fall apart on you. So I'm just lightly back combing where I put that texture powder. And then we're out of fine hair mode, and we're back into, like, coarser texture mode. So I'm going to be using my tangle teezer and my shaping spray. So I'm going to spray and brush that way to come into place, spray and brush, and start connecting everything together. That texture powder is really going to build a really nice foundation under there so that it doesn't separate so then you can pull the wave up, and it's just going to bounce right back. That was fun. I like that. That's cool. So it's going to bring it back out. Then I'll use my fort comb just to kind of work with these lengths a little bit. Again, it doesn't really matter so much at this point because I have so much hair coming back on top of it. But I'm a perfectionist, so I want to make them a little bit wider. This is also the layer where I'm going to put some finishing spray to give a barrier from the back and the hair. So remember, your client's going to sweat throughout the night, and it's going to get matted on the back. I want to create a barrier now, so I'm going to lift up this entire section, and I'm taking my finishing concrete spray. It's going to dry instantly, and I'm spraying that entire bottom line of the hair. Perfect. We created a barrier, so the hair is gonna. It's gonna take longer for the hair to start sticking to the Back. Perfect. Now we're on layer two. Oh, man down. Gabby, how are you feeling? Are you, like, super hot? No, I'm great in my studio. It is so hot right now because we're in front of a huge window and the sun is out. Please let me know if you get hot. Okay, so layer number two, I'm at about, like the mid top of her ear pulling out this section. So if you guys can see, I'm at like the top mid of her ear. We have extensions in here, so I'm just going to continue my twist wrap up this way. Brush your section before you start going in and curling. That's going to help you reduce fraction sprays and tangles. If I need a reminder of which way I'm going to be holding my iron, I can just look at the clip in the front. And I also always just like to start at that section. So one inch section. Take my silhouette spray moving my arm. So that way I'm getting spray here and all the way down, all the way down. Mandela, if there's any, like, wave in the extension, just take your iron and smooth it down first. When I'm twist wrapping, I'm trying to get as close to the root as possible. And really keeping these fingers tight. I don't want if you start coming down here, you start losing your twist wrap. So if you feel like your curls, your wave isn't as bouncy as you'd like. You're likely moving your fingers down when you're twist wrapping. So just as braiding, keep your index finger and your thumb really tight on that section. Just twisting at the top. Now I'm going to work my links through. And again, you want to hold it. It's usually about like 10 to 30 seconds you're holding it on. The thicker the hair, the longer you want to hold it on for that heat to come through and then just drop and let the heat release. You can either hold it in its place, you can bounce it up and down. I feel like when I bounce it, I don't know if it's mental, but I feel like the heat releases a little bit faster and you can let your section down. Why I prefer to do my waves this way versus where, like the biggest mistake I used to make and why my waves were always unblended and they didn't have that S pattern was in beauty school. They taught us that we had to set the entire head. And that's just simply not true. So imagine you set the entire head. This is what you. You do. You Set the entire head. You don't know where that pattern is lying. So when you go to take them out and you do the brush, you have no idea where any of these lines are in the hair. So you have no idea where that pattern is sitting Versus when I do it this way, I have a visual of where each ridge is sitting. So if one is out of place, I'm able to go in and curl correct it. Versus you can't tell on the head once you've set it and you've taken it out where the incorrect one is, because it's all. The pattern's already in the hair. So that's why I don't like to do the setting of the whole head. Like, some clients will still ask me, like, oh, will you set my hair on the wedding morning while I'm getting my makeup? No. No, I will not. I will not be 10. That. Because it's. It's honestly more time consuming, and I could unintentionally put the wrong pattern in there and not be able to fix it. So then I've done an entire hour of work, and I don't know how to fix my pattern. So with this one, it's kind of shaping as you go and you get to see where each line is hitting. And I know that they're all at the same height in the same spot. I also find that when I'm doing a vertical hold versus a horizontal holds, I just feel like it comes out more natural and it's more of that soft, glam, laid shape. And I'm also able to better know where each line is going to lay again, knowing where the pattern is going to be once I'm done. So that way, when I shape, that s pattern really comes up. Oh, wait, I could see some questions. Do you ever use a one for the style? No, Rachel, I don't use a wand. I always use a clamp. I'll show you on my next one. I've actually only ever used a wand when they first came out in like, what Was that, like, 2005? I don't know. It's a really long time ago. College. Yeah, I. That's the only time I ever really used a wand. And then I went back to my clamp. Clamps are just. They're my thing. But I'll show you on this section why I don't releasing my heat again once it starts to feel warm. Okay. So when I use a wand, I feel like I always get like those fish shell hooks on the bottom of my curls. So when I have my clamp one. I'm able to smooth out the hair if I need to. So any pattern that's at the top, like, I just washed these extensions so the natural wave of them came out. So I can smooth it out using my clamp. So that's reason number one. And reason number two, when I get to the end of my twist wrap this little guy, what happens is when you're using the wand, you just kind of pull it over my fingers. Unless I'm wearing that, like, horrendous glove that they give you that, like, adds frizz into the hair. This is going to create a fishtail hook because I'm holding it out because I don't want to burn the tips of my fingers off. So with my clamp, I can take these bits, push it up, clamp it, and then I can smooth that back in. So that way all of my ends are perfectly smooth and rounded, and I'm not going to lose the round shape of the curl wave at the ends. If I do use a wand, you're gonna get that fishtail, and your ends are gonna look straighter, so it's not gonna look as clean. Do they even still sell ones? Do they still sell wands, guys? I don't even. They do. Why? Okay, and this will be my last section here. So I have 1, 2, 3, 4. I have five rows in this section. When I'm spraying, I typically do, like, 1, 2, 3, 4, and then brush through, keeping my tension really tight. Don't lose your tension. Taking the tips, tucking them up, and then smoothing it through with my clamp and really trying to get tight to the root. The tighter you or the further you are away from the root, the more, like, length you're gonna have, the more stretch you're gonna have before your first, like, wave drop. Do you know what I mean? So right here, this is pretty smooth. So my wave is going to start here. If you want it to start up higher on the head, get really tight to the root and let that release. Make sure this is nice and set. And also what happens is, okay, say I wanted to set this hair. So I go and I push it up, and then I take my little clips and I put it on the hair, and I go to set it right. Number one, your sections are probably too, like, it just naturally falls. I don't know if you guys were able to see that. I'll pull it up a little bit closer, but it fell, so it doesn't actually sit on the root when you hit the clip. It falls. So that fall right there is going to interrupt this. We want all of these to be at the same height, and if they're not, when I brush it out, your wave is going to be all over the place, so it's going to be looking crazy. So that's why I don't set it with clips, because they all need to be set super, super tight, and it's just too time consuming to deal with that. So if I know that I want them all to sit at the same height to get that shape, I would rather just do this than set the entire head, because when I let this all go, can you guys see? I'll pull that closer, too. These are all sitting at the same height, and when they're all at the same height, they're all going to bounce at the same. That's the visual you want to see. If this one was sitting up higher, I would take my iron and smooth that out. If this one was sitting down lower like that, then I would go back in and recurl that. So you're able to fix as you go with this technique versus seeing it at the end. Okay, so this is my coarse hair technique for the wave, where all my sections feel cool. So I'm going to bring them all together, and I want to start stretching the hair, taking the wide tooth of my comb, starting at the bottom, and just lightly stretch. Stretching the hair, brushing it, seeing where it goes. Just like that. Perfect. It's okay if you get into your bottom layer. This one's laying on top. You're fine. So now what I want to start doing is back combing to start blending everything together. So I'm going to lightly backcomb my section just like that. And it might look a frizzy mess now, but we're going to start pulling that wave out. Together, together. I'm going to use my shaping. Oasis 3 spray. When you're spraying, you want to spray a little bit far from the hair. So I don't want to spray like this with my nozzle out. I want to spray down onto the hair. So I'm going to spray like that and then brush. I'm using my hand to kind of pull up the ridge of the hair, and then I brush down. So spray and then hold the hair brush down, go in the ridge, brush down, and brush down. This is where you're going to start to see it come out. This spray also adds a really nice amount of shine. The more that you use, start connecting everything together, looking super pretty. If your wave starts to look Funky. Like it's kind of disconnecting here. I don't know if you guys can see that, but I can just hit it with more spray and connect it more. This. This style takes a incredible amount of patience because it's a lot of brushing with the wave to get it to create that s shape. I am not a naturally patient person, so that's why these were so difficult for me to do and why I love them so much. Start connecting your wave. Don't worry so much about the lengths at this moment because you have so much hair coming back on top of, like, they don't need to be perfect at this moment, but now you can start to see they're all sitting at the same height. But if they weren't, I would be able to at this moment, go back and figure out where I need to recurl and go back in the lengths and just stretch them out. If it starts to separate anywhere, pull that together. And it needs a little bit more back combing. Add more back combing in. If it's looking too sparse, like too fine, too thin, you need to add width with back combing. And then we can just lightly stretch the hair into place and I'll start to come together perfect. So it's typically in this layer. I'm going to start pulling a section to go to the front. So I'm going to take one of these pieces kind of like right behind the ear, about 2 inches, like right here. I'm going to take this piece and start pulling it to the front of my wave like that. I'll actually be completely honest with you guys because I was doing that, I was like, why did I just do that? I typically would have done that first, but I forgot. So I'm to going be honest with you guys. I forgot. I would have did that before I started shaping it is what I mean. I shaped it and then I. I messed it up. But we're fine. We can fix it. Remember, this is alive. So this is actually what probably happens all my wedding piece. More spray to connect this section and start bringing that wave out. Okay, next layer, we're going to start to be above the ear in this third layer. So this section is pretty important because a lot of this for our side part style is going to go in the front. So we have a little bit of the crown in this section, but majority of it is going to be in our forest fourth layer. Okay. So this section, pulling out my section, I'm going to gather it all together and then I'm just Going to lightly comb it just to make sure we don't have any tangles. Subtree. Pretty thick section. Because I have a lot of extensions in this one. I think I have two rows of extensions. I'm actually gonna break it up a little. I'm gonna take this top layer of extensions. It was a little too. Okay, so now this is where I'm going to start bringing a lot of the hair to the front. So what I'm actually doing is I'm creating kind of a triangle that goes up to the crown. So this section here, I'm going to start splitting to go to the front. Can you guys see that? I'm creating, like, a triangle, like a diagonal line that goes to the top of the crown. So that's all going to be split to go to the front. So I'm going to curl this section first. This will probably be about three sections. Hit it with my spray. Get super close to the root twist wrap. I'm moving the hair through the iron so that way I can get my ends tucked up, peeling the heat through. My iron is on, like, 390. Yep, it's on 390. I like to keep it pretty high. That way I don't need to hold it on the hair as long and let the heat release. And that one's going to go towards the front. And then I'm going to split this into two. There's a little bit of a wave. So I'm going to use my clamp and kind of pull that out by the ear, tuck my ends up. See, that's why I don't like the. The wand, because I can just move that through and go back up and hold that on right here at her ear. So typically, what I like to do, if I want to get it tight to the earth ear, I hold my hand on their ear. That way I don't hit them with an iron. Knock on what? I've never hit a client with a hot iron, but I hit myself, and I know that it really hurts. So just protect your client's ear. Put your hand right there. We don't want no burns on the wedding day. And that's going to be my front section. All this hair is going to be staying in the back. Smooth the hair out. If you find that your hair is feeling too stretched out or your waves aren't as tight as you like, make sure that your sections on your iron don't look like that. That, like, with space in between, you want to keep them pretty tight. Otherwise, that's going to create too much length in between each row. Sorry if you guys are asking questions. Oh, Sierra, you're following along. Yay. I'm so excited. Are any of you guys styling on a mannequin or on actual people? Besides Sierra, that's pretty cool. Where are you at? Are you on level three? Around that. It's my bio ionic. Automatically turns off after, like, a certain amount of time. And it just did that. So it'll start to, like, not curl. I just turn it back on trying to keep up with you just behind you. No, I'm taking notes. Take notes in style later. That's my mo. Am I going too fast? So I feel like you can see now, like, how tall my sections are, which helps you get up the head faster as opposed to, like, those short sections that you use for a horizontal hold. I find it just takes me so long when I'm doing that technique versus this one. I don't know if it's just me, but every bridesmaids that sits in my chair just wants a glam wave now. So, like, I know some of you guys were talking about how it's, like, time consuming prep. Glam waves take me an hour. I was originally 45 minutes for a bridesmaid. This past year, I changed it to an hour for bridesmaids. I'm not gonna lie. Carly, you were the one who inspired me to do that. Carly is my friend who did makeup today. She's sitting over there like, is. Is it just me? I feel like every makeup artist does an hour for bridesmaids. Yeah. And they do an hour and a half for brides to two hours versus hair. Why are we trying to speed up that process? Once you do a wave technique and you see things, you can't unsee them. Like, I can't unsee that I need to do XYZ step now. So I'm not going to skip it. You know what I mean? So that's why it's taking me a lot longer. And I'm okay with that. I'm slow and I'm proud. So I upped my timing tip. Now, this year, I can do a wave in an hour. But here's my thing. When I'm doing a wave in an hour on a bride, I found that I run behind because when I'm doing her hair, I do my bride's last. The florist is coming. Somebody's coming to talk to them. Them, they need to get up or they're taking too long to get my chair. Like, they're going to the Bathroom or something. So I need to account for time into that. And also, if I'm super rushed, I don't have time at the end to really take pictures the way that I want. So why not add that timing in and do an hour and a half? So that extra half hour is kind of, like, going to be, like, a buffer for me with my brides. And also, like, brides are now handing me two packs of extensions. That's a lot more hair than I'm working with, so I need the longer time bridesmaids. I had a bridesmaid yesterday hand me two packs of extensions. I wanted a glam wave, and I was like. I'm like, all right, we're gonna do this. It took me an hour. Did I run over time? I absolutely did. I'm fine with. So just know after today, you might be seeing things that are like, oh, that's why this is happening. I need to take that step, or I need to hold the hair longer or I need to do that. Like, all these sections that I'm taking, if I'm holding the iron on each section for at least 10 to 20 seconds, that's going to take a lot of time. And at the end of the day, your client wants that result. So just take those steps to get them there, and I'm sure they're going to be happy about it. They're not going to complain once they have that new selfie on their gram of their perfect hair. So that was the long answer, but short answer, no. There are no shortcuts for the clip. And also, I can see over here. I don't think you guys can see as much because the hair is a little bit darker. I have to recurl a few sections, which typically happens. Actually, I know why it happened. Right here. This. This line is sitting a little bit lower. Can you guys see that? This curl dropped a little bit more because my iron turned off at that point. I didn't realize it yet. So I'm gonna recurl that now. So that way it sits up here sitting a little bit lower. So I just have to tighten up this curl and that other one. Do it now versus later. It's going to be so stretched out and, like, flatten out on this side. And this side of your waves will be super bouncy, and you're gonna be like, what did I do? That's what you did. Maybe your iron turned off. Maybe you didn't hold it on the iron long. Cat. Guys, I'm glad my coughing fit ended. It always happens See, look at that. It's a lot bouncier. Can we see? This one's a lot smoother, so I'm going to recurl that one, too. If you have any questions, I am able to see them, so you can ask as we go. And I'm trying to answer, but I will answer some at the end. If you don't hold your hands and hold the curl up enough, like, if it doesn't cool off, you will see that, like, droop down in your wave on that one curl. See, that's setting up a lot nicer. Okay, I'm gonna go in. This last section right here is by the ear. Let's see if this is still hot. I'm going to take my crimper, and you want to smooth out anything that's going on by the ear. Typically, we always tuck our hair behind our ear so we get that, like, natural wave right there. So you want to smooth that out with your crimper first. So I'm just taking light sections and going right in at the root. This is going to smooth it down way more than your iron could, because you can get closer to the root with your crimper than with iron. Curling iron. If you try this with your curling iron or probably clip their ear because you're gonna get too close. Your crimper has, like, a guard here. So I can get super close to the scalp with it. So you want to do that first. This section is going to be tucked behind the ear, so I'm going to start tucking it now. Start tucking it now. Because my wave doesn't need to be as close to the root. I can drop it down a little bit lower, hit it with my spray. If you take this too close to the root and bite it here, what's going to happen is it's going to be this weird kink in the hair, and you're not going to be able to get that out. So drop it lower to sit where all the other waves are sitting and be mindful of their ear. Place your hand there so that way you don't accidentally bump their ear with anything. Test to see where the heat is, and then you can let that drop. So because I've split my front from my back, what I'm gonna do is work in the front first, and then I'll come to my back sections. So I'm gonna take this section and move that away. Sorry. Is this on the. Is that better? Okay. I know. Perfect. Okay, so I'm gonna take my fort comb, and I'm Stretching the hair. This was my previous section that I forgot to pull in the front, if you guys remember. Okay, so I'm just stretching the hair with my fork comb right here to make the lens really nice. This is my second layer that I'm bringing on top. So what I want to do is, because this is really important, I want to make sure I have a good base there. So I'm going to hit it with some texture powder. After I stretch the hair out and taking my wide tooth comb and just stretching the hair to see what it does. So it's going to lay right on top of that. I'm going to bring it next to it so we can start connecting them. So I'm going to take my texture powder, take your nozzle one so that way you can control where you're spraying it. So I'm going to hit it at all these ridges underneath the hair. So 1, 2, 3, 4. And then I'm taking my small teeth of my cutting comb and I'm lightly back combing those sections. Lightly back combing. Make sure you get those ends and back comb them. Now I'm going to blend this layer with this bottom layer. So first I'm just going to wide tooth comb into them just like that. And then I'm going to hit it with my shaping spray. Get it right by their face so that you're not spraying your client's face. Put your hand there as a barrier and spray on the other side. Guys, I picked up the wrong spray. See what I did there? This is my finishing spray. I knew it as soon as I smelled it. It's fine. I'm gonna take my shaping spray, spray that section and it dries immediately. So you need to be a little swift with your comb. Okay, so brush, brush, brush. And we're brushing to connect these sections together. Perfect. Okay. Because I picked up that wrong spray, I'm going to add some shine with my liquid spray cuz it made that section incredibly dry. Okay, so just connect taking this layer and putting it on top of that layer and brushing them together, brushing them together. This is getting a little skinny here. So I'm going to come behind it, bring both sections together and lightly back comb. Then I'm going to take my fork comb and blend them together. Blend, blend, blend. Wherever the wave is, you want to find it on that bottom layer and just kind of move it into that layer. Taking my fork comb and I'm gently just going in the hair and lifting up. That's going to create width again. Your ends don't need to be perfect right now because we're going to go back in later and this is going to start shaping out really pretty, and we'll make a perfect layer. That's looking really good. All right, I'm going to hide this spray so I don't touch it anymore. Put it there. Okay? Okay. So now I'm in that back layer, and I'm going to pull up this entire section. And I'm working in one section. Take my wide tooth comb, Start at the lengths, and just start stretching the hair. Stretch the hair, Stretch the hair. Pull that one in. I don't know where he decided to go. Then taking the small teeth and really back combing your section together. If you find it splitting too much, go back in and back comb again. You need more structure in the hair. Okay, Shaping spray. Be swift with your brushing because it dries immediately. So you don't want to spray and take too long until your brush hits the hair. Spray immediately hit the hair. Do you know what I mean? Because we really want to spray it in to shape that piece, and it's popping out beautifully. Start brushing it into place. Spray. Am I brushing into my bottom layer? Absolutely I am. And that is fine because it's going to start connecting those layers. Layers together like a sandwich. When I'm taking my hand, I'm going in the ridge and I'm kind of popping it up and pushing this down, like to brush this hair down. That's what I'm doing with this hand. Anywhere that it's separating and not connecting. Go back in and re brush. This piece needs to be a little bit more connected here. See that gap right there? So what I'm going to do is I'm going to go in with my fork comb and just work with these lengths, and I'm going to tease it out to connect this piece together. Start connecting. Create width in the hair. You can even use if it's being super resistant. Take some wet spray because you can work with that. It doesn't dry instantly. We can manipulate the hair with that. That's like my working spray. And then I'm going to close off that gap again. I don't need it to be perfect right now, but I just kind of want to close any gaps that I'm seeing now while I can. That's looking really nice. Hit at each section with some spray just to like, tame any little frizzies that maybe you see. But I think that's looking really pretty. All right, fourth layer right here. So this is going to be this section is. Is. I'm sectioning it out about 2 inches above the ear. This is like 3 inches. I feel like 3 inches right here. So it's about 2 inches above the ear. So this is going to. This top layer is going to. I'm going to start working with it. When I get into my front fringe area, I'm going to clip that all the way. That's my, like, most important layer because it's going to be laying on top of all this gorgeousness we have going on. Okay, so first thing I want to do, gather my section into one. Get everything together, back comb, and I'm going to split my hair that I want to be in the front. Remember, I'm creating that, like, diagonal. So just follow the diagonal. You already created it and go up. So here's my diagonal line. I'm following up to the crown. This hair. I'm gonna blend it to go back here, but I'm gonna curl it in the front first. So I'm gonna do the hit it with my spray twist wrap. Keeping my sections nice and tight together, taking my ends, pulling them up with my clamp, holding it on. With these sections that are going in the front, I try to keep it as close to the root as possible. I'm not positive if you guys can see that right now, but I'm pretty close to the root. If I pull it too far from the root, it's going to drop down lower. So it's just going to create a different look. But I kind of want my wave to sit up high up here. This is my section for over here. Probably gonna have like four or five sections. If you guys haven't noticed, my belt really keeps me flowing smoothly. I absolutely love this thing because when I'm pro, when I'm working, I product layer a lot and I'm like combing through the section. So if I, you know, wasn't in my ideal environment and I had a table maybe in front of me versus, like, right at my side, I would constantly be moving to pick those things up. So it really helps keep me on time and helps me be a little bit faster having everything, like right at my waist. So I can keep like three full size products in here. I could keep like three hairsprays on the one. I keep my combs in this one. My tangle teaser is in here, and I can keep my phone in this pocket as well as, like, bobby pins and stuff. I just really love it. Oh, you're glad I made that mistake. You're welcome. Sierra, you're welcome. I made that mistake. So when I'm in this section, I have the crown of the hair in this section. So if you guys can see that this is her crown. In the crown is where you're always going to be doing your teasing. Right back combing. That's where we're going to be placing veils. So there's two ways I like to. So if your client has finer hair, remember the principle is that hair stretches very easily, so.
More from Marissa





7 Lessons I Wish I Knew In My First Wedding Season (I’ve Now Grossed $728,000)