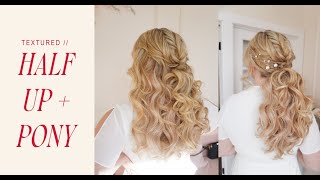
Kate shows how to create a textured half-up bridal style on model Michelle, covering extensions, a twist-wrap curling method, crown crimping, vertical teasing for lift, and pinning with open U-pins. She walks through product choices like Tame Wild texture powder and cream, section sizes, and timing for a camera-ready finish.
Hey guys, we are live. I'm here with Michelle. She's my beautiful future sister in law. She's gonna be my model today. We're gonna start out with the half up style. And like I said in the theory, I'm gonna be marinating everything today. And I've already kind of started prepping her hair. So first thing I'm gonna do is walk you guys through what I did on her already. Products and tools that I'm going to be using. So I'm just going to turn you around just like this. So I've already started prepping her hair because like I told you guys, we'd be here all day. Okay, so I already have the two rows of extensions in. If you guys can see that. I overlap them on each other and I've done two sections. So I started here and I have a section underneath and again they're taller sections. It's about that tall. So let me put that down, bring that back up. So if you guys are going along with me today, you can start your section at the nape, starting again right at the ear, going along and be about like a 3 inch tall section. So the products and tools that I'm going to be using is the same as always, guys. So I'm going to be using my long barrel curling iron, the 1 inch iron. If you don't have this iron, just any 1 inch iron is fine. I'm going to be using my silhouette spray, also my volume up spray, my tame wild. I'm going to be using a soft texture powder as well as a heavy duty texture powder. So I'm using both of these. The other tools. I'm going to be using my fork comb a lot. So grab your fork comb. And I'm going to be using my cutting comb. So if you have a cutting comb, use that. I have some 2 inch pins in here that I'm going to be using later for when I style the half up and then just my claw clips. So you're following along. Grab out all your tools. Okay. So with this style you can do your curl type differently depending on what you want to do. But to get the same one that's in the photo, it's a twist, twist, wrap, curling technique. So like I said, it's. We're gonna be. I'm gonna be probably repeating a lot of the theory that I did in the glam waves as well as the low bun. But it'll be like reiterating everything that we've already kind of went through. So if you guys can See, I like to start with this in the middle. This section is about 2 inches wide, and I go from ear to ear. So this is the last of my extensions that I have in this section. This is the last of the extensions and it's ear to ear. So if you guys can see that. And I like to start in the middle, so reason I like to start in the middle is because with this style, I'm going to be alternating my curl direction. So I kind of like them to go together in the middle. So like that. So my one below, I went curled in, and then with this section, I opposite curled them. So I'm going to start with this section. My sections are about half an inch to an inch wide, so it's pretty tall, as you guys can see. And then it's about a half an inch. We need some structural support because this is going to be the first curl that we're adding into the hair. So you're going to want to use a non aerosol spray. I'm going to spray on the top, top and underneath. When I'm doing a romantic texture, it's really important to use a non aerosol spray to help with frizz control. That's why I love to use it, but also to really get that curl pattern in there so that way it holds. I'm going to take my long barrel. I just kind of like to smooth the hair if there's any kinks in the hair. This curl went to the left, so I'm going to go in opposing direction. So this one's going to go to the right. Get a little closer. So this one I'm going to hold and it's a twist wrap and twist around the iron. When you come to the lengths, pull it up and then you're just going to feed it through on your iron like that. You always want to make sure you tuck up in your lengths on your curl. If you leave the ends out like an inch, it's going to give you just a different style. I like on this style to keep them nice and tucked in. If she wants more of like a beachy wave, then I'll leave out my lengths about like an inch, inch and a half. It'll give you more of that relaxed curl style. And then hold it and let the curl release the heat. This will give you more longevity for the curl. And then I'm going to work my way side to side, about a half inch section, spray on the top, underneath, it's about two sprays and then lift up in two sprays that way you get your product nice and evenly distributed and then comb it through. When I'm combing it through, I can see it tucking in any little frizzy pieces. So it's already going to be helping with frizz control. I'm going to go in the opposite direction now and twist wrap and then with my lengths, tuck it up and close the clamp. Some of you guys have told me that you bought the long barrel iron and you feel like the tension isn't as good towards the end of the iron. That is true. You're gonna find the most tension on your curling iron. For the long barrel iron, I find the most tension right here. So I usually do try to tuck up my section and I don't leave my legs here. Otherwise they just kind of fall out. That's why I take it and tuck it up. Yeah. Which also. It will fall already. So I'm going to do that. And then that's not softened and not what we did. And then I'm just going to do the same thing on these other sections. Spray, spray, comb. She has like a fine hair texture. Even though it's blonde, she doesn't have very coarse hair. So that's why I love extensions with this style. Anytime somebody does like a half up style, any kind of a down style, I always recommend extensions. When you're doing a half up and they're leaving some hair in the front and they're pulling this back, they lose a lot of the volume in the front. So when you add extensions, it adds that density back in the hair. When I get closer to the face, like I'm right behind her ear right here in this section, I'm gonna start going away from the face. I'm not gonna go like this. I always want to curl away from the face when I start getting by the ears because that's going to give the most flattering style. When you curl towards towards the face. When you're right near the ear, it starts getting like kinky. If they're wearing some in the front, the wave pattern will just get a little funky. So always curl away from the face. It's the most flattering. Always hold your section on until you feel the heat through the iron. So when I touch it and I feel the heat through on my fingers, I know it's ready to go. So my sections are pretty thin, I would say, because they're about a half inch with this style. When you're doing a textured style, the more sections you take, the more texture you have. That's the rule of thumb. So if I want, like, I want this to be super, super textured. I want this texture to be 3D on camera when we're taking pictures. So if I was to take bigger sections, like when I'm curling these, if I was to take thicker sections, like one inch or bigger, it's not going to be as visible when we're taking the pictures later. It's going to flatten out your texture. So you want to take smaller sections. Get my curl pattern in over here. And that's also why this style takes a little bit longer, because you are taking so many sections going opposite. Oh. See, there's no tension this far down on my iron, so I'm gonna push this back up. Oh, see, it keeps falling out. Okay. Oh, geez. I'm gonna stay up higher on my iron and wrap my ends in. That's my only thing I hate about this iron is there really is no tension past, like the middle part of the ir. When I'm doing this half up style, I'm not going to be really putting loading any of her lengths in the front like people traditionally would like this. I'm just going to be doing her face frame. So that's why, if you guys can see I don't have anything forward on her shoulders because I'm going to be keeping all the hair in the back versus if I was to keep some hair in the front for this half up style, then I would start bringing my sections to the front now. But I'm going to be keeping most of it in the back and just doing like a face frame in the front. So it's going to be pretty off of her face. That's why I'm keeping all my sections in the back. Otherwise, by the ear, I would start pulling that forward. And then these are going to be my last two sections. They're by the ear, so I'm going to curl them away from the face. Yeah, like, hey, do you love it? And then like, like if your client wants more of a relaxed style, curl wise, if they're showing more of a softer curl pattern, then I would just go through and do a traditional curl like this. And I wouldn't do the twist wrap. But if you want more texture to show in your styles, I find that twist wrap is really what's going to get you that. Also, if your client has virgin hair that doesn't hold a curl really well, the twist wrap is really going to be your go to curl pattern that you're going to want to use. It just holds so nicely. Okay, so we have our curl pattern in. Now that I have the curl pattern in, the second step is we're going to go in and shape it. So I like to use my fork comb for this. When I'm using my 4 comb to shape it, it's going to be a lot easier to get more width in the hair. So my goal for this section, I'm going to start in the middle. I'm just going to pull out my section that I curled. And you're just going to want to start stretching the hair with the part with the 4 comb of your comb. So I start at the bottom and just start stretching that hair. Stretch the hair from the bottom up. Stretching. And if you guys can notice, I'm pushing it out towards me. I'm not making it wide. So because my sections, because I curled vertically, I'm gonna have a lot more depth going, like, out, and that's what I want. I'm not going wide like this. I'm keeping it kind of in like a vertical shape. So don't flip the hair to make it wide like that. That'll give you a different look. But I want to focus on bringing the volume this way, because if you guys remember, we want to keep the volume in the Mohawk section of the hair. So we're going to stretch, and then I'm going to take some teen wild. Right now I'm gonna put some on the back of my hand. Because what I'm gonna do is with every section, I'm gonna take a little bit of tame wild like that and start adding the shine onto that section. The hair is going to start to get pretty dry looking. And I don't know if you guys can see that right now, but I could see it looks a little dry. So I'm going to add that on to give some of that shine. And then I'm going to really create more depth and width with some texture powder. So I'm taking like a soft dust texture powder. And at every ridge on the curl, that's where I'm gonna. Whoa, that was a lot of powder. It's just like went all in my hand. Okay, this is a new one. So they always, like, explode on the first one. Okay, so I'm gonna take it at each ridge very lightly. There we go. A lot. And then I'm gonna take my fork comb and fluff it out and make it nice and wide. Can we see that texture starting to come out like that? Very pretty. Okay, now I'm going to work side to side on every section. I'm going to do the same thing. So stretch out the hair. Stretch out the hair. Any, like, crunchiness you got from your non aerosol spray? We're basically brushing that out as well. Take my tame wild and go through every section. And then I'm going to add my texture powder at every ridge. That's 1, 2, 3. And then lightly back comb with the fourth comb like that. And we're adding that texture. I'm pinching and pulling it forward. And I really want you guys to see this, like, perspective. So I'm gonna turn you on the side like this. Can you see how this hair is coming out? That's what I'm focusing on. So I'm going to show you at this angle. So taking it and stretching the hair and see how it's getting wide vertically like that. I'm keeping it in that shape. Take some tame wild. Get it on the lengths. I usually focus on the lengths because that's usually the driest part of the hair. And then taking my T wild or texture powder. Now watch when I take my fork comb for this, so I'm not going wide. I'm taking it about halfway in and pushing up very gently. And see how that's adding width to the section. What this is going to do is add a lot of volume. So this is good for your girls who have fine hair that really want their hair to look nice and full and voluminous. And when you're creating texture like this, it creates even more depth. So when you take pictures, it's super visible. And then we're just going to repeat this on every section. So for a style like this, this, this is why I started adding on. Instead of 45 minutes for bridesmaids, it's now an hour. Because of this style, specifically, 200%. I posted I did this style on Michelle this time last year, and I posted it, and so many bridesmaids showed me this style. And it doesn't take 45 minutes. So if at this point you're like, wow, Marissa, this seems like it would take a long time. Yes. Yes, it does. And that's okay because we don't cut corners here. Really creating that vertical width and keeping all the hair in the back. So right about here, this section, if I was to create some hair in the front, I would start pulling that forward. This is like, right behind her ear. So I would start pulling this forward. But I'm going to be keeping it on the back today. Add a little bit more team wild on the back of my hand so I can work as I go. This will save me a little bit of time versus constantly picking it up and putting it down. Work smarter, not harder. Stretch Cream powder. For all my girlies who are like, oh, I'm afraid to use product. Look how much product I'm using right now. If you don't use a Tame wild or some kind of cream before you use the powder, you can. You can start to see how dry the hair is going to look and how frizzy it's going to start to look just from the shaping of this particular romantic texture. That's why I find I love layering in the Tame wild because it's so light on the hair and look how shiny it is. Like, I wish that was able to pick up. Yeah, yeah, okay. Like, if you find the hair is looking really frizzy, really dry when you're going through with the powders, that's likely because the powders are dry and that's going to make your hairstyle look dry. So that's why you always want to add in Tame wild and work that through your style. Now we're going to go on this side, stretching down Tame oil on the back of my hand. And that's like, a pretty generous amount that I'm going to be using just for these four to five rows. The reason why I like the light powder as opposed to, like, a stronger powder is because I'm not really looking for a crazy amount of hold right now. I just want it to have, like, a foundation to stand up on for the hair. I'm not, like, teasing or pin it, pinning it into anything where I need it to run, really hold. So that's why I went with the softer dust. If you find your style is looking dry, you can go again after you do the powder and do even more Tame Wild. You can never use enough Tame Wild. I promise it's not going to make the hair look greasy. Well, it's funny. Yeah, exactly. Exactly. So, yes. Okay, so. And this is what you want. See how it's coming out? That's what we want to see. That's the visual that you want to start to see. Beautiful. We got two more rows on this side. Stretch. I find doing each section individually is more helpful for me as opposed to. I've tried, like, stretching them all out at the same time and doing everything at the same time. Like, stretching it all and then tame wing every piece. But I find I get lost a little bit and I'll forget which section I was on. So that's why I like to do this individual. Okay. See how they start to, like, mesh together? If I was to do this all at the same time, they kind of get a little lost. Okay, so that is layer two. Look how voluminous this curl looks. I'm. Are we kidding? Are we kidding? Okay, so next section, we are in our crown area. We're. Yep. We're in, like our whole crown. So in this section, I'm gonna do even more prep work with you guys. When I do my half up styles, I kind of like to prep as I go. So I didn't even crimp yet. So I'm gonna start crimping this section and then I'm gonna go in and start adding my curls. So we're doing a middle part section this on the side for you. So I'm gonna section. Her ear is right here. I'm gonna section out. I'm doing a zigzag and I'm gonna end right above her ear. So I'm just sectioning out the front from the back with my zigzag part like that. Clip that out of the way and I'm going to be doing my crimping. Crimping is going to add volume. And remember, we're taking like highlight sections. You want it to be see through and over directing with the crimping. You want it to be. You need your volume here right at the high recession. So those are going to be my horizontal holds. And then by her ear is where I'll do a vertical if it needs it. I find if I do my crimping first and then I'm clipping up the hair, sometimes the clip will add the kinks back into it and I'll have to re crimp again. So that's why I started, like, prepping as I go. And we're at the high recession, so that feels good. Perfect. I'm just going to add a little clip and keep that section out of the way. I'm going to do the other side, sectioning out the front from the back with a little zigzag. Perfect. Remember, don't be afraid with your crimper to go right in at the root. And I'm not going all the way down the lengths of the hair. I'm only going about like 5 inches up off the scalp. And I'm at the high recession, so that'll be my last section. Perfect. Add a little clip and then I'm gonna do the. Does anyone hear my squeaky hairspray shoes? Fun times. Shooting hoops I always crimp any style that I'm doing because I just feel like crimping adds such a different volume and smooths at the same time. Again, when I'm doing even down styles, crimping just the crown area, it smooths it out, like right around here. If anybody has like a cowlic or anything in their hair, they'll get, like, kinks in the back of their hair. And all of this area is going to be visible in my style because it's a romantic texture. So I'm going to be twisting in the crown, so it's going to be visible. So I want that all to be smooth. When I'm smoothing with a curling iron, it doesn't come out as smooth. Not a fan it at your end. Once I finish my crimping, I'm gonna have two more sections of curling in this, and then we're gonna start creating a romantic texture. It. When I'm crimping, I find it takes too much time to, like, add a clip in the hair. So I just flop it over smarter, not harder, and I just open my iron and press it over. Okay, I'm just finding my whole section again. I'm going to be going all the way around the head, so I want my section to be about an inch and a half. I'm gonna go around and clip that out of the way. So I'll show you guys my section. So this is how tall the section is. That's how tall your section should be. Okay. So when we're in these last two top sections that are in the crown area, these are our most important sections. So you should have two layers already of your curls. All right, so I'm going to start in the middle. So again, you're taking about half inch wide sections. We're going to spray with our non aerosol on top and underneath to really distribute your product, comb it into the hair. And then when you're in these sections, you want to make sure you're really close to the root. On the other ones, I might have been stretched down a little bit. Now I want to make sure I'm really close on the root. So I'm gonna have my iron really close to the scalp, and I'm not going to be pulling it off the scalp. Is there anything else you want to adjust or try? Still doing my twist wrap, keeping my lengths, and then I'm gonna keep rolling them in, and then I'm on the scalp, if you guys can see that. So I'm not stretched off the scalp because I want my curl pattern to start from the root. I don't want my curl pattern to be stretched down at all. So you guys can see that my curl pattern is starting really close to the scalp. And then this one's going to go in an opposite direction. So this one I'm going to curl going to the right, keeping it really close to the scalp and twist, wrap it. This one's going to go to the left. These ones I have two more sections are right by her ear. So I'm gonna go away from the face. Not necessarily. I do place them differently if I do a company. Yeah. If she got vacation though and depending like if I do she placement kind of all of that. If that makes sense. Yeah, yeah. Especially if she just had it. Okay. I'm gonna get closer on my iron and close it. You may see the earrings. Okay. We like hair on the face, right? Yeah. And this is where we part. No, no, no, no. Depending on the thickness and width of your client's head is going to depend is going to determine how many sections you do around the head. So I have about 1, 2, 3, 4, 5 going, 5 rows going to the right. I'm probably going to have five rows going to the left. So that's what it should look like. No, I know. Honestly, it's something that you have to, you have to have a spare commit. That's it. Curl away from the face when you're by the ear judge. But okay, so we got our whole curl pattern in there. Again, we were, we're in row three. So this is our third section. So this section as well as this top section is what's going to be visible in the crown area of our half up style. So since this is going to be visible, what we want to think of is like when you're baking a cake and you have all those layers, you want that top layer again to be perfect, that you're icing on the cake. So that's going to be this layer. This layer, when you're doing that romantic texture, it's also going to be visible even though this is on top, because you're going to be weaving the hair and twisting it together. So we want to start creating that in this layer of our cake. So because I was whole, because that's going to be showing, we want to make sure that this isn't flat and that we're like reinforcing that twist and that curl in this pattern right here. So how we're going to do that, we're going to do the same Thing we're going to start with our fork combination them, stretch from the bottom up and stretch that hair out. But now we're gonna start to want to add in more of a tease. So when I'm teasing with this kind of a style, I'm gonna tease. Let me see how I could show you guys this the best way I'm gonna tease, leaving it in its section, so bring it really close. Okay. So I want to tease at the root. I'm going to be pinning here. So if we remember where we pinned, we need a tease underneath for it to hold. So instead of breaking this up and teasing horizontally, I'm going to tease vertically. So I'm taking my strong texture powder, and I'm going right in at the root. And then I'm going to tease holding my comb vertically. So holding the section out and back combing that way, not horizontally. So it's vertical. So your section should look something like that. And then you can twist it. And it's going to look like that takes perfect. And then I'm going to add in my soft powder for the lengths, and I really want it to look nice and shiny. So I'm going to add some cream after. You can still do it before. You can just clean up and reinforce. Force that twist right here. Perfect. So I'm going to take some tame, wild, add it to the back of my hand so that way I can work with a little bit as I go and just take a little bit and slide it down onto the hair. Super pretty. Do the same thing, stretch. Take my texture powder at the root. Whatever direction the curl is going, you're gonna. So this one is curled to the right. So I'm going to lift this up and do my texture powder underneath there. Because when I twist it, it's going to be going to the right. So I don't want to tease over here because my tease will be exposed. And then I'm going to tease vertically and then tease my legs and add in some cream. If you see it start to flatten out here, reinforce your twist list again so it'll look something like that. So then did she take it down for the rehearsal or. No, she just laughing. She wasn't sure at the drive wheel. And when I'm teasing vertically like this, I'm only pressing down about two times with my comb. I don't need it to stick out. Crazy. I just want to add a little bit of width, but cleaner or whatever. Yeah, it's still like, to me, it's still formal, but a little Bit of tmi. Okay. California is. Yeah, for sure. Honestly, I think the pictures will tell you a lot. Yeah, I'll say that. Once you go back and look and you can compare that. Guys, I feel like I'm so silent today because I'm just. This is a very repetitive style, and I just feel like I'm doing the same thing. I apologize. If you have any questions, please ask them as I'm going, because I'm just repeating the same steps in each layer. If I see any tease because I'm teasing at the root, I just go in with my for comb and tuck it down. So what you'll start to see is your twist at the root is going to create a lot of dimension. Obviously, the lighter the hair color, the more highlights, the more texture you're going to be able to see. But this is kind of what I want to see. You want to see it, like, connect together here, and then later on, we're going to pull it out so it's going to look like a twist and then just go on the other side. And I'm just going to repeat the same method. This is where my belt comes in handy because I'm layering products, and I like to have them all at my waist. Teasing at the root and pressing down about two times and then teasing the lengths. Because we did the twist wrap, curl, you can see it's like a really bouncy kind of a curl. And take my team wild. This don't feel like you. Well, that's. They do look. Both look like. Clean up any tears. These. If you see it start to stick out. And I'm just kind of blending these two sections together with my. For. Absolutely true. Absolutely true. Yeah. I don't need to know ahead of time. I can know the day of, you know, as long as you feel comfortable. I feel like now is where you can really start to see the texture pop out on the style. Because we're doing so many layers of curl, and when you're doing so many layers of the curl curl, they just lay over top of each other. So if you ever feel like your curl is flattening out, maybe you're not taking enough sections. So split up your sections a little bit more if you feel like your curl starts to flatten out. And also I find sometimes in the crown area, you might feel like you lose your curl when you start manipulating the hair. Like, if you're doing this with the hair, it kind of flattens out. So what you can do is you can always twirl it Back up into its shape like that. Now I'm just going to take my fork, comb, and kind of blend these sections together. Any visible tees that I see, I'm going to start blending that down with my. For comb and just shaping. I think that's looking pretty good. With this layer, I want to add a little bit of shine and some hold. So I'm going to take my volume up and just hit it right at the crown area. I just want to add a little bit of barrier between this layer and this layer. All right, now we have our most important, our icing on the cake. Just going to take this leftover T Wild, put it on the lengths of her hair. Can never use too much. Yeah. Okay. So you're going to want to pull out your parting. I pulled out my parting. So in this layer of our textured style, the parting or the. The sections that you do when we're curling is pretty important. I'm going to draw out what it actually looks like because, well, here I'll pull them out. Okay. Okay. So we're in our top layer. I'll pull it out, and then I'm going to draw it on my whiteboard so you guys have a better visual of exactly what's going on. So if we remember, zigzag parting is what's going to create the most blended look. So my partings that I'm doing in these sections that I'm going to curl are all going to be zigzag. So I'm going to try to pull them out, and I want to start at the front. We want them to be about a half an inch, so I'm going to zigzag each piece. Right. The phone was lying. His phone broke, and I got. I started laughing. I was like, all right, I combed you a little bit. So. Yeah. So think on it. I sent you the pictures if you have my cell now, if you have it, might wait till you're out of here. Extra, like, hatted and stuff. So, like, the wi fi is. Yeah. So, yeah. Where you back here feel better? Because the routers back here sometimes all the way to the front or right? Yeah, it's just. It's basic. It. Okay. That's a lot of sections. All right, so I'm gonna pick up my phone and show you guys. When I started doing this style, I found it was most helpful to section out like this. So what you're gonna imagine is, like, Cassia Fortuna says it as, like, an orange on top, top of the head, and it, like, you're peeling it. So if you guys can kind of see, I'm gonna have you dip your head back just a little bit. See how they're all just kind of spread out on top of her head. So it's kind of like a triangle. So this is the thin part of the triangle, and it goes out a little bit wide, but again, it's only a half inch. So we have about 1, 2, 3, 4, 5, 6, 7, 8, 9, 10. About 10 or 11 sections on. On the top. So I'll show you guys the side. So we have about 1, 2, 3, 4 on the side. This is going to create the most blended crown area for a lot of the romantic texture to be shown. I'm also going to draw it out so you guys can maybe see a better visual of that as well. So let me draw it it on my handy dandy notebook. Okay, so we'll imagine just a circle. And we're looking down on our client's head. Right. So we're looking down on their head, and their part line is right here. Right. And then this is kind of where it splits right by, like their ear, let's say. Wow, this person has a big head. So let's just say these are their ears. This is their part line. Right. So what I did was I start out here, we'll do a different color start out right at their fringe. And imagine we're just doing little zigzags section. So that's one section right here. One section. And then from here, they just kind of look like slices like that. I'm drawing a straight line because it's a better visual right now. But they're actually zigzag lines. So it looks like that. So that's what it looks like. It's kind of finer here, and then it gets a little bit wider. But the widest point is about like a half an inch. So that's what I just did for the crown area. This is going to create a beautifully blended, romantic texture feel for the top area. And again, they're all zigzag sections. So that's what it looks like. What I just did. I find it is helpful to section. Section it out in the clips first, so then you have cleaner sections when you're going around. So can start. I like to start in the back because again, we're going to be alternating the curl pattern. So when I start in the back, I'm going to start going this way, and then I can alternate my sections. Right. Got my iron. And again we're staying really close to the root. So I'm taking it with a lot of tension. And my iron is right near the scalp. And twist wrapping, you want to make sure your iron is really close, close to the scalp. So that way your curl pattern starts right at the root like that. So that's what you want it to look like with the curl pattern starting at the root. So this one went that way. So I'm going to do this one going to the left. No, I don't. So am I. But I also never wear. It's not warm in here at all. I never really sweat. Okay. Keep your sections and alternating. These clips are honestly really helpful. Keeps it so clean. And that way I'm not losing my place and having to pull out the sections as I go. So we need to get somewhere. Actually, when I'm in this area, I try to have them two. I try to have these four pieces go in opposing directions for when, like these two. See how going in. I like them to do that. I like these top four to go opposing because once I get by the ear, I'm not gonna alternate. I'm just going to go away from the face. I think it just looks really seamless when these two and these two. So it's like that top four row go together, and then these go together. It's going to be really blended. When you get in this section by the E here in the section on the side of the face, you want to keep these sections very fine. When you take them too thick, you start to lose your texture. So that's why I like these clips. They need to experience these things before they. That's my weakness, is by the side of my curly textured styles, they usually start to flatten out. And I find that if it's starting to get flat and I'm not seeing as much visible texture, my section is probably too big. It talking about oblivious, like, who are you? These three are by the ear. So I'm gonna go away from the. I know in a way. Yeah. Keeping my iron really close to the root so I don't lose my texture. If you lose your texture in this area, it's probably because you stretch the iron too far away from the scalp. Right. I followed all these. Like, this last piece that I have right here is the fringe area. So that's what I'm going to be leaving out the way. And I'm still curling the same way. Even though this is going to be my fringe piece that I'm leaving out. Still curling the same way. Twist wrap, Getting it really tight. I want it all to be super cohesive. If it's. If I find it's too curly, I'll just go back and change my curl pattern when I finish my style. So all of these pieces besides these two front guys are all going to go into the crown of my half up style. Okay. Same thing. Take your four comb, and we're going to stretch these pieces out, starting in the middle. See how bouncy that curl is? And I'm going to tease at the root area. So texture powder. This curl is going this way. So I'm going to pull it up and do my tease underneath there. I find it's easier when I stand in the direction that I'm teasing. And I'm just doing about three times, so. And then do my legs and t moil. I'm going to take the tape because this is my top section. I'm going to take that tame loud all the way to the root as well. So you're here and go into my next section, you know? Yeah. Fully turned in. I give them, like, when they get their traffic, like, extensive direction to get in here to pull in, and then to find a door. There's not much parking. Like, you can only park on one side of the street over here. I'm gonna start to blend these two sections together right here. I'm gonna have you dip your head back a little bit. So I'm gonna start to blend these two together just like that. Add a little bit of teen wild and put that on the crown area. Marissa does sometimes. I haven't been here yet with like, Jenner Chan, and that's up to you. I've done them. I've done them on Mondays before. Everyone's schedule is different. So it's like, if it's starting to flatten out, you could just come up with your fort cones weekend. Pull it back out. That's up to you. So you tell me when you're free so that I can tell the client. You know what I mean? Right. So I can say Kate does trials on the same this day and that's it. Yeah. So, yeah, there we go. I do find that you have to just, like, case. Well, honestly, no. I set the boundary and say I do trials on these days and they have to make it work. The evenings. Yeah. Like, you can come in here. I feel like just second down boundary, like with yourself. Right. Just blending these two sections together. Am like zoned right now. You guys going to be honest with you? I'm like in the zone. Do you Ever get quiet when you're in the zone? Cuz that's me. Stretch it out. Texture powder at the root and back home. Back in. 1, 2, 3. And the hair stands up back home. Now the size of and blending up at the root it and then this is my fringe area. So this is what I'm going to leave out around the face. So I'm going to come and make sure that I get my. This is going to be horizontal. I'm going to split this section horizontally and it's going to be because I want to make sure my tease is really close to the root to get that lift and volume by the face. And that section was just too thick. If your section's too thick and you're trying to tease it, your tease isn't going to be at the root. It's just going to be like on the lengths of the hair. And I'm just going to add my teas in for now and then I'll come back in later and figure that out. But that's looking pretty cute. That's looking pretty cute. Let me do this side. We got a few more rows over here it out. These sections by the face are pretty fine. So that's why I don't really need to go through and stretch with my four comb. If you see I'm just kind of running my fingers through it and I kind of like that these curls aren't as wide. It's going to add even more dimension. Like I'm not fluffing them out with my for comb. I just think it looks pretty. All right, we're in my fringe area. I'm going to split this horizontally and I'm going to do two texture pattern tee sections. So I added my texture powder at the root and I'm going to backcomb two, three and backcomb this on. Add some nice volume for the front. I'm going to leave that for now. And now I'm going to start blending in all of these sections and creating my half up. So I don't know if you guys can see, but these sections, I'm going to start putting them all together and blending them so like these two, any two that are like opposing, I'm kind of gathering them together with my fork comb and pushing it towards the center like this. So you don't want to see like a gap like that. You want to push it towards the center so that it looks more like that. So they're like that. We want to do like that. So if you remember all of our volume, we Want it to stay in the Mohawk section. So these sides, I'm going to start tapering them down and I'm going to start creating more height and width here. So any teas that's standing out, I'm going to just hit it with my fork comb and I'm going to use my volume up. Spray volume up because it's going to add shine and I want to add shine in this area. Okay. So to create even more visible texture in photos, what you're going to want to do is pinch and pull it out your sections like that. Pull it up for even more visible texture. When the hair is highlighted, try to pull out the highlighted sections and leave the low lighted sections down to create even more depth. So, and I'm connecting in the middle. When I'm feeling good about a section and I feel like it's kind of where I would want it to be pinned, I'm gonna use my big open U pins and hold it into place. So my big open U pins like this. And I'm just going to kind of gather it all in the middle like that. Hit it with some volume up, tuck it in and then pinch and pull. I'm pulling up and air it out as much as you would like. If you want it to be really romantic, add a lot of sections. And I'm taking these two fingers and pinching it out. I always like to start in this middle section and then bring my sides in because this is where I want my volume. So now I'm going to start bringing in my side sections. My side sections. I don't need volume, so I'm just going to reinforce my twist by twirling it. And again, I'm going to take my open U pin and hold the hair in place so then I can pull it out for texture. Hitting it with some volume up to add more shine. This is Kate. She's. She's one of my lead Tyler. She's just doing final training. She's just going to be observing. Hello, nice to meet you. This side piece, I feel like people tend to push it up like this. You want to leave it down so that it's going down like this and creating a curve. And I'm going to wind up putting a pin right there. I'm not going to be pulling this back. This is more of an effortless kind of a half up. You almost want it to look like, did we put a pin there? Did we not have a seat? Because I have teas and I have my backcombing underneath as well as in this entire section, I can put a pin there, and it's going to stay. I feel good with this side section. So I'm literally just going to take my pin, leaving it closed, and taking just the open part of it, pushing it in the hair, and sliding it up. It going to do the same thing with these sections. I'm just going to start placing my pins in into the hair. Okay. Pinch and pull it out for your texture. The section I feel good about, so I'm going to add my pen into it out. I'm just closing up any of the gaps that I see in my crown area. I can lift out for volume at the root with my port comb. Once I feel good with this area, I'm gonna secure it with an elastic and two bobby pins. So I'm going to take an elastic stick and add two bobby pins like that? Just like that. And what I'm going to be doing. So here is my U pins, Right. So the occipital flows and. Or the occipital. The occipital is about here. So that's really where I want to add my pins in. You don't want to pin up too high, because that's going to. To. It's not going to be proportional in your half up. Remember, we always want to follow the crown down the slope of the head. So right where my open U pins are is kind of like my guideline of where I'm going to do my half up. So what I'm going to do, the ridges of the bobby pins, I want them to be on the scalp. So I'm not going to be go. I'm going to be going over top, and I want the ridges to be on the scalp, and I want my pins to be horizontal on the head like this. I'm not going down in the hair vertically like that with my pins. And it's just this section here in. Okay, so I got it open, and I'm just going over top of the hair and pressing in like that. And then I'm going to take out my U pins. Looks so pretty. So now to cover this little piece of elastic. If you want to cover this little piece of elastic, there's a few things you can do. Just going to take a piece from over the side, so. See, you can see the elastic. I'm going to take this little piece from over the side and just bring it over top just like that. I think that's going to look pretty. So I'm just going to add a little bit of back comb to make it pretty wide. And then I'm going to place a pin over top. If you want to add even more depth in here, you can take, you want to add even more in more depth here. You can take your bobby pins and go inside like that and create more depth. But it should look something like this. Knowing that we want to keep our volume in the Mohawk section, something that I like to do is lift up these hairs right here where you pin. Sometimes they get pretty flat. So I'll lift it up and I'll take some texture powder and go underneath of there and really reinforce that volume from it getting so flat. I always find that looks really nice. So I'll show you guys from the side. I feel like that looks really nice from the side. See how the ball volumes coming out. I always think that's really cute and proportional and I love using that half up base. When it's something like this that has a lot of texture, I don't want to add a lot of pins because I find it's going to take away and like flatten out my style. So I love to use that as like a half up base. And as you can see, I don't use a lot of pins in this size. Don't want to over pin. So now something I like to do with my textured styles is I like to go through and detail the hair that's laying over top. So the hair that's visible like this one. What I'm going to do is take my tame wild, put a little bit on the back of my hands and I'm just going to pull out some of the curls and define them even more like this. What it's going to do is show up way better on camera, almost like 3D. So just take some of the ones on the top layer and really define them out with the cream. It's going to make them shinier and reflect on the light better. When she's standing in front of a window, any pieces that flattened out, I'm going to go through and look for them and twirl them back out. Get even closer. Like here. I can tell on camera that's going to look pretty flat. So I'm just going to take a little section on the top and twirl it back out so it has even more dimension, even, even more depth on top of the hair. So this style is a lot of prep work, but when you actually get to shaping it, it's like five minutes. So the prep on this is like what, over an hour and then like the pinning of the Crown was, what, 10 minutes? Just peeling them out, and you can see them just start to come to life. I'm gonna do a little over here. Just taking, like, a very small piece on the top layer and curling it. Exactly. Yeah. Oh, wow. That's looking so pretty. What do we think, you guys? It's moments like this I miss being in front of a live audience. I'm like, how's it look? I got you been. Wow. Thank you, Michelle. Thank you for the participation. I'm gonna turn her to the front and show you guys that we're gonna finish off the face frame a little bit more. This is looking a little wild, so always brush out with the small teeth part, and then I'm gonna add my back combing to add width for this part. If the hair is longer than her chin, then I definitely would have cut. We're getting up close and personal right now. But if her face frame was longer than her chin, I would have trimmed that. That's my number one thing with face frames is wanting it to be the correct length, because if it's not, it just is a jellyfish tentacle, you guys. And that is never the vibe. Okay, I'm gonna do the other side. See, this one's brushed out, and she's shaped, and she's ready versus this one is not. You see the difference? There's the difference. This one is still just in her little curly shape. So comb underneath. Taking the small part of my teeth and fluffing it out, adding that with our flames. And what I'm doing, I'm taking these two fingers, and I'm pushing it forward towards the face. I never pull it back off the face. I always want to do forward on the face because I use so much powders. It's looking pretty dry at her root, so I'm taking that volume up, doing a light shake, and spraying it right at her root adds such a nice, glossy shine. And again, for my clients, for the face frame, always take, like, a strong spray. This is my three. I'm gonna have you close your eyes, lift up the hair, and spray nozzle down right at the root area. It's going to help for sweat resistance. It creates that barrier between the hair and the sweat, because the first place they're going to start to sweat is the hairline. But damn, I'm checking out my volume here while I'm in the front and just making sure that everything is nice and even. O, what a face frame. Isn't that so fun? Okay, I'm going to do a full turnaround. Can you turn with your feet? There we go. All right, we're gonna do a full turn. Ready? Go ahead. Go. Oh, girl, girl. So pretty. Yay. Love it. Love it. Okay, guys, that was the half up. I'm gonna transition this and into a ponytail and a low bun. I'm going to take some pictures really quick, so I will be back on in, like, five minutes. And we're going to do the ponytail and the bun, so I'll see you in a minute.
More from Marissa





7 Lessons I Wish I Knew In My First Wedding Season (I’ve Now Grossed $728,000)