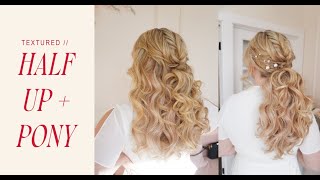
Marissa Brennan shows how to build three looks from one textured base: a half-up style, a low ponytail with a hidden elastic, and a low bun made by rope-braiding the ponytail sections. She covers workflow tricks for content days, like prepping texture once, then converting between styles fast for photos.
Questions this video answers
A bungee (hair tie with a hook).
Three packs of extensions.
Three sections.
In April.
Back. Okay, so I wanted to show you guys how I like to transition this style into a low bun and a ponytail. So if I'm gonna do a content day, which we're gonna do a whole video in April, but if I'm gonna do a content day, what I love to do is get the most bang for your buck, obviously. So we did, like, an hour and a half of prep on this. You guys seen that? That was a lot. So since I have all this beautiful, romantic texture, it's very easy to throw it up in a ponytail and to throw it up into a low bun, because I've done all the prep work, so it's not going to take me a long time to do either of those. So if I was to do a textured low ponytail with this texture up here, I would have done everything I already did. I really wouldn't have fluffed out the ends maybe as much. And same thing with a bun. If I'm going to do a textured bun, my prep and everything that I did in a handbap would have been the same. So, again, if I'm going to do a content day, what I like to do is pick something that has the same texture that I'm able to easily transition into something else. Like, if I was to do this style, I wouldn't want to transition it into a clean ponytail, because then I would have to go in and smooth all this out. So to transition, I'm gonna do the ponytail first, and then I'm gonna put it up into a bun. So for the ponytail, what I'm gonna use is a bungee. We've become friends. I normally don't like using bungees. They're kind of hard for me. But we're gonna do this together. Okay. So with the bungee, what I'm gonna do is hook it into the hair where it probably has some T's. So probably right here where the half up is, I'm gonna hook it, and it's gonna be like a mid pony, maybe a low, and then I'm gonna wrap this around one full time, and then a half time, and then add the hook in. So let's do this together. Turn you. Is that okay? Are you in the sun? I'm good. You okay? Yep. All right, so got my bungee ready? That was the door. The door, like, slammed shut. Sound like an intruder. It's not you. Okay. And I'm gonna gather up all the hair, pull out any face framing pieces that I want to leave out. So I'm just going to leave out those face framing pieces, because I think they already look nice. And then gather up all my hair. Before you do your ponytail, you just want to know the height that you want to do. I think I'm going to keep it pretty low, so maybe like, right where that half up base was. So it's a lot of hair. We have, like, three packs of extensions in here. All right, I think my bungee's gonna go round one. So let's be honest, guys. Okay, so with my ponytail, my thumb is on her scalp, right underneath that half up base. So right here. So you want your thumb on the scalp. Taking the hook of my bungee, putting it right above my thumb, hooking it into the hair. And then I'm gonna go down underneath, down underneath, pulling it, Stretching one time. Yeah, this is only going around one time, guys. And then I'm gonna hook it into the hair. Boom, we got a ponytail. So that is such an easy transitional style when you have all this prep work in. So if you're doing a content day, you have a model over your house, the easiest thing to do first is a down style, a half a pad down style. And then you can transition it into a ponytail, into a low bun, and then. And it gets you more content for when you have a model already in your chair. Make the most work smarter, not harder, remember? All right, so I'm just fluffing up her ponytail a little bit, but honestly, I feel like there's not much we need to do here. Easy party pony transition. Also, if your bride wants to do a down style and then an upstyle for a reception, the easiest one to do is a ponytail. To be honest, because you already have all the prep work in there, so you're not taking much time away from her cocktail hour. You might need to re curl some pieces. And underneath, they've probably been sweating. So what I typically do will give a good comb underneath there. I probably would have taken out a little bit of the extensions, but it just determines on what she wants to go with. Okay, so I'm gonna hide my ponytail rubber band. So I'm gonna take a piece from underneath, maybe like that, and just wrap that around. We're gonna do a wraparound. Have you guys seen that TikTok? Oh, my God. I laugh because there's this one the girl did. She's like, I think I want to do a wraparound. It was her going around home goods. When you're depressed. When you're depressed and you just walk around home goods, that is me tucking in Any pieces. Look how pretty that ponytail looks. Easiest pony. Look at that beaut. Okay, if you want to add more height, you can lift these sections up, add some teas underneath of there. I'm gonna add some pearls into this style, and then I'm gonna take some pictures. I'll take some pictures with you guys on this ponytail with my camera, and we'll add the pearls in. These are pearl hair accessories that I just have from Amazon that I got. I got, like, a bunch of packages back for, like, $7. They're pins. I love these guys. So I like to place my pearls on the side. I'm gonna place them going up in the hair. I find when you place them too close to your hairstyle, it just kind of doesn't flow proportionally. So I'm going to start out with my larger ones closer to the ponytail. I'm in my pearl era. Okay, guys? So don't get on me, because I put a pearl in every single one of these styles. We love the pearls. Not a whole lot of room in here. We have so many expensive. I like to go big and then make them use the smaller ones like that. Simple, but looks so cute. Okay, I'm gonna take some pictures on my camera. All right, I'm gonna have you stand up, and we're just gonna move the chair. So I'll show you guys how we do some poses for the pony. So what I like to do for my clients is I first show them the pose that I want them to do rather than have them stand there because then they get awkward because our clients, they didn't take a posing class, did they? So got my camera ready. So, Michelle, this is what I'm gonna have you do. And I'm gonna shower. I'm gonna have you stand here like this, close to the wall. Stare at the wall. That's what I said. Like that. Okay. And then they do that. They don't know what to do with their hands. You can tell them to keep them in front. So we'll go a ponytails. I want to shoot this side of her face. So I'm gonna say, can you look over your shoulder like that? What I want to be in my image is this. It's looking a little flat here. So I always don't be afraid to judge up the hair when you're taking your photos. Remember the eye. The first thing your eye is going to go to in a photo is the perimeter. So it's going to go to the outline of the style. So always have some products handy and Judge up your style. So I'm gonna go in. Oh, that's looking cute. So I'm gonna go in and add in more shine spray. I'm going to clean up anything that I see that's going to be showing in my photo. Pull your face ring out. And I like to pull it back. That's gonna look really pretty in the picture. Hold that back so you guys can see on my camera, I'm gonna be not shooting like this. I'm gonna be shooting over top like that gorgeous phenomenon. And I'm shooting the side of her face because that always looks so pretty. I wish I could do this on my camera for you guys. If you guys figure out how to do that, let me know. I'll have you take a step that way. The sun is, like, blaring, so it's a little bit too bright, so that I'm, like, pushing her out of the sun a little bit. So I'm gonna have you stand, like, right there, and then just look back over your shoulder, and that looks gorgeous. Fluff out your pony if you need to. And I'm shooting this side. Always tilt up and have you taken the sun? You guys is just ridiculous. You stand more over there. There we go. You don't want the sun to be directly on you because it's going to create more shadows, more frizz on the hair. So you want the sun to always be behind you. And you don't want to be in direct sunlight. You want to be in indirect sunlight. That. That's the one. I knew it. And I'm just kind of going. Working my way around. I'm going to start here on the side, and then I just shoot and work my way around. And I'm just going to have you tilt your chin back towards me. Phenomenal. Don't be afraid to direct your clients or move their head. Let's see if I could take some videos on the camera. Okay. I just took some videos on my camera. And then typically on ponytails, I really only like the side because that's what's going to show the fluffiest of the ponytail. And so if you want your ponytail to look perkier in a photo, have them pull their chin down. That's gonna bring your ponytail up. So you saw that? Oh, that looks cute. That looks cute. Stay there, stay there. Oh, oh, oh. You know, and then you can turn. Have her look over the other side. Typically, I don't shoot it from the back like that. It's not the most flattering for your ponytail style. I'm just gonna have you stand like that. A vision. When I'm taking photos of my clients, I also like to hype them up. You know, you want to hype them up. You want them to feel good. Tell them they look gorgeous because they do. They just got a fabulous hairstyle. Okay, so we got pictures of that. I'm gonna put it in a ponytail really quick. A bun, guys. It's a long day. All right, so now we're gonna put it in bun. Okay. So a bun is super easy because we're already in the ponytail. So what I'm gonna do is the same ponytail or the same bun that I did in the last live. I'm gonna split my ponytail. So I'm going to split it. I probably because there's so much hair here, I'm going to do three sections. So I'm going to do 1, 2, 3. So I'm going to take this section, and when I'm doing more of a textured pony, you want the texture to be the same in the bun. So to get that texture, going to split this section into two and rope braid it. I'm not going to use any padding. Just going to go up and over like that. I'm going to take my pearl out because that's going to get hidden. Okay, we're gonna do that again. Here's my section. I'm gonna split it in two, and I'm gonna rope braid it, and then I'm gonna twist it up like that. And then I'm just gonna add my pins in. Yeah, okay. Okay. So when you get hers. Yeah, there's already a lot of texture, so I don't see myself airing this out for a lot of texture. But you can. If you find your sections are really dry, you can go in and use some tame wild. And then with this section, I'm also going to split this. I'm going to do this section first and go up that way. So I'm going to split this rope, rate it. Okay, so just, like, getting ready. Up and over, adding my bins. Yeah, you just want time for everyone to, like, well, get dressed. Right. Are you going to do. So I did one here, one here, one here. There's a lot of texture powder in here. So my pens are just going in really easily. Right. Okay. Okay. To be not as much if you guys are. Yeah, yeah. If this was for her, like, second look or something like that, I would probably use a lot more pins. But I'm just doing this as, like, my content day. Okay. So if it's your content day, you don't really need to focus on longevity of the style. We're just looking for a photo, right? Take my ends, tuck it close to the nape, and then these ends are going to go up under here. And then these lengths do another one. It's going to be a pretty big bunch. All right. I don't want it to be too big, so I'm going to take these lengths and go up in the middle. It's going to twist, twist, twist. Go up in the middle and then these lengths. I'm gonna tuck them all like that and tuck them underneath here. It's a pretty big bun. It's a very large bun. Should we have taken some extensions out? Probably. Can we go back now? Nope. We're gonna roll with it. Just going to close up by the nape. Oh, that's a big bun. I'll show you guys this bun. It's a pretty big bun. I'm gonna have you look over your shoulder. And then the other one. What? Bam. That's a big bun. I like it. I probably should have taken out some extensions, but that's an easy way that you can just transition from a half up to a ponytail to a low bun. And you can get even more pictures, even more stuff for your content days. If you guys are trying any of this at home and want to get more for your content. Alright, guys, we're signing off. That was the textured low bun. Romantic class. I'll see you guys later.
More from Marissa



7 Lessons I Wish I Knew In My First Wedding Season (I’ve Now Grossed $728,000)