This content was created by Pete Ericson. This content was uploaded by Pete Ericson. This is a YouTube video titled "How to add an issue, article, and launch an issue" created on July 29, 2013, providing a tutorial by Pete Ericson on managing issues and articles in a WordPress environment, including steps to add and publish them.
Chapters
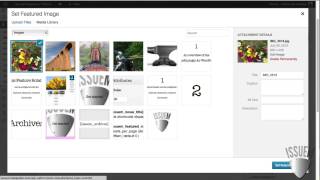
Let's take a look at how to add an issue. Add an article and launch an issue. I'm logged into the demo site here, which is our issue M magazine theme, and what I'm going to do. So I'm going to head over to the dashboard and we're going to look at how to add an issue. First, all we have to do is go to articles and then go to issues, and that'll bring up the one issue that we have here. Now, in order to add your new issue, all you have to do is give it a name. There's really nothing else you have to do. So we're going to call this test issue. The SLUG or URL is automatically generated, but you can control that here if you like. Description. Most themes don't use a description box. You can tie into it if you like. And by default, the issue status is draft. You will come back here to launch the issue when you're ready to go. All you have to do is change it to live and update it. And if you are uploading PDFs only, you'll want to go live with the PDF archive link. So, in other words, let's say you have 20 issues of PDFs that you want to quickly put up on the site. Well, you can upload them and make each issue or the specific issue a PDF archive only. Okay, let's add this issue here. And here's the test issue that shows up right here. Now, the one thing you will want to do with the test tissue, let's click into it, is add a cover image to it. And all you have to do is browse for a cover image. And what I'll do is I'll just grab a file here, this one. And if you do have a PDF to go along with the issue, or if it's a PDF only, you can browse here, update the issue, and you're all set. Now, let's look at adding an article to this new issue. All we have to do is go to add new article in the sidebar and it'll bring up your standard WordPress interface. So we'll create a dummy article here called Article Test. I'll throw in some dummy text here and all you have to do is assign this to the issue. So in the issues box here, you'll see that the test issue has shown up and you check off. Okay, this article is going to show up in the test issue. If you have categories and tags that you want to add, you can do that for each article. And if the article is going to have a feature, either a feature large feature rotator or a feature thumbnail image. Then what you do is you'll go over to the issuem articles options area and add them here. So let's say that this particular article is going to have a nice large rotator. Well, let's. We'll check off set featured rotator article. The teaser text allows you to add teaser text to the navigation. So that that sells the click. And it's optional. If you don't put it in here, it just won't show up. That's what that field is for. You can have. And by the way, you can have articles show up in the rotator and in the thumbnails. If you check off both of them or just one, it's up to you. So now that we've decided we want the image and the feature rotator, how do we upload the image? Well, we Simply use the WordPress Featured Image function. So we'll grab an image. I'll just use one that I have here, and we'll set this as the featured image and then we can save the draft. If this article is ready, it still needs to be edited. I'd recommend you just save it to draft until it's ready to go live. Once it's ready to go live, hit publish. And keep in mind that the publish button will not take the article live. It's the issue that overrides the Publish Publish button. So when you take the issue live, that's when all the articles will go live at the same time. Okay, so we've added this article. Now let's go see what we have here. We're going to go back to the homepage, and here we have the current, the new issue, the COVID image. I loaded up. Here's the one featured rotator image. That's the only thing we have here. And if you go to past issues, to the past issues page, you'll see the first issue is here, the second issue is here. And because it's a draft issue, you get this lovely pink border around the issue cover. And once you take this issue live, that pink border will disappear and the public will be able to see it. Now, the reason you can see it now is because I'm logged in as an administrator, so I get to see everything, all the draft issues. But the general public, once you log out, won't see this image. All right, let's go and take an issue live. So we're going to go back into issues. We're going to go hit the test issue. And we're going to change the. We're going to change the status to live. And that's it. We'll update that. And now we'll go back and take a look. And we have a live issue. And if we go to past issues, you'll see that the pink border has disappeared. And this is what the general public sees. And that's it. That's how you add an article to an issue and launch it.