Initial setup: How to configure up your publication with IssueM
Pete Ericson walks through installing the IssueM WordPress plugin and configuring it to publish a multi-issue online publication. You'll set up custom pages, add shortcodes for layouts, configure settings like API keys and PDF behavior, and use bundled widgets to display issues and articles.
Chapters
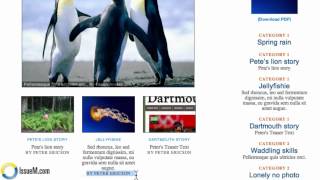
I'm going to show you how to configure Issue M. And we need a separate WordPress installation to do this. In this case, we've set up a couple pages here, the current issue page, which shows the current issue selected, the archives or past issue page. And then we have our news blog, just living on the recent News page. That's WordPress controlled. So let's load up markup so I can mark this page a little bit and show you that on the current issue page we have three shortcodes. One shortcode controls the large feature rotator and you can control the size. And you can control the captioning on this page there. The second shortcode sets the feature thumbnail segment and you can have one, two or three shortcodes. And the third shortcode controls all the stories here. And you can order these any way you want. If you wanted to just have stories but no features, that's fine. If you just wanted to have features and thumbnails, that's fine too. And the thumbnails will wrap. You can control how many thumbnails go across. In this case, we've limited to three. You can go two, you can go three, you can go four, and then they'll just wrap down as you add feature thumbnails. The two other elements are widgets. So we have the COVID widget, which I'm going to show you, which shows you what issue you're in at all times, gives you the ability to choose a downloadable version of your publication. And then the other widget is. Let's take a quick look here. It's called the Issue M article list widget. So the COVID widget we name Issue M active issue widget. So if you look in the dashboard, you'll see that. And then the actual navigation is the Issue M article list widget. Okay, now let's go into the dashboard and actually set this up. So after you install the plugin, you'll get a custom post type here called articles. And we're going to start by going to the help screen first. Okay, here's where your shortcodes are. And this is going to be the current issue page. You're going to have your Issue M articles shortcode, which shows all your articles for that issue. You have your featured rotator shortcode, which will drop in your large feature rotator. And then you have your featured thumbnails shortcode, which will drop in those smaller images. Okay, now on the archives page, you'll want to drop in the Issue M archives shortcode. And all you have to do is Cut and paste these actual shortcodes and that includes the brackets. Now let's go look at the pages themselves and we can see how this works. So if we go to the current issue page and take a look at it, you'll see that all we've done is dropped in the featured rotator shortcode first and then we've dropped in the featured thumbnail shortcode second. And note that there's a code here that you can adjust here. And this sets the maximum Images across to 3. So no more than 3 thumbnails will go across in the body of your current issue. And then we have the article shortcode which shows all your articles there. And you can see they stack big, big rotators first, thumbnail second, articles third. Of course, if you just want to have your articles, just, just use this one shortcode. If you want thumbnails and articles, just use these two shortcodes. If you just want to do features, you can just use that one short code. And of course you can put whatever kind of content you want above these short codes or below these short codes. And that's, that's the whole idea. So it's pretty flexible. Okay, let's look at the archives page. I think you're getting the idea here. And we'll go to past issues and you see that all we have is the archive shortcode here. And in this case we have issue order, which I'm going to show you in a second, which determines how the. The archive cover images are actually ordered. Okay, what I'm going to actually do here, I'm going to open up here, we're going to go into past issues and you'll see the covers here, the COVID images, and that determines what order from left to right and then top to bottom, these covers. Okay, let's go back to articles and just back to this help screen for a second. On the bottom of the help screen you'll find some code which gives you an idea of how to otherwise order your cover images if you choose to do so. Alright, now we go to Settings. So jump into Settings and you'll have your. This is where your API key goes. Your page for articles. So you want to choose which page your current issue is going to live. So simply select that. Your CSS style. If you choose to create a style sheet for yourself, you can choose it here. Otherwise it'll just choose the default style that you see. PDF Download Link title okay, so you can control download the title of your download link. So in other words, if you have a PDF that you're going to upload with each issue. You can include or not the words Download PDF or however you want this to display, but by default it says Download PDF in parentheses PDF only. If you are publishing an issue that only has a PDF and doesn't have the web version of the article, then control what that says. So in this case, if you click on this, there's no web issue, it's just a PDF that will pop up and then it says PDF only here. Okay, when you do open the PDF, you have a choice. Do you want it to open in a new window or tab? This is the default setting. Or in the same window or tab, your cover image size. The default settings for your cover image, which is your this image right here, the jellyfish image, and this cover image can be sized accordingly. Your large slideshow or feature rotator image can also be sized any way you want it. And your thumbnail, the feature thumbnail images can also be resized any way you like it. But these are the default sizes and this is. And that's what you're looking at if there's no issue, if there's no image selected, you can choose to have a default issue pop up and you can just browse to do that. Now show byline for featured rotator. Okay, author credit can be given in the featured rotator and in the thumbnails. And let's go take a look at how that works. So let's go into the June issue here. And here's Pete's lion story by Peter Erickson, and that's the by Peter Erickson is the byline or the author credit. And the same goes for the thumbnails. You can have author credit here by who's the story written by, or the article written by or not. So if you don't want that, just uncheck the box. If you want to leave them, that's fine. And by the way, the author credit is pulled from the WordPress user's database. Alright, Then we can display the author name as first name, last name, excuse me, first name, last name or display name. If you want to use global WordPress category and tags for both posts and articles, then you can just check this off and they'll all be the same. And when somebody pulls a category or tag, it will pull all the categories and tags from your blog posts and your articles, regardless of issue. Hit save settings. And that's pretty much what you need to do to set it up. Now that you know how to set up the current issue and past issues with the shortcodes and Manage the size of the images. Let's take a look at the two widgets that you get so people know what issue they're on, and a navigation widget. So all we have to do is head into the standard WordPress widgets area and you'll see that there are two widgets that are set up here. The issuemactive issue, which is the which issue is active, or the COVID widget, as I like to call it. And that looks like this here. So once you drop this in the sidebar and people click through stories, regardless of which story they go into, they know which issue they're in. The other widget is the article list or the main navigation. So if I, if I drop that widget in, then I'm going to get the main navigation here for each issue and there's a little configuration. If you drop the box down here, you can display the issue title or not, the COVID image or not, if you have no images and include the PDF link here. And for the article list, it's pretty simple. You, we have the number of articles to show and by default it's minus 1, which is all articles and all categories. So, and then the article format here, if you look at this code, you'll see that it'll display the category name, the title text and the teaser text by default. So if you look at this and you go back here, you'll see the category name and then the title, oops, the title text. And if there's teaser text, you can add that here as well. And again, if you don't want any of this, you can just delete it out of the widget and it won't show. So let me show you something else you can do. What I'm going to do is I'm going to drag in a couple of widgets I've created. And let's say you want to, instead of having your categories and then your titles and then your story, let's say you just want your category and all your stories within that category and, and then the next category title and all your stories within that category, then this is how you do it. So I have a couple of widgets I created. I'm just going to pull them in here for you and we'll drop them in right underneath. And I'm going to do, I'm going to show you two categories here. Bring this up. Okay, so now what I've done is I've created two lumped up two categories in the navigation. So I have the category one and category two and What I'm going to do here is I'm going to go back and just refresh this so you can see what the sidebar looks like. So let's skip over the first rendition. Now, what I have here is, I have category one and the title here, and all the articles within that category lumped up, and then category two here, and all the articles in the category lumped up here. Now, you can style this to make it look a little nicer, but that allows you to lump all your stories within each category. So if this is the feature category, you can have all your feature stories in one place. If this is, you know, a different department or category, you can lump all the stories in one place here. And how do we do that? Well, if you look at the settings in here, I have the category title here. We're going to show all the articles within that category, and then all you have to do is select which category it's going to be. And what I did is, if you notice, I wiped out the category code snippet up here. So it's only showing within that category all the titles and teasers of all the articles in that one category. And that's how you do that. And it's the same setting with category number two. In other words, title of the category. We're going to show all the articles. We're selecting category two, and all we're showing are titles and teasers. So all the titles and all the teasers of all your articles show up in that one category. And you can have as many categories as you like, of course. Okay, that about concludes how to set up issue M for the first time and get you going.
More from Pete



From Donations to Subscriptions: How KB Independent Built a Sustainable Local News Model