Beginners Guide To Get Funded In 2026 (Full Course)
Jesse Rogers teaches how to pass prop-firm evaluations with rules on profit targets, drawdown limits, and hidden consistency requirements. He compares firms like Topstep and FundedNext, explains a risk model called the drawdown shield that scales position size based on account peaks and losses, and walks through a mechanical strategy trading the first five-minute candle on MNQ with 2:1 risk-reward targets.
Questions this video answers
$3,000
$30 to $200
Keep 80% to 90% of profits (depending on firm)
Topstep 50K: $89/mo → $2,000 drawdown ($4.45 per $100); FundedNext 50K: $129 one-time → $2,000 drawdown ($6.45 per $100); Tradify 50K: $103/mo → $2,000 drawdown ($5.15 per $100); Apex 50K: $33 → $2,500 drawdown ($1.32 per $100).
Topstep 1.5; FundedNext 1.5; Tradify 1.25; Apex 1.2
Chapters
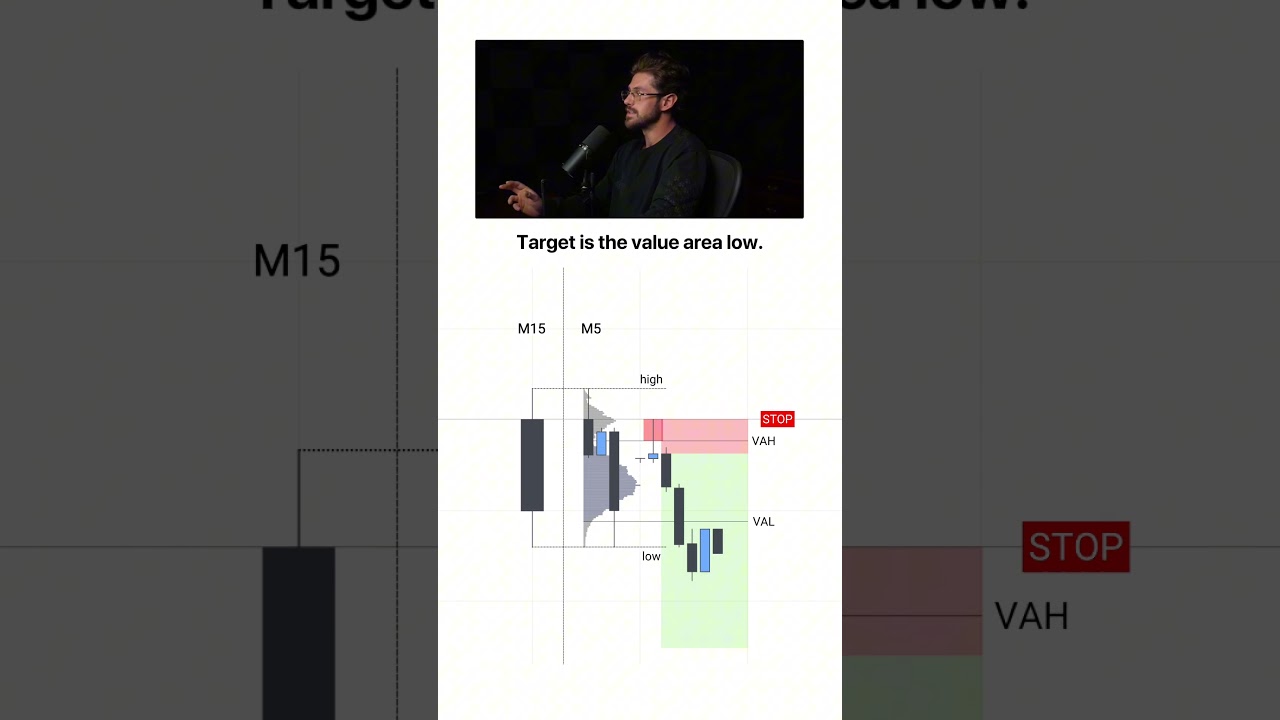
In this video, I am going to give you the entire A to Z roadmap on getting funded this year. This is not just another TIPS video. This is a full beginners course, completely for free. I'm going to break it down into three key sections. First, the opportunity. What prop firms are, how they work, how to select the right one, and the rules you need to understand. Next, the math and risk management. The approach to profitable prop firm trading that most traders completely overlook, which is why they fail without it. And finally, the strategy. I'm going to teach you my mechanical back tested system that has helped me pass dozens of funded accounts and consistently get winning days like this, this and this. So if you're looking to get funded this year without all the wasted time and effort, you, you're in the right place. Let's get right into it. All right, so what are prop firms? Well, a prop firm lets you trade a large account funded with their money, usually around $50,000 or more. And you get to pay a small evaluation fee which is anywhere from $30 to $200. And if you can prove that you're profitable under their rules, well then you get access to a funded account. You then trade the account and keep 80 to 90% of the profits depending on the firm. Absolutely insane. I mean just think about that for a second. When else in history has there ever been an opportunity like this? I mean, literally never. Which is why trading has blown up so much over the past few years. With prop firms, making real money through trading is now possible for anyone who is willing to risk a couple hundred dollars or even less. Meanwhile, before prop firms, you had to risk tens of thousands of dollars to make any real money. Whenever I started trading nine years ago, props prop firms, well they weren't a thing yet. But once they came out, I went from making a few hundred dollars per trade while I was doing doordash deliveries to having five figure payouts hit my bank while doing literally nothing differently simply by just having more capital. Because at the end of the day you're taking the same trades, it's just with a bigger account. And all this sounds like sunshine and happiness, but here is the reality. Most people fail and and it's not pretty. They blow through five, 10, sometimes dozens of accounts before they even realize what's happening. And even though each account is cheap, it adds up Fast. You have $500 gone, $1,000 gone. Next thing you know you've spent multiple thousands of dollars. And the worst part isn't even the money. It's the doubt that Creeps in. You start to question yourself, your family starts questioning you, thinking you're a gambler. And now you're defending something that you don't even fully understand yet. And I know all this painfully well because this is exactly what I went through before I got to where I'm at today. So whether you're already struggling or you're just getting started and want to avoid all this, here is what you need to understand. The reason people fail comes down to three things that they don't understand. Number one is the rules. Which firm to use and which account is the best. Most traders don't understand how to leverage the rules in their favor or or even understand all the hidden rules. So they're playing a game that they don't even understand and lose before they even get started. Number two is the math and risk management. Prop firms require a completely, and I mean completely different approach than trading on your own account. If you use the same risk management that you'd use with your own money, well, you're going to fail. And it's not that it's complicated, but it is different. And whenever you understand this, you have a much higher probability of success. And last but definitely not least, the right strategy. You can't just trade any setup. You need a strategy that is designed for the constraints of a prop firm. And that is exactly what this video is about. I'm going to break down all three in depth. That way you're able to trade prop firms correctly and avoid all the mistakes that cause most traders to blow up. But first, let's get started with the rules. So there are two kinds of rules when it comes to prop firms. The main rules and the hidden rules. The main rules are just the profit target and the drawdown. Every single firm has rules around these two things one way or another. Now the profit target is pretty simple. It's just how much money you need to make to pass the evaluation. For a typical $50,000 account, the profit target is $3,000. So once your account balance hits $53,000, you've passed. That's the finish line. But the trailing drawdown. This is where 90% of traders fail. And it's because most of them don't even understand how it works. So let's say you start with a $50,000 account and you have, I don't know, a $2,500 drawdown. Well, that means that your account can never drop below 47,500 or you're out. Simple enough. But here's the catch. That floor moves up with your highest balance and it never comes back down. So let's just say you take a trade and your account goes up to 51,000. You made $1,000 in the trade. You may have not even closed the trade yet, but Your balance shows 51,000 as the highest level. And this is how prop firms work because they count unrealized gains. If you didn't know already, unrealized gains are just profits that you haven't fully secured by closing out a trade. This is like buying Bitcoin at 10,000 and it goes to 100,000, but you never sold. In this example, your unrealized gains would be 90,000. So the moment that your account hits a higher number, whether you've secured the profits from your current trades or not, your floor or your trailing drawdown threshold moves from 47,500 up to 48,500 since you went $1,000 in profit. Now the trade reverses and you close it only for a $200 profit, where your account is now at 50,200, but your floor is still at 48,500. It didn't go back when the trade came back, so now you only have $1,700 of cushion left instead of the original 2500 you started with, even though you technically didn't generate any profits. And the reason for this is simple. It's to punish you for letting winning trades turn into small gains or losses. This is why it's important to have a strategy that's actually built for prop firms, along with proper risk management, which we'll get to later. But now let's talk about the hidden rules. These are the ones that trip most people up because they're not as obvious. So first we have the consistency rule. Some firms say that your best trading day can't be more than 40% or 50% of your total profit, depending on the firm. So if you need to make $3,000 to pass and you have one great day where you make $2,000, you would have to keep trading until that $2,000 day didn't account for more than 40% of your gains. So you would have to actually have a higher target than you started with simply because you had a really big winner. This can result in literally doubling the amount of money that you need to make in order to pass. Now for the second hidden rule that messes most traders up. It's daily loss limits. Now, a lot of firms have done away with this, but some still have it. And what it means is that you can't lose more than a certain amount in a single day. If you hit this level, then your account either fails or is locked immediately. And this can kill you if you take multiple trades in one day. Third is minimum trading days. Most trades will require you to trade on at least five to 10 separate days before you can pass. So even if you hit the profit target in three days, you have to keep trading and risk giving it back. These three hidden rules are designed to make it harder to pass. So if you're trading prop firms, you need to understand these and and be able to select a firm that doesn't stack the deck against you. But now let's hop into selecting the right firm. Most people are going to look at one thing, price. They see a low fee for this big account and think, oh, that's cheap, I'm just going to go with that. But price is only the surface level. Instead, you should make a decision on which firm to use based on these three things. The first is value. Value is what you're actually getting for that price. It's not just about how much you pay, it's about how much trading capital you get for every dollar you spend. And second is difficulty, meaning how hard is it to actually pass the evaluation. And this just comes down to one simple number. How much profit do you need to make compared to how much drawdown that you have access to? Next is scaling. Now, scaling just means whether you can trade multiple accounts at once. Because one account might get you $2,000 a month. But if you can trade the exact same way and scale it across 5, 10, or maybe even 20 accounts, well, that is how you turn this from a side hustle into a real income. These are the three things that actually matter when it comes to selecting a prop firm account. And when you run the numbers, there is one firm with one account that beats everyone by a mile. So let me break down the math. Now. First, let's talk about value. When you buy a prop firm account, you are buying the drawdown. You're not buying the account balance. You're buying the amount of drawdown that they give you. That is your actual trading capital. And here's the simple way to think about it. How much are you paying for every hundred dollars of drawdown? Let me show you what this looks like with some of the most popular firms. So we have top step with their 50k account, you pay 89 per month and you really get $2,000 in trading capital. That is $4.45 for every $100 of capital funded. Next, futures with their 50k account, you Pay $129 one time, so you get $2,000 in trading Capital. That's $6.45 for every $100 of Capital. For Tradify's $50,000 account, you pay $103 a month. So you get $2,000 in Trading Capital for that, which is, which comes out to $5.15 for every $100 of capital. And then for the Apex 50K account, you pay $33 and you get 2500 in trading capital, which comes out to about a dollar and 32 cents for every $100 of capital. So these firms are charging anywhere between $1 and $6 for every hundred dollars of trading capital. Now that isn't the only thing that you should make a decision on, because we need to talk about difficulty. And when it comes to difficulty, there is a very simple metric that you can use to determine which firms are the easiest to pass. And this is the ratio of how much profit you need to make compared to how much drawdown you have. For top step, you have a $3,000 profit target and you have $2,000 in capital. So that gives you a 1.5 ratio. And for funded next it's the same thing. You have a 1.5 ratio. Now with Tradify you only need to make $2,500 in profit with that same 2000 DOL capital, which gives you a 1.25 ratio. And then for Apex, you need to make $3,000 in profit with $2,500 worth of drawdown, which comes out to a 1.2 ratio. Last but not least, you need to also consider your scaling, as this is what determines whether this is just a side hustle or a life changing opportunity. On top step, you can trade up to a total of five funded accounts. And on funded next, it's the same thing up to 5. With Tradify you can actually trade up to 10 accounts. And then with Apex you can trade up to 20. So if you're making $2,000 per account per month and you scale to 10 accounts, that's $20,000 per payout. But with the same amount of effort using 20 accounts, you could be making 40,000. Because no matter how many accounts you're trading, it's the same amount of work because you just use a software that links the accounts and copies trades from one account to the other. You're only executing on one of these accounts. It's the same no matter what. And we'll go over this later where I teach you the strategy and how to execute it using the trading software. So whenever you look at value, difficulty and scaling together, Apex's 50K account comes out on top on all three metrics. When it comes to value, every $1.32 spent gets you $100 of trading capital. So you're paying a fraction of what other firms charge and you're getting $2,500 in trading capital instead of just 2,000. Like many of the other firms with the difficulty of a 1.2 target to drawdown, that is the easiest ratio in the industry for 50k accounts. And whenever it comes to account size, guys always go 50k whether you use Apex or another firm, because these are almost always going to give you the best ratios of your profit to drawdown. And again, you can just link these accounts to get more. And whenever it comes to scaling well, you can trade up to 20 funded accounts at once. Now, the minimum payout is $2,000 per account. So if you were to get one payout on each of these 20 accounts, that is $40,000. Now, I'm not guaranteeing that you'll do this. To be clear, most people lose money. But today I'm going to do my best to show you how I would approach this. To give you the highest chance of success when it comes to the other metrics that matter. Apex checks every single box as well. Not to mention at the time that I'm filming this, they've paid over $600 million to traders. They have no consistency rule, no daily loss limit and seven minimum trading days, which is standard across the industry. And this is why I chose to partner with them. I'll leave a link down in the description with a code that you can use to get 80% off of their normal pricing. Now, rules can change, so always double check the current rules on their website before you sign up. But as of the time I'm filming this, these are the metrics that matter. So now we have identified the best bang for your buck and the highest chances of success based on value, difficulty and scaling. But here's the thing, if you don't understand the math of winning, it does not matter how good the account is. So let's hop right into the math of prop firms and proper risk management. I'm going to show you how to reverse engineer the math so the trailing drawdown actually works in your favor instead of against you. And this is so simple, but most people completely overlook it and this is why they fail. But whenever you understand this, everything changes. Now I'm going to give You a risk management plan that allows you to pass a challenge in just three trades, but it also gives you 11 losses in a row for protection. And I know that might sound impossible, but it's just really simple math. You see, most traders, they fail at prop firms because they make one of two mistakes whenever it comes to risk management. The first is being way too aggressive. They hear some gurus say to risk 1% of the account size, which sounds professional, but in reality it just simply doesn't work. Because 1% of a $50,000 account is $500. But remember guys, your account isn't $50,000. Your real capital is the $2,500 drawdown. So you're actually risking a massive 20% of your actual capital on every single trade. So you're going to blow up in just five losses. I mean, it's almost a guaranteed way to fail. Now, the second mistake that I see the Ganners making is being way too conservative. Remember guys, risk management is exactly that. It's risk management, not risk avoidance or eliminating any risk. Because if you take too small of a risk, sure, you may remove the risk of blowing up, but you remove the possibility of success along with it. And people do this because someone tells them, just give yourself 10 losses. Okay, but why 10? It's just a completely arbitrary number. With a $2,500 drawdown, that means that you're only risking $250 per trade. And yes, this solves one problem. You don't blow up as fast, but it creates another. Because you're going to struggle to ever pass the challenge at this rate. You're going to have to go on a huge winning streak to even pass the challenge itself, much less get funded and make any real money. But most people are stuck between choosing a system that's too aggressive and one that's too slow. But what if we could have both? What if there was a system that let you be aggressive when you're winning, but automatically protected you whenever you're losing? And it really just comes down to one question. Can you make just three good trades? Of course you can. The problem isn't making these good three trades. It's surviving the losses in between. And that's the problem that this system I built is going to solve. And combining this risk management plan with the strategy that I'm going to teach you later in the video, you can pass the entire evaluation in just three winning trades. But I want to be very, very clear, in order to do this while still protecting your downside, you cannot risk the Same amount on every single trade. This is where a tool that I call the drawdown shield comes into play. All right, guys, so what we're looking at is the draw down shield. And simply put, this is a risk model that instead of using fixed risk, as you can see, your risk adapts to your performance. So you're going to start aggressive and we're going to break this down into four tiers. So the first tier is $500 risk per trade. Now you're only going to risk $500 a trade until you lose two losses from your peak balance. So for example, let's say if you start at 50k and you were to just take 2 losses, well then you would cut down your risk to tier two and so forth. Right after another two losses, you would cut down your risk to tier three. And if you get down on a six losing streak on the next couple trades, you would cut it down to a hundred dollars a trade. Now what this does is it helps you take aggressive trades when you have the capital to, but it helps you also get the most out of your trailing drawdown and descale your risk when you're on a losing streak. Because as we all know, when you go on losing streaks, you're more likely to make bad decisions and have more psychological errors. And with the strategy I'm going to teach you guys here in a second, you're able to pass the account in just three wins at the first risk tier. And the best part is you're not stuck at lower risk forever. If you go on a losing streak, you're going to earn your way back up. But it's not based on how you feel or how confident you are. It's based on one simple rule. You can only move up to your higher risk tier once you have hit a new peak in your account balance. So let's say you start here with your 50k balance, okay? And then you make some winning trades and we'll say you get it up to 51k. So at this point, this is your peak balance. If you go on losing streaks, if you take two losses, you're going to cut down to tier two. If you take another two losses, you'd cut down to tier three. And it goes the same all the way as if you had started from 50k. So you're just giving yourself the total losses from your peak balance. This means that no matter where you get the account to, you're always going to have room for an 11 loss losing streak, which significantly reduces the probability of you failing the account. So I want you to think of it like a health bar in a video game. You took some damage and now you need to heal back up to full health before you can get on the offensive again. And here's why that's not as hard as it sounds. Because with the strategy I'm going to show you, you're going to be able to get back to your peak balance and no more than a few winning trades. In most cases, this system will force you to rebuild confidence with actual results instead of just hoping and praying and eventually blowing your account. Now, while this risk model is a fantastic starting point and I'm going to give it to you for free, you can just join my free trading community using the link in the description and it's inside the tools channel along with my other valuable resources and a full free course. But let me be very clear. As you get more advanced, you are going to want a tool that automatically tracks your personal trading metrics to create a risk model that is custom tailored to you and that is much more powerful. Now, I'm going to show you the software that I use at the end of the video to do this. But I want to be very, very clear that what you risk is on you. I'm not telling you to risk this much. This is just a tool that I use. I cannot tell you how much of your own money to risk. Obviously this is for prop firms. But I have to make a disclaimer and tell you that trading is super risky. Whatever you risk is totally on you. I'm just showing you my strategy to do so. Now that we got that out of the way, let's continue with the course. The reason this math is so important is because of how prop firms amplify psychological pressure. Whenever a payout could be life changing you, your brain doesn't see a trade, it sees a threat to your future. This triggers what scientists call an amygdala hijack, AKA fight or flight, and your primitive brain takes over and then you make emotional decisions. Now, the easiest way to fix your psychology isn't me gonna just tell you to be disciplined or to go meditate or something that you see online. It's just telling you to lower the stakes and get the math. Let's just do the math on failure, okay? So that way you can get comfortable with it because you do need to accept the risk that you're taking. An evaluation cost for Apex with my code is $33. And with the drawdown shield, this gives you 11 losses in a row. So each loss costs you less than $3. That is less than a cup of coffee. That's less than a gallon of gas in most places. So it's really not that serious to take a loss. And as long as you're not putting yourself under unnecessary strain from over risking, you're probably not going to be as much of a bundle of nerves. So look at the big picture here, guys. The minimum payout on one account is $2,000. That means that one single successful payout covers the cost of you passing all the way to funded and having to pay the 80 activation fee that you have to pay to activate the funded account and then failing 17 times in a row. Now if you're just trading evals and never passed, it covers over 60 attempts if you get just one payout. Because remember, it's $33 an account and $2,000 for your minimum payout. Now I'm not telling you guys to gamble or that losing a bunch of money doesn't matter. I'm not telling you that. But what I am telling you is that the fear of one loss is irrational whenever you understand the math. Because if you're using this drawdown shield that gives you 11 losses in a row before failing, this means that you would have to lose over 170 times in a row without getting a payout before you would be fighting an uphill battle. Now, I want to be clear. This sounds easier said than done. And people do lose this much. But most of the time it's not that they lose this many times in a row. It's that they don't stick to the hard things they need to do. The hard part is staying consistent with your risk and not taking some crazy trade. Because as soon as you do that, you mess with the math. And whenever you mess with the math, you can do away with a lot of these losses in one bad day. I mean, a lot of people can blow an account in one day. Remember earlier, a lot of people who are just risking 1% of the account are going to blow it in five trades. So you see how just these small differences can make an absolute massive impact on the amount you're getting out of your funded account. And this is why it's so important to act as if you are the casino and not the gambler. That is how real professionals operate. And whenever you do this subconsciously, your stress levels do decrease because you know that you're actually doing the right thing. Remember guys, stress and anxiety is something that nature created for us to tell us that we're taking risk. We Might should not be taking. And in trading, this can happen in the wrong way, in the right way. It happens in the wrong way whenever you look at getting this funded account and getting a payout as holy grail. Because then every little thing that happens that causes you to take a loss is going to cause you to go into fight or flight, when in reality you're going to take losses, you're probably going to blow some accounts. It's just the name of the game. But once you understand the system, in the math and, and you have data that you can cling onto, and once you see the strategy I'm going to teach you and it's data, you'll be able to realize, hey, this actually isn't that crazy, okay? It's, it's not a big deal to lose. It's expected. And overall, everything is going to come together much, much easier. And you're going to be in a better state of mind to actually make the right decisions. Because I want you to think of your state of mind as a limiter, almost like a speed limiter on a car. You could have a Ferrari, but if the speed limiter is on 20 miles an hour, it doesn't matter how fast the car is. And the same goes for your trading. Because if you're a great trader and you have a great strategy and all these things, none of it matters if you're a nervous wreck because you're not going to see clearly, you're not going to make the right decisions and ultimately you will always fail. Now, I also want to be very clear on something else. Please just start with one account. Do not try to scale to 20 accounts overnight. Prove to yourself that you can get one payout first. And look, I wouldn't tell you guys this if I didn't really mean it because obviously I get an affiliate. Whenever you buy an account, most gurus will tell you, oh, just buy all these accounts. There's this big deal. You should just buy as many accounts as possible. I'm not telling you that. I'm telling you to buy one. Because whenever you build real confidence from doing the work, that is when you should scale. So get one account, get to a payout, and I promise you guys there will be a time for scaling. And later I'm going to give you the exact roadmap on how to scale from one account to multiple accounts once you've proven yourself. So I want you to take a second and ask yourself, what does my trading look like if I actually follow this structured system? You now have a Logical math based way to manage your risk and the framework to manage your psychology and you know, which prop firm gives you the most value. So now you're going at this with a much different angle. You're going at this like a professional. You're going at this the right way. So I want you to take a second, ask yourself, if you stick to this, what does your trading look like? Now I cannot guarantee that you're going to succeed because trading is risky. But what I can guarantee you is that if you act as a professional, you are going to feel a lot more confident in yourself and most likely have a better chance of success. And while all of this is great, literally none of it matters if you don't have a simple strategy that is all optimized for prop firms. And that is exactly what we're going to build next. Okay, so we've picked the account we're going to start with. We have a system to manage our risk. And now it's time for the final piece of the puzzle, the strategy. Now a huge mistake that I see people make is that they over complicate their trading. They have 10 different screens and 20 different indicators trying to make everything way more complicated and way more hard than it needs to be. And the truth is the most powerful strategies are are simple. And the strategy that I'm about to show you is the simplest and most effective one that I know for beginners or struggling traders alike. And it's the one that I use every day. Now we are only going to focus on the single most important time of the day, the opening range. This is the highest volume that we'll see all day and it gives you all the information that you need in order to find our key levels and our trade entry. In fact, we're going to be able to do that in just one candle, which is why I call it the first candle rule. Let's hop onto a chart so I can teach you the strategy over multiple examples and show you how to execute it using the trading software. Alright guys, so this software you're looking@ is tradingview.com and this is the software you're going to be using to chart your trades. And you're going to connect your broker by going down here on the trading panel, clicking this and then you would connect trade of 8. So when you buy from Apex, I recommend that you buy the trade of 8 account and they'll give you a login that you just click this, you log right into it and it's automatically set up for your trading and you can just buy and sell with these two buttons. Now for the 50K account, we're going to use a micro NASDAQ contract. So to get to this chart, you would just type in mnq. And this is the chart we're going to be trading. Now what this does is it lets us trade the NASDAQ futures market with less risk because we don't want to be over risking and we want to make sure that we can stay in control of how much we have on each trade. So for step number one, we're always going to start at the same time every day, which is 9:30am EST, 9:30am New York time. Not any other times. I get asked a lot, tons of different times. It's just this time. Okay, we're always going to start on our five minute chart, which you can go to by clicking this five minute button right here on Trading View. This brings you to a view where each candle represents five minutes of trading time. And what we're going to do next is we're going to go over here to the left, we're going to select this trend line tool and we're going to draw the high and the low of this first candle. We want to wait for that 930 candle to close and then draw the high and the low. And that is literally it. You've got your trading levels for the day. For step number two, we're going to go to the one minute chart and we're going to wait for a break of one of these levels. Now we need a very specific type of break. We don't want to just see a baby move past one of these levels because remember, the highest amount of volume occurs in this first five minutes. So if we know this, we know all buyers are going to be wrong under this level and all sellers are going to be wrong under this level. And if you're wondering why I'm talking about where people are going to be wrong, it's because when people are wrong, they get squeezed out of the market and will have big moves. So for example, let's say if the market hits here and all the buyers are wrong on the day, what are they going to do? They're going to exit their buys, which is the equivalent of a sell, and it's going to act as rocket fuel to the downside. Now there is a pattern that can help us avoid the fake outs. And I'm about to show it to you right now. So we want to wait until one of these levels is hit. Now, a lot of people might Think, oh, just because we closed a candle, we're all good now. And that is not the case. Just because we closed a candle. That did not confirm this trade. What confirmed this trade is something called a fair value gap. So if we look really closely here, not at this candle, but the candle before it and the candle before that, because the fair value gap is a three candle formation. Now all it is is when there is a gap between two candles. Wick. So we have some kind of expansive candle right here. And see, there's a gap right here between these candles. Wicks. Notice how in other candles there's not gaps. Okay, you can see up here there was a fair value gap and that acted as a level of resistance. Now, that combined with the context that we're at this level is very powerful. And as soon as this occurs, this is a sign telling us the market is likely going to make a quick move. And this brings us to step three, which is the displacement entry. And this is very important because it's optimized for prop firms and it's going to get us in the market and out very quickly. That way the market doesn't come back and hurt us on our trailing drawdown. Because the one thing you want to avoid with strategies for prop firms is strategies that have a lot of drawdown where the market might bounce around. Because remember that trailing drawdown, like let's say if you enter the trade right here and then the market runs back to your entry, that's actually hurting you. So you want to make sure we're getting in explosive trades. Hence the logic behind this entry. So as soon as we get that fair value gap where any of the three candles are closing, either outside the low or outside the high, we are good to enter the trade. Now, if we're hitting the low, what we want to look for in this scenario is a sell. So as soon as we get that fair value gap created, we can go over here to the left, we can hit our short position right here because we're selling. If we are longing, that would be buying. So short is selling, long as buy. So since we broke through the low, we're going to short and you're good to enter the trade right there. And you want to put your stop right at the candle that close outside of the range. Now, if you guys are a regular viewer of the channel, you know, there are some variations to this. I'll leave a link down in the description where you can watch another guide here on YouTube that explains everything else. But for now and for this strategy for prop firms, I want you guys to focus on what I'm showing you right now. So for our target, we're going to go for a fixed 2 to 1 risk to reward. Now, the risk management is very important because right here we can look and see our stops are at that first candle that closed outside the range. So to recap, we've marked our first candle high. In the five minute, we went to the one minute, we got a fair value gap where one of the three candles closed outside the range. And as soon as this candle closes, confirming this fair value gap, there has to be a gap. Okay, One of the three candles has to close outside the range. It doesn't have to be the candle that forms the actual gap, just one of the three. Once that happens, we want to enter the trade and place our stops beyond the candle that first closed outside of the range, which was this candle. And then our target is just fixed 2 to 1, meaning that on our winning trades, we're going to make twice as much as we lose on our losing trades. So let's break down the risk management on NASDAQ. So if we have a 27.5 stop, the way that this works with risk management for MNQ, so if we know that we have $2 worth of risk for every time the market moves one point and we've got a 27 point stop loss, what we're going to do to calculate our risk is we're going to take 27.5 and we're going to times it by 2 because this is how much risk we're going to have on each contract. So we see for every contract we open, we'd have 55 at risk. Now, to calculate our position size, we want to take a look over here on our drawdown shield. And you can see that if we're in tier one, we have 500 at risk. So we would take whatever tier we're in, take that number and divide it by how much dollars we have at risk per contract. This tells us how many contracts we can enter the trade with. So in tier one, if we are at a 500 risk, we could go back and say, okay, cool. Well, we know that we have $55 at risk for every contract. So if we take 500 bucks, that's our total max risk we can take on the trade and then we divide that by 55. Well, we know that we can risk nine contracts on this trade. Very important that you make sure to do this properly and ensure you're not over or under risking on each trade. Now, once we know how many contracts we need to enter with, you can go over here and click sell. And then we would enter with a nine contract position and then we would put our stop loss where it goes. And as you can see, we have $495 at risk on this trade. And as you can see to the downside, we have a little bit under a thousand dollars in our favor if we win the trade. So at this time, you just let the market play out and you let it do the heavy lifting for you. You don't micromanage the trade. And as you can see, we hit the target in about five minutes. We which isn't too bad. Now all you need to pass your challenge is literally three of those. We're not trying to catch home runs. We're not trading some complicated strategy. We're just trying to get base hits here so we can pass the challenge and then after that so we can get a payout. So now let's take a look at another example to really drill this in your head. So here's our second example. And as you can see, it's 9:30am We've marked out the high and the low so we can head down to the one minute time frame. And we want to wait for that second, same exact pattern. We don't want to trade until we get the fair value gap through the low. And this is how we're going to avoid a lot of chop. Okay. If you notice, once the market's still inside this range, a lot of time it's just going to chop around and that's what we don't want to be a part of because that's where money is lost. And as you can see right here, even though we wicked outside of the range at one time, this was a big down candle through the range. And if you fomo in too early, you're going to take losses. And, and these are the little micro mistakes that people make that keep them unprofitable. So as you can see right here we had that fair value gap outside of the range because right here we have a gap, remember, and one of the three candles closed out of the range. So as soon as this candle closed, it confirmed this fair value gap. And at that time, since we're breaking out of the low again, you would be good to short. But remember, we're going to place our stop loss at the candle that first closed outside of the range as we can see here. And then as always, your target is just going to be a fixed two to one risk. To reward. Now, if we look at the risk for this trade, it has a little bit bigger stop loss. So we're going to have to have a smaller position size on this trade. So on this trade there are 45 points at risk. So we need to go into our calculator. We're going to go 45.25 because that's how many points are at risk. And we're going to multiply that by two. So we know now we have $90 at risk for every contract. Now we're going to take our risk tier and assuming we are at risk tier one, we're risking 500. We're going to take that risk tier and we're going to divide it by the amount of risk we have on each trade. So as you can see here, it shows we can risk 5.5. Now, a lot of you guys will want to round up. Always keep it lower. It's better to risk just too little than to over risk. So for this we, we're just going to go in with a five contract position. The same thing. We would just hit sell. But on this one we would go in five contracts. We're going to put our stop loss right here. And notice it's 455, so it's a little less. But we never want to go over our risk tier. It's better to go a little under like I said. So on this trade, same exact thing, you just let the market play out and it runs to the target pretty quickly. This one took a little bit longer, but it was only seven minutes. It still not bad. And as you can see, guys, it's really simple. This isn't rocket science, but what's important is sticking to your risk and sticking to your plan because that is where people end up messing up. And it's literally that simple. That is a strategy. It's mechanical, it's boring, but it works. But look, a strategy by itself is just a tool to actually build a career. With this, you need the full instruction manual. You need to know how to go from your first practice trade, taking your first challenge, when to scale up and everything else in between. And that is exactly what I'm going to lay out for you in the road map. Now, whenever it comes to road maps, you have two different paths. Either one of them works, but only if you select the right one for you. Now, the first path is for those of you who prefer to fly solo and have likely had some success in the markets already. First, I want you to go down to the description and watch the video that breaks down more examples of this strategy. That way you have it drilled into your head. Second, I want you to get just one account, not multiple, even if you've had experience and stay consistent, use the drawdown shield and get your first payout. Do not start scaling until you've proved to yourself that you can actually do this. Otherwise, you risk a lot more money than you need to and you put way more pressure on yourself than you need to. Now, for those of you who are newer or maybe you struggled, maybe you don't want to do this on your own, there is a second path. And this is what I call the smart trading blueprint, which is where I personally work with a close inner circle of traders to help solve the exact problems that keep you stuck. Now, I want to ask you a question. If you were able to actually sit with your mentor while they were trading, watching them execute live, would that have a positive impact on your trading? The answer for most traders is that would be night and day. Or at least I know for myself. Whenever I started trading so many years ago, this is what I wanted to so badly. And if I would have had this, I would have been able to become successful in a fraction of the time. So we're going to be sitting there trading with you five days every single week. On top of that, you're going to get access to our proprietary smart trader AI that helps you optimize your trading. And every single trade that you take is reviewed by a coach and you get direct feedback so you know exactly what you're doing right and what you're doing wrong. And of course, you get access to my full approach on the markets and my full software suite, which has our trading journal along with Enigma, which is the tool that I use to create the drawdown shield. Like I told you guys earlier, I would give you access to the same tool, but this way you're going to be able to actually custom tailor it to your trading metrics, which is an absolute night and day difference from just using the beginner's template. Now, I want to be crystal clear, guys. You can definitely do this on your own. If you want to just accept that it's going to take a long time. By no means am I telling you that you need to work directly with me to become successful, because I'm literally giving you a ton of information and value here for free online. And that's exactly why I do this, because due to the direct nature of the mentorship, I cannot work with everyone. And every month's enrollment fills up very quickly. So if the link in the description next to the word mentorship is still working, that means that spots are still available. And if not, I'm sorry, you'll just have to wait for the next time. But don't worry, I put out a ton of free videos here on YouTube and I will never stop doing everything I can to impact as many traders as possible worldwide. Thank you guys for watching. Make sure to subscribe to the channel and I'll see you in the next video.