Easiest Way To Trade ICT + Volume Profile (Full Course)

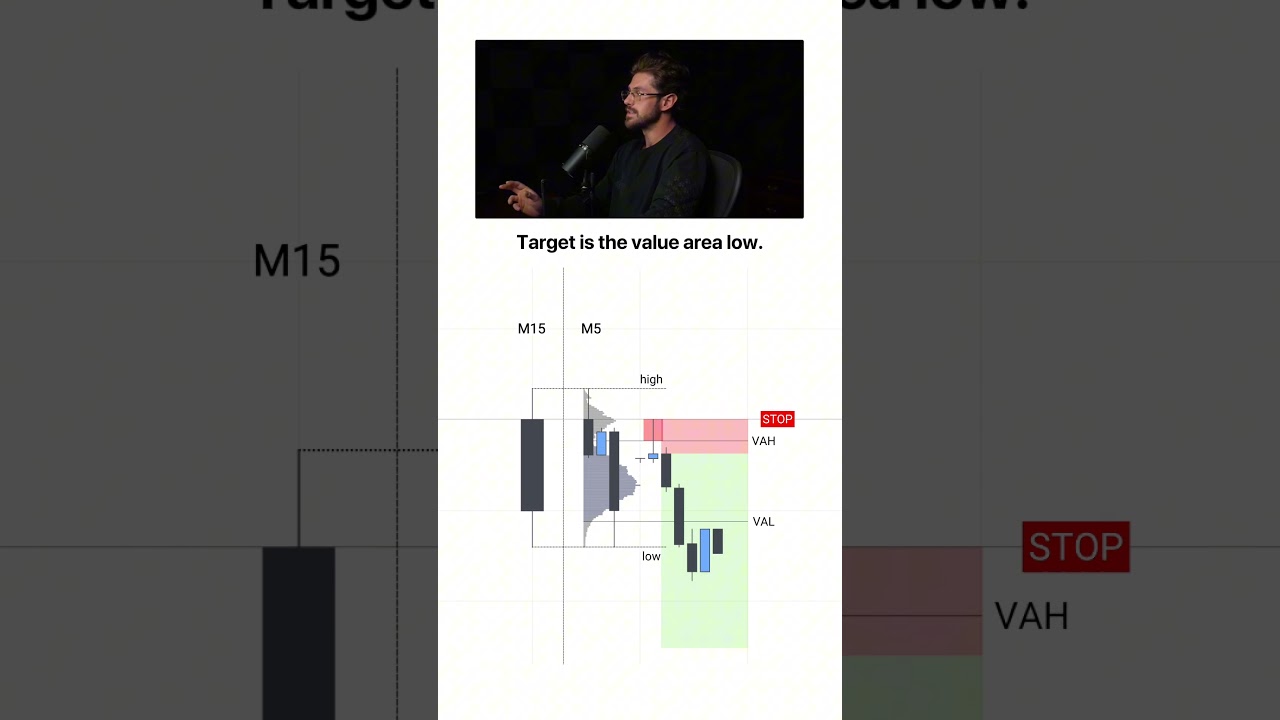
Jesse Rogers combines Inner Circle Trader concepts with volume profile analysis into a mechanical trading system. He covers the SPC strategy (Sweep-Profile-Confirmation), how to validate order blocks using high-volume nodes, and setup instructions for DeepCharts on 5-minute charts for scalping or day trading.
Chapters
Today I'm going to teach you how to put ICT concepts on steroids by combining them with the volume profile. So if you've ever been stuck or overwhelmed with ICT, it is not because you're a bad trader. It is because you lack a mechanical, clear-cut process, which leads to overthinking, emotional trading, and ultimately being an unprofitable trader. But today we're going to solve that for good. And to be clear, if you have been struggling, you're not alone. Just a few years ago, I was still blowing all my trading accounts, doing DoorDash just to buy prop firm challenges. But fast forward a couple of years and I've made multiple millions of dollars, retired my parents, bought my dream cars. And in just the last few months, I grew a trading account from under $10,000 to over $190,000 trading the exact same system that you're going to learn today. But it wasn't always that way because at one point I was in the exact same place that you're in right now. I overtraded, made emotional trading decisions, and honestly, I never thought that trading would work for me. So with my younger self in mind, I took everything that I've learned over the last 10 years that I've been trading and condensed it into this single video. And yes, this is a free course, but take this seriously as if you paid for it, because truth be told, I'm going to teach you more today than you'll learn in most paid courses. So take notes, pay attention, and make sure to promise yourself right now to stay consistent on actually executing what you learn here today. Let's get started by taking a look at my regulated broker statements. That way, you know what I'm teaching you is backed by real money and real results. So as you can see, we're here on tradovate.com, which is a regulated futures broker. We're going to click log in, then we're going to go to live trading. And after this loads, I'll go over to the right-hand side of the screen, click reports. Now we're going to go back to whenever I started this account, which was on November 5th, 2025, and we're just going to go to today's date, which is the 27th. And as you can see, gross P&L, $195,000. And also, as you can see, I definitely had some drawdowns, right? Like there were some ups and downs, um, since starting this account. I don't want to make it sound like there were no losses or any losing streaks because there were. And as you can see over here, I had about a 50% win rate. Now a lot of people think that you have to have some crazy win rate to make money. It's just not true. Now the reason that I show you guys this is not to flex. It's because Anybody who is out here teaching you trading should show you this. And if they could, meaning if they have these kind of proof of profits, then they're going to show it to you. Trust me, they flex all their cars and everything else on you. So they would show this if they had it. And something I wanna make clear is that these results aren't typical. I've been trading for 10 years and trading's not easy. You're not gonna turn around and get these exact same results overnight. And trading's very risky. Most people lose all their money. Now that we got that outta the way, let's hop right into the video. Now I want to be clear, if you're struggling with ICT, you're not stupid and you're not a bad trader. And in fact, most ICT traders struggle because ICT lacks a clear and mechanical process, and this results in a ton of mistakes like guessing which concept you should use when you have 5 on each side of the market contradicting each other, and then you end up overthinking. And now you have all of these psychology problems. But in reality, if you actually had a clear, structured process that actually worked, you probably wouldn't have all of these problems. And that is exactly what I'm going to give you today by combining ICT with the volume profile. We're going to take all of these concepts that you already know and make them into a much more clear and mechanical process. That way you know exactly what you need to do when it comes time to trade, and you're not just stuck in analysis. And at the end, we're going to tie all of this together into a simple, mechanical, and rules-based strategy. And not only that, you're going to learn how literally everything that you have learned in ICT can be leveraged by understanding the volume profile. Because at the end of the day, ICT and the volume profile are really the same thing, because you're using both of them to track smart money's moves in the markets and make trading decisions based on them. But the cool thing about the volume profile is it makes this mechanical. For example, instead of having to mark some kind of price range to find premium, the volume profile marks it for you based on real data. It does the same for discount pricing. It also can show you how to avoid choppy markets simply by understanding where the market is likely to have consolidation and where the market is likely to make big moves. It gives you a mechanical way to find your daily bias, which, if you're anything like me, whenever I started trading ICT, this was almost impossible for me to get right. And if you get this wrong, literally everything else you do in ICT fails. It shows you a mechanical way to find the best order blocks and more importantly filter filter out the bad ones. It shows you exactly which liquidity sweeps are likely to work and which are likely to fail, which helps you with patience and clarity on waiting for the best trades. It also helps you know when a liquidity sweep is likely to not happen and the market's going to continue, which give me some of my biggest trading days. And when I used to just trade ICT, I was always stuck looking for a reversal and not able to catch these larger moves. It shows you which fair value gaps are real imbalances and which are likely to fail. And not only that, I'm going to show you how to find hidden levels inside fair gaps to increase your accuracy like you didn't even realize was possible. But first, before we go into any of this, you need to understand what the volume profile actually is. Now, most people overcomplicate the volume profile, but we're going to go over it in a stupid simple way. Now, I would assume that most of you guys know what volume is, you know, the, the bars on the bottom of the chart. I think everybody, if you've traded for any period of time, has probably seen this. Now, the difference between regular volume and the volume profile is it measures by time. So it's just going to show you how much volume happened at a specific time of day. But the volume profile measures this by price. Now, why is this important? Well, if you're trading ICT, then you are trading on the presumption that you're tracking smart money. So why wouldn't you just see exactly the levels that they're trading at? And that is what the volume profile shows you in a very mechanical way. Now, when it comes to the volume profile, we have 3 types of key levels. We have the value area, the point of control, and nodes. So let's get started with the value area. Simply put, the value area is just where we saw 70% of all trading. Now, why is this important? Well, if we can say that we had 70% of trading in one price range, then we could say that the market deemed that area as fair value. Now, fair value is a concept that you've likely heard a lot in ICT. But the way that you're going to learn it here today is going to change the way that you look at everything, and it's going to be the foundation for a lot of what we learn here today. So understand that when we have the market in any day, time, week, or whatever, it does not matter any market you're trading, you're going to have two states of price action. You're going to have balance, which is what we call consolidation. You're going to have imbalance, which in ICT is called expansion or displacement. Really just a big market move. And those are the only two states the market can ever be in. So when we have the market in balance, the market is finding fair value at that price. So if we mark out the volume profile over a day and we can say that 70% of volume was traded during this range, well, we could say that for that day, that is where the market found fair value and agreed was a fair price. So the value area high and the value area low are your two value area levels. And think of this like premium and discount, okay? So if we say that this is where 70% of traders agreed was a fair price, well, under that would be discount and above it would be premium. And we're going to pair this with a bunch of different ICT concepts to make very, very simple but powerful adjustments to what you're already doing. So if we know that the market is always either in balance or imbalance, how does that actually help our trading and what does that mean? Well, if we see that the market is creating value at one area— and when I say creating value, I mean you're trading and creating a lot of volume— well, we could say at one time there was a balance between buyers and sellers here, but at some point buyers took control and moved the market aggressively to the upside. Now, where did the market end up moving towards? This is where we get into the concept of liquidity. So think of it like this: the markets are moving in price based on finding orders, okay? So if we see the market from a sense of ICT, we're going to use the term liquidity a lot, and it is very true, right? ICT had the right idea and the concepts are based on sound logic, but it's hard to actually see these without tools like the volume profile. So let's just say right here the market had this state of balance and then we moved very aggressively to the upside and we started to see consolidation. Well, typically this is going to happen once you hit into some kind of key level of liquidity because the market here, there was enough liquidity, right? There was balance. There were buyers and sellers exchanging orders. Now we see the market expand right here. So there wasn't balance. Now, this is why we look at these areas and this is where you're going to see your fair value gaps. Now, if we understand that here there wasn't any market participation, that is what we call a low volume node. Now, if you haven't guessed already, high volume node is HVN, and this is just an area where you see a lot of volume. And when we are in this stage of imbalance like you see here, the market is going to rush to where? To another area that it can find balance. And that's where you're going to get these consolidations. So just remember, the market is always moving from balance to imbalance, balance to imbalance, and over and over again. And once you can see this, you'll be able to see where the market is moving value. If you see consolidations and value just being established higher and higher, it doesn't really matter so much about market structure, because you understand the market is literally being valued higher. So very simple trick that we're going to be using throughout the entirety of this video. Now, last but not least, we have the point of control, and I'm not going to spend a ton of time on this one. It's very simple. It's literally just the area we had the most amount of volume at. It's going to be inside of the volume profile. And a really easy way to use this is just as a key level. You're going to expect choppiness. and you're going to expect it to kind of be a line in the sand. So like if we're above this, you could lean towards buyers being in control. If we're below it, you could lean towards sellers being in control. So another couple of ways you can use these concepts is let's say you're in a market and you're trading and you want to see some kind of bearish day on a day like this. Let's just say that that was your idea and we had this exact price action. You're trading in a value area, and then the market comes up into the value area high. You sweep a high right here and then go back into the value area. Well, at that time you're looking at this like, okay, cool, this is a likely reversal because you had reason to be bearish. And now we've got a bearish setup in premium. So if you can sell up here, then you can get a really nice sell even just down to this point of control. Right? Because a lot of times what's going to happen is the market's going to hit this consolidation, and this has probably happened to you guys so many times and you don't know why. You're in a great trade and then it comes all the way back up. You usually get scared out before it goes down and makes the real move. So you can actually catch this trade and you can then catch the second trade and then use the overall volume profile to understand where this is likely to happen. Because in these higher volume nodes specifically the value area, really anywhere that has high volume like here or here, you're going to likely see consolidation. Like even if you're right, you're going to see a little bit of chop before we make the big move. And that's normal. And once you expect this and understand why the market is doing what it's doing, you're not panicking or switching up your plan or doing dumb stuff that keeps you unprofitable because you have a very clear outline and a clear understanding of what's going on. Because most of your problems that you think are psychology, they're not psychology. It's just because you don't know what you're doing. And I say that with love because I used to do the same thing. Now let's say on the flip side you didn't catch any of these, and let's say you come down into the value area low and you get some kind of move down, you hit into this level, and then you get a very aggressive move. This is where you're going to expect very rapid sell-offs. And if you guys follow me on any social media and you see a lot of these bigger trades that I'm taking, these are a lot of what those setups are, are those breakdowns or breakouts from the value area through a lower volume node. Because remember, in this area we had not many traders positioned. So sure, you might have a fair value gap, but if we had reason to believe we were bearish on this day, then you wouldn't be paying attention to this. And I'm going to give you a mechanical process to figure that out. But understand that instead of just looking at every fair value gap as a level of support, a lot of times you're going to look at them as a level to trade through. Right. So where would you take the trade to? Well, you can look and see we have this high volume node over here and you would understand the market's likely going to chop there a little ways and you could just capture those quick moves. Understanding this will— this alone will change your trading. And obviously we're going to go over a ton more and show you how to tie this all into a very clear strategy. But I just want to give you an overview of what the volume profile is, how the levels are important, and how this can affect your trading. Okay, so we have now went over what the volume profile is, and if this doesn't make full sense yet, promise it will. You're going to actually see it over price examples and combining all of these concepts, and it'll come together very nicely. Now I want to talk about how we can mark the volume profile and the settings that you need to use. So for this, I'm using a tool called DeepCharts. Now DeepCharts is a little different than TradingView because it actually has real volume data. Now, if you're on TradingView, you can also get the volume profile with the premium subscription that you have to pay extra for. But the thing is, these areas of volume, they're not actually measured by volume. And you might be like, well, how is that possible? I don't know why they do that either, but it's the way they do it because in each of these areas, one volume is just counted as one tick up or down, meaning if Nasdaq moved 0.25, it's going to count that as a volume, right? Even though there could be 10 trades happening or 10 volume in that one tick, it's just going to count it as one. So it's an aggregate, it's a proxy of volume, it's not real. And if you're going to be paying for volume data that, you know, you have to pay for this subscription of TradingView, then you might as well pay for a real tool like DeepCharts. And I have a discount code down in the description. When you use my code, you also get access to my full workspace and you can literally just come in and load a workspace and you'll just have my workspace turnkey. You don't have to do any work of setting this up, which saves a ton of time because these softwares, if you're newer at first, can be a little challenging. But I went ahead and set up this whole system for you guys. Now, for those of you who don't sign up my link, that's fine. We're going to go over a quick way of how to mark these tools anyways. So what you'll see right here on NASDAQ that I have marked is something called the RTH profile. That stands for regular trading hours. Now, why would I mark out just the regular trading hours volume profile? And to be clear, when I say the RTH profile, what I'm saying is 9:30 AM Eastern Standard Time to 4 PM. This is Eastern Standard Time. If you need to convert that to your time, look it up on Google. Now when we look at this chart right here, these are the RTH sessions. Now I want you to notice the volume, like the actual volume by time. Notice in these ranges how much higher the volume is than all of this overnight session. You can very quickly and easily see that the real money is trading during the RTH, also known as the cash session. Now, this is why you'll see a lot of these big overnight moves or gaps end up getting faded, because there wasn't really money behind it. And we're going to go over how you can avoid that and how you can use these RTH profiles in a ton of different ways. Now, when we talk about marking profiles again, we can do it a couple ways. Now, the first way is that RTH profile. For this, I just have an indicator set up It's just the Delta Vol Profile, or I think it's the Deep Profile is what it's called. Um, so you'd go on here on your indicators and you would hit Deep Profile. So the way that I have mine set up is very simple. If you just go into the settings, I'm going to have it set up with the Delta and the volume. I'm going to have it as one day profile, and then I'm going to filter it by the RTH. Very simple. Now that is going to show me the volume profile between that 9:30 and 4:00 PM. Now another way you can mark out the volume profile is by using a week. So these are going to be the cash session, meaning just the New York session each trading day. But if I want to see a little bit of a broader perspective, I can go out and I can actually just mark the week volume profile. So this is going to show me the volume profile over the entire week. In the last couple of weeks, it'll separate them out. And this one is literally just since the market opened at 6 PM on Sundays all the way throughout the rest of the week. And you can look at this and see, okay, well, this market is definitely leaning bullish. And this is why I've been bullish for some time, even though we're at all-time highs, and telling you guys to be bullish, because it's so obvious when you have a tool like this, right? You can literally see what is happening down here when price gets to discount. Buyers are aggressively buying at discount. You're seeing liquidity sweeps and inverse fair value gaps to the upside from discount. That is the definition of a bullish market. Then the market is coming down to this red level, which is the point of control. And how is it reacting to it? Moves right away from it. Also, you can see that we're getting above the value area and holding above it. So that is the definition of a bullish market. Now, another trick you can use is see how we're coming above the value area right here. And we created a lot of volume. So this is a concept called acceptance. So if we have this right here and we know that there was a lot of volume traded outside of a key level, we also know we're at all-time highs. We also know we are above the high of the week and other points of liquidity. But you see the market trading a lot of volume and the market didn't immediately reverse. Yes, at some point it did have some moves to the downside. However, However, when you understand that we traded up higher and the market was accepted up here, you're going to expect a lot of these moves to the downside to be reversals to the upside. So they're fakeouts, right? So like right here, for example, in this example right here, if you look, we had traded a lot of volume outside these key levels at all-time high. This shows acceptance. So even though we had this very sharp move to the downside, you can see this was just a fakeout and actually provided the best buy all week. Now, this happens on the weekly profile. This happens on the daily profile. And I'll show you the next way that I like to draw the volume profile. That is a very dynamic way of doing it. And I'm actually going to show you two more ways you can draw the volume profile. Now, I want to be clear that the way you use these is the same in all. You're just looking at different sets of data. So if we want to go down to a lower timeframe, let's say we want to go down to the 5-minute. And it takes a second to build these charts because it's actually, you know, loading in a lot of real data. Let's just say if we want to look at the market from just one swing point, so we'll use this big move to the downside right here and we'll say, okay, cool, like what happened in this actual move? Like what caused it? You can go over and mark out a volume profile using this tool right here, and it's going to be a fixed range or just like a custom range. So you can just drag and drop where you want to mark the profile. Okay, so let's just say if you wanted to mark a swing point and you're trying to say that, okay, well, I want to see if we had a liquidity sweep, or I want to see if this is a fake out. Well, if we look at this volume profile and we're expecting it to be a fake out that's going to reverse to the upside, what do we want to see in order to confirm that that's happening? Well, we could look at the value area. Now, if you see in this example, the value area I have is marked out by this blue zone, and it has these lines at the top of it. So what we would want to see in this area is using this like a key level. So if we know that we had this big move down and we know that we had traded into some area of liquidity from over here, which we do know from what I showed you before— so let's just say you know that there's a key level right there, you know you're expecting to be bullish, and then we hit into that level, we see a big move to the upside and then you get the same ICT concepts you're looking for already, like an inverse fair value gap. So right here we have this fair value gap, right? We inverted it right there. So that right there could be the setup because you look at this and say, okay, well, this is helping me see whether or not this is actually a fakeout. Because if this was actually going to continue, you wouldn't usually see this type stuff happening so fast, right? You would see us hit into this value area low and then go down lower. So you can use this on swing points, and you can also use this on very specific ranges of time. Just like you're marking out the RTH profile on the full day, another really cool way that you can mark out this profile is going to be by marking out the opening range. So let me go and show you a very good example of this, and you guys have probably seen me talk about this a bit with the First Candle Value strategy. And I'm going to show you exactly how I draw that range. So as you can see right here, this was on April 22nd at 9:30 AM. Now I actually traded this move, as you can see right here. Now, if you want to get access to my free community where I post my trades and a ton of insight on the market and tons of free value, then I'll leave a link down in the description. So if we want to mark out the important ranges of the day, whether it's a liquidity sweep, whether it's the RTH session, whatever it is, it has to be an important range. So we know that the opening range, meaning the first 15 minutes of the day— now some people will use first 30, some use first 5. I've used first 5 for different strategies. Essentially the idea is this first segment of the market opening, you're going to see the highest amount of volume. So it's the most important time of the day because where we see the most volume and how we react to those levels gives us a cheat code. To understand who's in control of the market. For example, let's say if I mark out these first 15 minutes, okay, so I've got the first 3 5-minute candles, right? So we've got the 9:30 candle, 9:30 to 9:35, 9:35 to 9:40, 9:40 to 9:45. A lot of people will say the 9:40 candle, but remember, it ends after 5 minutes. So if we know that this has the most volume throughout the day, how we react to this range tells us a lot. Now, in this example right here, you see us come up to the top of that value area high and we closed a candle above it. That helped me provide an entry that I was able to make that trade on. It's very simple because if we start to see the market displacing out of this area, you're likely to see a big move because you understand that we are showing buyers are in control. Because if you look right here in this profile, we can see that a lot of market action happened right here and a lot of volume was traded. but then the market moved up higher. And if sellers were in control in this area, would they just let the market move higher and put them into the red? No, they wouldn't. And another really cool thing about DeepCharts that I love is you can actually see on the left-hand side, which is a delta profile, where the buying and selling happens. So these blue bars are where we had a lot of aggressive buying, meaning people trading at the market, and the gray bars are where we had a lot of aggressive selling, meaning people selling at the market level. If you want to have a whole video on more order flow stuff, leave a comment and I can make that. But really simply put, and we're going to get into a little bit of stuff later, this is just showing you where people are more aggressive. So if you see that more people are aggressive on the selling side and you see a lot of volume, but then the market isn't moving to the downside, and this is where a lot of people misunderstand this stuff, they'll say, oh well, we had a lot of selling, a lot of volume, the market has to go down. Not necessarily, because if somebody comes in even after all that and let's say there's a bunch of sellers that are just trying to aggressively push the market down, but somebody on the other side, smart money, is sitting there willing to buy from them like you see right here, then we're likely going to see the market moving up. Because let's just say we had all these aggressive sellers coming down this candle, right? All the retail traders, we'll call it, they're aggressively selling to push the market down, push the market down, push the market down. But then what happens? Then we see this sweep of the value area low, and we see a lot of big moves from that. We see some aggressive buyers step in as well, and we can see that they took control of the market. And the way we actually confirm that is price closing its candle outside of this high volume node and outside of this value area. So hopefully that makes sense. We're going to go into a lot of ways to combine this, and I wanted to take time to really break down the volume profile for you guys and show you this software and how to use it. Because it's extremely important for the rest of the video. All right. So last but not least, let's talk about the composite profile, which you see over here on the right side of the screen. So to get to this, you would just have a profile and you want to set it up like this. So you just change the period to composite and just have volume on. Okay, that is the only difference. Now you can split the time in different ways, which we'll get to later on. But for now, just understand that this one's very, very simple. You can use this as an area of either high or low volume. That's really all I use it for. So for example, like, let's just say we understand that the market is bullish. Well, if we understand the market is bullish, we're going to look at this like peaks and valleys, remember? So if we look at the market as a bullish market, we're going to be looking for liquidity sweeps into these low volume nodes. Okay, so you can draw this out and just draw out where the market had started to descend. Another cool tool about DeepCharts is if you want, which I personally like marking them myself, but you can actually go on here and there's a setting called Peaks and Valleys. You can go and click and you can just turn on the peaks and valleys and have them to where it will mark them for you. Okay, so it's pretty cool for especially for a beginner. It just kind of marks them out. But I like to just mark them myself. So we have a valley, meaning this downhill area, and the lowest point of volume is often going to be the area you're going to get the most high probability reversal. So if you want to be a real sniper here, just look at that precision. Look at how the market danced off that level all week. And this is exactly what a lot of ICT traders look for with these complicated levels that just don't have as high of a win rate. Because if you look here, sure, it only hit 3 times the week, but Every single time it hit, it worked. Every single time you got a liquidity sweep into it, it worked. You see what I mean? Just much, much, much more powerful. And then also look at all these areas you usually would chop yourself to pieces and lose money, right? This kind of trading is typically where people lose money, all this chop. But if you understood that in this area is likely to be choppier in that high volume area because we have a mountain here, you would wait until we get on one side of it And that's where the best trading happens. You see, this is where all the volatility is. Now, these are just a cool couple of ways you can leverage this. I think it's important you learn the foundation of what we're doing before we go into how to actually combine them with the volume or with ICT concepts. And if you're still here at this video, know that you are destined to be more successful than most traders because most people probably didn't even make it this far. So congratulations for that. All right. So that was a lot. We just went over how to mark the volume profile and the settings. And now you know more about the volume profile than 99% of ICT traders. Now, to kind of recap, remember, we can mark it on the RTH, the weekly profile, the fixed profile, which is when we drew the custom ranges, and then the composite profile. So those are the 4 ways you can mark this. And you kind of think of it more so like this can give you, uh, intraday and daily bias. This can give you weekly bias, and this can give you trade confirmation. And the composite profile can give you levels. And really, all of these can give you levels, right? The intraday levels for the RTH, um, weekly levels for the weekly, uh, etc., etc. They can all give you levels, but that's the only thing I really use the composite for. Now let's get into the exciting part, which is how we can actually put every ICT concept you already know on steroids using this ideology. Now, the first concept we're going to go over is the number one most struggled with ICT concept, and that is daily bias. And daily bias is simple. It really just means are you bullish or are you bearish? It's a kind of a complicated way of saying that. Now, why is this important in the first place? Well, because if you have a bullish bias, trading is extremely simple in ICT. You just have market structure to the upside. You wait for some kind of liquidity sweep or a fake out on a low into your fair value gap. And then you look for a trade in that swing leg, and it's as simple as that. And it can be as simple as that. The problem is that most people don't get their bias correct. And the same thing goes if you're bearish. You would just look for some kind of, you know, liquidity sweep to the upside into a fair value gap or a key level, and then you'd look to sell in here once you got confirmation. And it seems simple, but if you've been trading ICT for any amount of time, you've probably realized that it's actually not that simple because there's a huge bottleneck here. Instead, if you get the wrong bias, which in ICT there's no clear process on how to do this, then every single lower time frame setup you take fails. And then what I see a lot of traders, they think, I have bad psychology. It's like, no, you, you don't. You don't have a mindset problem, you have a process problem. Because when you have no clear process, this leads to overthinking. There is a reason why all businesses in the world have something called a SOP. And if you're not familiar what that is, it's standard operating procedure, because If you don't have a clear way of doing things, you will not be consistent. It's literally that simple. So why should it be any different for you as a trader? So we're going to go over 3 steps to find mechanical daily bias. Now, what mechanical means is it's the same thing every single time and it removes your emotion from the decision making. So step number 1, we're going to mark the New York session profile. Step number 2, we're going to look at how yesterday closed. And step number 3, we're going to talk about how today opened. So we have already went over how to mark out the New York session profile, but just as a quick refresher, you mark out the 9:30 AM Eastern Standard Time to 4 PM Eastern Standard Time. And after that, we're going to look at how yesterday closed. Now, when I say how yesterday closed, specifically we're looking at the value area high and the value area low, because remember, like I said, a lot of what we're doing is going to build off of the concept of fair value. So if the market said that these prices were a fair area and they agreed on that, but then at the end of the market we see the market rallied up and at market close at 4 p.m. EST right here, we see that price closed above that value area. Well, that is saying the market is bullish because if the market is literally rallying and it's staying at an area where typically you're going to see a lot of people, you know, get out of the market or take profits, etc., etc. And the market just hangs out up there and it closes, that is a very bullish sign. Now, what's even more bullish is if you had a very large high-volume node created. But even if the market just closes outside of that value area high, that is going to give you a bullish bias for the next day. And then on the next day, you can look to trade from that previous day's value area levels. Now, for step 3, you want to look at how today opened. So let's say if you have yesterday in the market and let's just say it closed inside the value area or wherever it closed. It doesn't really matter for this. How did the day you're actually trading open? So if it comes 9:30, right, it's 9:30 a.m. and you look at yesterday's value area low and let's say you closed way under it. Well, that would give you a bearish bias and you would expect us to trade up into that value area low or fair value gaps or other key levels around that area and then get a sell-off. So this is literally like a cheat code at understanding not only bias, but also where you're going to look for trades because of the overall data you're seeing with the volume profile. Because if we see that, well, today the market is opening up way lower than what yesterday was deemed as a fair price, then that would literally tell us that, okay, well, the market went from a state of balance, we had to go to some kind of imbalance, and now we're just saying, cool, the market is valued lower. If we agree on that and that the market is valued lower, That is the definition of a bearish market. And you don't need to watch market structure, all these things. You can just see value is being moved lower and vice versa goes for value moving to the upside. It's the same thing. You're just looking at something and this is called value rotation. Okay. Now, a couple of questions you might have. Well, what if we closed yesterday bullish but open bearish? And what about FOMC or NFP or holidays? I know people are going to ask these questions. So let's go on a chart and break down both of these and show you some examples of what you just learned. All right. So as you can see, we are here on April 15th, and this is on NASDAQ. So we have the RTH profile, and if you look right here, the market ended up closing outside of it. Now if you look, where was the market at that 4 PM area? We closed very far outside of it. So if we look at the next day right here, we opened up and you had a move to the downside at the beginning, right? But if you understood this concept, instead of getting faked out by this move to the downside, you were looking for areas to buy and were able to catch a very expansive move to the upside, probably up towards these equal highs. So how do we tie this in with the ICT concepts you're already using? Well, we can then look at the market in this volume profile and find hidden key levels that already line up with what you're doing. So let me give you an example. We'll head over to a higher time frame. So as we said before, there are three types of levels in the volume profile. We have the value area levels, which right here you see the value area high, you have that point of control, and then you have the value area low. You also have the nodes. So notice right here we started to form some of these little mountains and we had a couple valleys inside this area. So what you want to look for are fair value gaps inside of these levels, because once you have that confluence of having the low volume node and your fair value gap, it becomes much more powerful. Because a lot of people were probably waiting for this fair value gap because it's where the move started. But if you look at this example, then you could say, okay, cool, where is the first fair value gap where we have a low volume node? And if you notice, we have this low volume node right here and it overlaps with that fair value gap. Okay. Now, another thing that's really cool you can do here is instead of just trading the edge of the fair value gap, you can always look and say, like, where did the actual low volume start, or the lowest point of volume? And you can see in this volume profile, if we zoom in even more, you could see the lowest point of volume was right in here in this little pocket. So you could say, okay, cool, well, I'm going to mark out just that area of the fair value gap. And you can see that that area is where we got that bottom of the day. Now, you could have just been looking for your entry models, and we're going to go over a full strategy of how you can actually catch this kind of trade. But I just want to give you an example of getting bias, meaning we closed above the market. And then also, if you look at the next day, we opened above the previous day's value. So right here we opened above yesterday's value area. So this is the market telling you the market is bullish. Don't try to be selling here. And if you understand that, then you can avoid any bad trades on the downside and be patient and understand that you're just waiting for a key level to hit. Now we're going to go over other ways you can find these key levels as well. A lot of different ways that you can leverage this stuff that's going to help you overcome a lot of the problems ICT traders have. But as you can see on the next day right here, well, the market closed inside of the value area. So just based on this close, we didn't have any bias on that. Then if we look at the next day, we opened up way outside of the value area. So that can give us a bullish bias. Now, if you look right here, What ended up happening? Well, the market kind of came down into a fair value gap right here, and then the market rallied to the upside. Now, in this example, the fair value gap wasn't a part of the previous day's value area, but if you look at the market and just understand that you had bullish bias and you said, okay, cool, well, if I have bullish bias, I'm looking for key levels like my fair value gaps, or whatever you're looking at, whether it's liquidity, any key level, it does not matter. It's just going to be a level of support you're anticipating. Once you have that clear bias, you understand that the market is opening up right here in that level and you got your entry models to the upside. You can see that the market ended up making a nice move. Now, this one wasn't as expansive and it's not going to be an infinite rally every day, but understanding this simple trick can help you so much. Now let's take a look at weekly profiles because this can help you a ton as well, because obviously you want to know which way the week is likely to go. So if we see right here, we had the week's value area high from the last week. And then if we notice, the market ended up gapping down right into that value area high, but we opened above it. So notice right here where this market actually opened. And this is a unique example and it just shows you how powerful this is because this could have helped you get over a war scare where a lot of people are thinking, oh, the market's going to crash. But the market opened outside that week's value. And not only that, we tested that previous value area high. And had a nice move to the upside. And now if we look at this week, has this week been bullish? Absolutely it has. So you can use this on any time range. I'm just teaching you on the RTH and the weekly because that's what has worked the best for me. So for this question, what if we close bullish but open bearish? Well, what you want to look at is this weekly profile. What is the weekly profile telling you? Because if the weekly profile is bullish, let's just say if you have some kind of conflicting analysis on the daily or the RTH profiles, well, then you automatically can mechanically remove that conflict because you know that the weekly profile is telling you that we're bullish. Now, another thing you can do as well is just kind of look at the market from a position of volume. And when you do this, you can even remove price. And I know this might sound a little crazy, but you can get a little bit of a clearer idea of what's going on in the market. Because if you just look at this and just ask yourself, where are the value areas moving? Where are these blue zones moving? Are they moving up? Yeah, overall they're moving up. And this shows you a real trend, because when you add price, what ends up happening is it becomes very choppy and there's a lot of market structure down, market structure up, down, up. And this is where a lot of traders get confused. But when you remove all the noise and see where is the market really finding value based on data, not your assumption or discretionary way of marking price, that can tell you what direction the market is moving. And this alone, if you master this, will eliminate so many losses from your trading. And most of you guys, if you were able to just eliminate half the losses you take, you would be a profitable trader instantly. So simple tricks like this— when people ask me like, what's the light bulb, what, what was the big breakthrough for you? It's not as if there's just one, but moments like this hopefully are what that is going to be for you. and for FOMC and NFP and holidays, I would just omit holidays. But for FOMC and NFP, these are actually very important days because we wanna see after the smoke clears on the next day, does that same energy continue? Like for example, let's say if you have FOMC, you had this huge crazy day, and let's say your volume profile looks something like this right here. We had a high volume node and the market just rallied. You wanna see like once we come back down to that area, cuz you oftentimes will, How does the market respond? Because if the market starts to fail, you could say that this was just a huge trap. And anytime you have a huge trap is when you're going to see very aggressive moves in the other direction. Or let's just say if the market came back down into this range and started to show signs of the upside, you know, it's going to be a huge move because this was actually real. So either way, it can give you a huge day on the next day. And it's why it gives you patience understanding this, because now you're not trading FOMO of this because, you know, a good move is right around the corner. Now, a really easy way to catch moves like this is by order blocks based on the volume profile, which is what we're going to go over next. So we've got daily bias covered, and we even went over a little bit into weekly bias, and hopefully this changed the way that you look at the markets. Now let's talk about order blocks, which is one of the oldest and most popular ICT concepts, but often people misunderstand these. So simply put, order blocks are just a fake-out candle before you get a big move to the upside, right? So like, let's say if you're having a big move up and then you have this move down. Let's say if you bounced off the last down candle before an up move like you see right here, that would be your order block. Now there's a lot of different like reasonings of why this occurs in the ICT world, but I don't want to focus on that because we want to focus on what we actually know. And what we actually know based on the volume profile is that if that is the case, right, if we're saying that the order block was a down move that was a fake out by institutions to like you know, trick retail traders into selling, you know, to give them their liquidity. Well, if that did happen, then we're going to have a tremendous amount of volume because, you know, smart money is always going to leave a footprint. And that's why the volume profile is so powerful, because they can't hide the volume. So if we see the market made a big move to the upside, this big move, and we know that there is a reason to be bullish based on what we went over in bias then you can look at those areas, order blocks, as a very high probability zone, so long as there's a high volume node at that level. So if we have a high volume node, then we know smart money was involved and that order block is confirmed. But if we have an order block with no high volume node, which you will see a lot, then we know that that's not a good order block. So it's stupid simple, but it's a very powerful filter because it can remove all the fluff from your charts. With, with ICT, that's the biggest thing, because if you look at fair value gaps and Breaker, all these things, they're everywhere, right? How do you know which ones are going to work? And that is what the volume profile is good for. Now, if you really want to put out order blocks on steroids, combine them with the point of control. Because remember, the point of control, or the POC, is just the area of the highest volume. So like we were talking about that FOMC example, let's just say the market had a, you know, consolidation and it moved all day, chopped around like most FOMC days do, and had this massive move, right? And then it kind of just closed up here. Well, you would want to look at this volume profile over here and see like, okay, cool, like where in this area, where in that higher volume, uh, node in here, like let's say if you had the point of control like somewhere in here, and then you could find the order block that was holding right there, and that order block is very likely to continue. So let's look at a price example. As you can see, this is on the same setup that we just went over in the daily bias. And if you use the Mechanical 3-Step Checklist, you would know that today is bullish. So if we're bullish and we're trading into a key level, that is exactly where you expect a bullish order block to form based on ICT concepts. So we're going to look at the candle that traded down into that level, the last down candle, which you can see is right here, this large candle right here. So that would be your order block. And as you can see, this order block worked. Now, how could you have known this was likely to work beforehand? Well, if we look over to the left, we can see that there is a lot of high volume in this area. So right here you can then look and validate that order block, and you can also know where inside the order block is the best area. So if we look right here, this is really the best area of the order block. It's the highest volume. So you can see that once the market hit into that level, the market started to rally. Now, another thing, if you haven't noticed already, look at where else that happened. Right here at the value area low. So you can see that this was in a discount. So with ICT, you'd have to like mark the range, guess which one of these order blocks was going to work, and it becomes very overwhelming. And every time you have to do things like that, you're burning cognitive energy. You want to think of it like you have so much gas in the tank, you want that to be focused on making the best decisions, not overthinking a million different things. And using volume profile can absolutely supercharge your decision-making because it does a lot of the thinking for you. You just look and say, okay, cool, I'm biased, where am I looking to trade from? Right here. Cool. Okay, we have a key level, where inside that key level do I trade from? Cool. And I have extra confluences. It's, it's very simple, right? And then, then you can use the same things. Look, right here we had your inverse fair value gap. So let's just say right there you waited for that and you just traded on this candle. And then look to trade up towards that point of control. Good risk to reward, very quick trade. And you can see that you could have caught multiple trades in this day. And then if you want to zoom out, you can see that up here at the top of the day, there was an order block where I'm sure a lot of ICT traders wanted to sell because, you know, we're at all-time high, you got a liquidity sweep and we have this order block. But as you can see, there was no volume here, very little volume. So whenever the market did eventually hit into that order block, it blasted right through it as if nothing was there. So this one little simple filter, again, like everything else I'm showing you, can make massive differences in your trading. So just to recap, order block that is sitting on a high volume node, that is a valid order block. Order block that is sitting in a low volume node is likely fake. But an order block at the point of control or the edge of value, like we showed you in that area, this is going to be your strongest setup whenever mapping out order blocks, and it's going to give you extremely high risk reward. All right, so we can now check order blocks off of our list. Now I want to get into what might be my favorite part other than the full strategy, and that is liquidity. Now, most of you guys have understood this, but most ICT traders are barely scratching the surface with this because they open their chart and they just try to trade every single liquidity sweep. And as you probably have figured out, this doesn't work. And that is why a lot of ICT traders aren't profitable. And to overcome this, I'm going to give you a 3-step mechanical checklist called the SPC method. So what this is going to do is going to take all those sweeps that you usually trade, and we want to filter them down to only the best ones that you are going to execute on. And I'm going to give you a way to find targets based on those liquidity sweeps. Now, if you aren't already familiar, a liquidity sweep is pretty simple. Let's just say if we had came up here and you formed some kind of equal highs and the market came up, traded into those levels and then reversed, that is what we call a sweep. And ideally you want to sell from the top. Now, sounds pretty simple, but as we all know, it's a little bit more complicated to go out and do, because what ends up happening is when you trade with this mentality, it's kind of like right now the market is at all-time highs and everybody thinks we're going to be bearish because they think every liquidity sweep, every time you hit into equal highs or lows, that you're going to reverse. But as you have probably figured out by now, a lot of the time the market continues. I mean, if we look at a chart and we just zoom out and don't overthink things. This is where I like to say that, you know, we want to, um, kind of reignite our early trader brain. How many times does the market continue versus reversals, right? It's much, much, much more often for the market to continue. So you need to understand how to catch those moves and how to avoid the bad setups that a lot of ICT traders are plagued by. Because when you try to trade every single liquidity sweep, now all you're doing is, is basically saying the market is never going to have a breakout, and you sacrifice so many good opportunities. So we're going to give you a mechanical way around that. So with the SPC method, you're going to need to understand something called CVD. Now, this is something that a lot of people overcomplicate. We're going to break it down really quickly and very simply. So Delta— you want to just think of like, who is in a hurry? Like, who is aggressively trading? Okay, so every candle is made up of buys and sells. Delta is going to split them apart, and it's going to specifically focus on market orders. So like when you trade, if you go in to take a trade, like let's just say if I go over to TradingView, so let's just say I want to take a trade right now and I go over here and I click buy. Well, if I am going to click buy and I'm at the market level, if I clicked buy right now, it would just immediately fill me for the best price that was available. Now let's say if I wanted to set a limit and I said, well, I'm not comfortable paying where we're at, I want to set my limits where the highest limit I'd pay for it. If I set my limit for whatever this price is, uh, $27,222. That's me saying that's the highest limit I'll pay. So I would be passively trading. I'm not willing to get in the market right now. Now, if I was very bullish right now, I would just want a market order so I can just get in. So think of market orders as showing like who's in a hurry, like who is ready to be aggressive. And a lot of times this is going to be retail traders because larger institutional traders, they have such a big order that they're not going to just execute it all at once. They want to get a better price. So we can use Delta, which is the difference between aggressive, meaning those market orders, and you can see what side of the market was more aggressive, right? So if we had 300 market buys and 500 sells, well, that would give us a negative Delta of -200. So that can show you in that candle there were more aggressive sellers than buyers. Now, why is this important? How are we going to actually use it? Well, we're going to use a tool called CVD. And essentially what this is, is going to be one number that adds up all of the delta of each candle throughout the entire session. So it helps you filter this. You don't have to look at footprint charts. I know a lot of you guys may be overwhelmed by those. If you guys want me to make more videos on that stuff, again, just comment down below. I'm happy to do it. Um, you don't need that for, for this. CVD is just very simple and it's very easy to use, and that's why I like it. It's one of my favorite order flow tools. So if we look at CVD, or cumulative volume delta. And we can go on DeepCharts to view this. You can just go in, you add the cumulative volume delta indicator. So you would just search and you would just go cumulative, uh, delta cumulative candlestick. That's how you would get this. Again, you'll have this template if you sign up with my link. What we're going to look at here in the CVD is we want to see how the market is moving in relationship to price action. So it's, it's just like price, it's candlesticks. You can see that like, okay, aggressive market buyers, we're getting really aggressive throughout this move. You can see aggressive market sellers are getting really aggressive this move. Now why is all this important? Well, we're going to go over that right now. So I'll give you one quick example. Just, I didn't even plan this one. Um, if you look right here, notice how in this example we have a higher low in price. So if we look at price action alone, we see that we made a higher low. Okay, now if we look at the CVD though, we made a much lower low. So what does that tell us? Well, that says that we had a lot of aggressive market sellers. Retail traders were really bearish here. Retail traders were just selling aggressively. They said, we're gonna go down. But passive buyers, meaning smart money, was absorbing them. Now you've probably heard the term absorption a lot, and this is how you can view that. Because if we see a lot of aggressive sellers putting in a lot of work to try to push the market down and that work isn't rewarded, then that's going to be the base of a bullish move because those sellers are getting absorbed. And think of it like this, and this is why I say ICT is literally order flow, but you're just using different tools because if you're saying that, you know, you want to be on the right side of the market and you don't want to be liquidity, like these guys are getting turned to liquidity, right? So if you see where did this selling really start, it started up here. So there's going to be guys in cells right there. There's going to be a guy in a cell all through here. There's a bunch of people. So think of it like once the market moves to the upside, you're taking out their stop losses and they have to be then turned to buyers because they're getting turned into liquidity. We'll say it like that, right? That's the idea in ICT. And that's, that's what you're looking at here, because once that happens, you know that you're likely bullish. So to kind of break this down simply, let's say on this day we were bullish. Okay, we trade into the value area low. Then what happens? We then trade back up and we get this bullish setup, which, you know, in ICT, let's say if you trade into a key level, which this example is that value area low, and then you trade into this fair value gap and you invert it. Well, in ICT, that right there would be bullish. You could just long right there. But let's say if you wanted to wait for extra confirmation, you could then see that the market had a bullish CVD divergence. Because if you're long right here, if you're trying to manage your trade, let's just say you're in a long right there and, you know, your stop loss was down here below this value area, right? So once the market came down and you had the, uh, the CVD divergence, that's extra confidence in your trade that you're likely going to be bullish, right? Because again, just to kind of recap here, It's very simple. Don't overthink this. If you have a lower low in CVD but a higher low in price, that is bullish because you see a new increasing amount of retail sellers, but smart money buyers are absorbing them. Okay, now you want to use this in context, and we're going to break down how you can use this with liquidity sweeps, but you also can see you can use it with a ton of different things. So if we go over here now and we want to mark out this, um, this little chart that I was going to mark out before I explained that. We can see like if price action is moving up and we see that CVD is moving up, then we could say that that is a true trend, right? Those aggressive traders are actually in control because sometimes they are, right? Um, a lot of times they are. And if we can see that CVD is increasing and price is also increasing, like let's just say if you hit into a key level Well, that's not necessarily a liquidity sweep. You're not expecting it to reverse because the same traders that are pushing to that level are still in control. But let's just say if, you know, the market started to move and we hit up into this area and the market was just starting to consolidate and we weren't making higher highs, and let's say on the way up there you saw CVD move up and as you hit into this key level, you saw CVD continue up. Well, that's saying buyers are really trying to push the market up. But if price isn't showing that it's not making higher highs and it's actually making lower highs, then at some point there is going to be an imbalance because these aggressive buyers are going to get absorbed by those smart money sellers. And once that happens, remember we talked about balance to imbalance, you're going to get that massive move and then CVD will usually follow. So in SPC, absorption is required and we want to make sure to use this at a key level. So now let's break this down before we hop on a chart to show you some examples. Let's just say the market is consolidating and we don't want to trade on this because we're in the value area. We know that we're likely to consolidate. We're just waiting, right? So then the market comes up, it hits into your key level, and you can also see that there is a low volume node above, right? Let's just say if this was the previous day's value area high and you're hitting into this area, you see a low volume node. So then let's say you're looking at the CVD and as we head into that key level, you see the market was making higher highs in CVD and then the market hits into it. You kind of just sit here and this is where a lot of you guys will have like lapse in confidence. You don't know what's going to happen. You start switching up on your plan. But if you look at the CVD and you can see CVD is just ripping to the upside, right? It's ripping to the upside, but price is just stuck. Well, then, you know, at some point likely price is going to reverse. And at this point you can just literally sell and put your stop above here and you don't have to wait for that second sweep. And catch the move. Now let me give you a different example. Let's say the market hits into this level and you're hitting up higher. And let's just say even you are maybe kind of moving down, but you keep making higher highs. A lot of times people look at this and they'll say, oh, well, this is the market preparing to sell off. Well, if you look at CVD and you see that CVD is just consistently rising, making higher highs, and price is also making higher highs, don't get in front of that freight train because that's likely to continue. And you can actually reverse engineer this and get a breakout trade. So not only are you removing the bad liquidity sweeps from your trades, but you're also opening up the ability to take trades in that direction. And, and this right here, out of everything I'm teaching you guys here today, honestly, this is probably one of the biggest breakthroughs I ever had as a trader. Because when you realize this, you open up an entire new world of opportunity. Because all those trades you used to sit there and be confused and overthink on and take losses on now are an opportunity to make money on. So that is how we spot a high probability reversal or continuation. Now, bonus for reversals if this is hitting into any key level or liquidity, right? So the previous day's value area low, value area— this is supposed to say value area high, um, but the previous day's value area low, high, or point of control, the previous day's high or low, which is a very common use of liquidity in ICT, or the higher time frame swing point that you're looking at. Could be like a 4-hour or a daily or just some kind of structural swing point. So now let's take a look at another high probability reversal. So let's say the same setup, right? You hit into, you know, price has hit into some kind of level and then you see Delta dying off, right? And not only Delta dying off, Delta increasing to the downside. So let's just say the market hit into a key level and you see a lot of aggressive buying into it on the Delta, right? So Delta is moving up and then immediately hits it and it starts really moving off and you get your same, you know, confirmations here. That is where you would be very confident as well in the market being a liquidity sweep. But again, if the delta is staying strong, then it's likely a trap and you're not going to be trading it as a sweep. So in that situation, you either wait or you flip bias and go with the breakout. And this is again one of my favorite setups. Like, let's just say if you're bullish and you're heading into an area where, you know, the old you would have said, oh, equal highs, but, you know, because of the mechanical bias checklist we went over that we're likely bullish, you see this and you see this kind of setup, now you're not sitting there overthinking and scared. You're executing, right? You're trading the breakout while there's a bunch of ICT traders that are saying that, you know, you're liquidity or whatever like that. It's just, you know, this is how you actually trade. Now, another thing that you can use to trade these continuations and reverse engineer liquidity is let's just say if we hit into, you know, your liquidity level, right, whatever level you're heading into, you hit into the swing highs, equal highs, whatever. And the market then forms acceptance by showing high volume outside of it, right? Because if the market just hits into it, like, let's just mark this out and draw this out for you. Let's just say we hit in this area and the market's just sitting there. We're, you know, if the CVD is aggressive, great. But even if it's just consolidating and the market's just sitting here, that means they're accepting that higher price. It's developing value. It found a state of balance at an area where if it was going to be bearish, it should reverse. If it's bearish, it should hit into this and pretty quickly start to reverse. The longer it stays, the more likely that any fake-out down move is going to be just that— it's a fake-out. Now, how many times have you guys been in trades where you hit into a level, you waited for some kind of reverse, when it finally happened, and then immediately it just shoots to the upside? That right there is why. And again, once you understand this, now you're not sitting there confused, an anxious mess through this consolidation, because you're looking at it like, bam, that's my opportunity to long. And you see how groundbreaking this can be once you really start to get a grasp on these concepts. Now, for finding a target, let's just say if you did confirm that you got into an entry and you were above the value area high, well, very simply put, you could just trade to the point of control as a first target and then the second target as a value area low. Now, I don't like setting a TP order. Now you might be like, well, what is— how does that work? Let's just say if the market hits into my level right here, I'm just looking up to trail at my stops right just above it because a lot of times the market will explode to the next level and I would rather just hold on to the trade. And because if I put my stops right here and the market's moving down, worst case scenario is I get taken out for just a little bit worse than my, you know, TP. But best case scenario, the market freaking falls and I get into a huge trade. And that's how you see me taking a lot of these bigger wins is because I hold on to my winners. I don't just take them as soon as the market, you know, gives me a reason to get out of the trade. I want to be in the trade as long as it's a winner. So now let's say when I say liquidity beyond— so I'll give you some specifics here. Let's just say you had another volume profile that was the, let's say, a day before or the next day before that. And let's say on that volume profile you had a very large high volume node, right? So at that area you would want to see, is there any kind of liquidity like front running that? So let's say there's a bunch of a bunch of swing lows right there. Well, if the market runs into that area, we're under the swing lows and to a high volume node, you know, the market's likely to chop and see a big move up. So at that point, that's really where I start to, to aggressively move my stops up again. Now let's break this down on a recent example. That way you have a simple way to implement this into your trading. As you can see, based on our mechanical bias checklist on this day, we established our value area. And the next day we opened up higher than the value area. So that gives us a bullish bias for this trading day. If we go into this day and we have a bullish bias, we are just looking for bullish reactions at key levels, whether that is a reversal from lows or whether that is a push through highs. So if we look right here, there is a really clear setup. Now I want you to take a second to see if you can spot it, and that will show just how much you've been paying attention. So you may have noticed this fair value gap right here that price traded into before having the big move to the upside. Now something else that I want you to notice that happened in that fair value gap— we had a much lower low on CVD. So we can see there are a lot of retail sellers that think the market's going to be bearish. And then right here we had this higher low in price. So if you map at the same area in price, you had a higher low. Now we also are looking at this after we saw a sweep of these lows over here, and after the market— if you look pre-market, we ended up sweeping this liquidity here. So you're just watching the way the market is responding. And again, we can use this for both breakouts or we can use it for reversal. So if you look in the market right here, what happened? We came back down and traded into that fair value gap on a bullish day at the point of control. Also, you have an order block like we talked about earlier at the point of control. So this is an A+ setup. You've got CVD divergence, bullish bias. The market has shown that it wants to move higher by this market structure shift. And once the market trades into this area, you can also see we had that CVD confirmation. Now, if we also want to trade long on this, look what ends up happening. What happens at this key level? Well, we trade into that high, we get our market structure shift. And what did you get in CVD? You got confirmation. So then you could just trade from, you know, this fair value gap, or you could just enter on that candle closure because you're expecting us to break through this value area high. Or if you waited for us to hit the value area high right here, what happens? We close above it. And then what's going on in CVD? We're making higher highs. So you can see that this is a very easy way to spot whether we're going to reverse or continue. And I could show you a million different ways of how you could use this, but hopefully it's coming together for you. Simple rule of thumb is you're using CVD to determine whether or not a, a liquidity sweep or a break in structure is going to continue or reverse. Because again, look right here, we had this sweep of this low right there, and with the sweep, what did we have? We had a CVD divergence. Now I want to be clear, it doesn't have to happen with the liquidity you're sweeping. Um, that does happen sometimes, but you just need to be spotting like, are we forming a divergence, because what this shows you is we have a new higher amount of aggressive sellers, right? Because if this is going down, there's more aggressive sellers on the retail level. That's what we want to think about. They're aggressive. Now, they're not always retail. I'm using that term to explain to you guys. There's going to be some in the comments telling me I'm an idiot. But you want to— you can think of it like the retail traders are selling aggressively right here and they're not able to push the market down. And with bullish context, we know that means the market's likely to go up. All right. So now we can check liquidity off of our list. and we're going to get to probably the most popular ICT concept, which is fair value gaps. And after that, we'll get to the SPC strategy. But you first need to understand the real fair value gaps and how to spot them from the fake ones. And like I said, these are undisputedly the most popular ICT concept, and for good reason, because they work very, very well. The only problem is at any time you're going to literally have hundreds of them on your screen. I mean, I'm not exaggerating. Go check your charts if you don't believe me. And if you haven't guessed this already, a fair value gap and a low volume node are the same thing, because a low volume node means that there weren't any market participants in that area, which is what ICT says. There is an imbalance in the market that creates, you know, buy side liquidity was only offered or whatever. That's actually true, okay? It is true. However, not every single fair value gap actually has this characteristic. So it's very simple but extremely effective, and the ones that do act as a vacuum that price is almost always going to trade into. So with this, you're really not learning anything new because they measure the same event, but one of them does them with patterns, the other does it with data. So the way that I combine the Volume Profile with Fair Value Gaps, I like to call the vacuum method. All right, so let's take a look at this example in price, and this is going to be painfully familiar. We have a big move to the upside, and let's just say you're looking to long. Where do you do it? Because if you're trading ICT, you're going to get a fib retracement tool and you're going to mark out this price range and you're going to look for the fair value gap and discount. But how many times has that happened to you? And then you see exactly this happen— the market just not ever go to it and it just keeps rallying. In fact, there's actually two fair value gaps in this price leg. And if you don't understand how to spot the real fair value gaps that actually hold the imbalance, then it's going to be extremely difficult for you to ever be consistent using fair value gaps. So very simple and mechanical way around this, what we're going to do is we're going to take our volume profile tool. This is the fixed range tool. We could draw a custom range that we talked about earlier. So if we take this tool what we're going to do is we're going to then mark this up towards the swing high. Okay, so just the price leg that really created this big movement. You don't want to include everything else in this because what you're trying to pay attention to is in an expansive leg where there are multiple fair value gaps, how do you know what the real level is? So as you can see, do we really have that much of low volume here? I mean, it is lower than the rest. Then if you look at this one, it's really not low at all. However, if we look at this fair value gap right here, you can see that in this area we have much, much lower volume. So when we look to mark out this fair value gap, you can trade confidently knowing this is a fair value gap that is likely going to create a continuation. Now let's take a look at another way you can use the volume profile to find the best fair value gaps. Right now I have the composite profile turned on and we talked about how to set this up earlier in the video. So once you have that composite profile on, simply put, you can just be on a 30-minute, 15-minute, it doesn't really matter because this is helping you spot fair value gaps that your naked eye without volume profile is not going to see. So as you can see over here, we have our peaks and we have our valleys. So typically this is a pretty low volume area. So anytime you're looking at fair value gaps to determine which ones are likely going to be the best, you just want to see if they match up with a low volume area. And you can actually combine multiple fair value gaps together and not be forced to just pick one and use that as a general area of interest. Because if you extend this out, all of these fair value gaps go into this low volume area. Now, if you want to get a little bit more precise, you can start to see where that volume really tapers off and see that that's going to give you a pocket within all of your fair value gaps. So when you use this method, you're finding fair value gaps based on data more than you're finding them based on pattern. So if we look over here as well, and you can just kind of treat the edges of this value, so like an edge of high volume, as a fair value gap. It's the same kind of idea, and just pair them up with the fair value gaps you're already using. Now that we understand how to find mechanical bias, how to find the best order blocks, how to use liquidity the right way, how to spot and validate fair value gaps, let's get into the SPC strategy. Now one of my favorite things about this strategy is it can be used whether you're scalping, day trading, or swing trading, and it can be used on any market that has volume. For me, I like to use this on a 5-minute chart. So step number 1 is going to be S for sweep. Now, this can be any key level. It does not have to just be a point of liquidity. You can also combine key levels, and that gives you higher probability. Now, for this strategy, the levels that are permitted are the previous day's volume profile levels. So that could be your POC or your value area levels. Or nodes, the previous day's high or low made in price, the previous session high or low, which is the Asia or the London session, which we'll break down in a second, the current day's value area levels, or the current week's value area levels, or the ICT and volume profile levels. Now, I know at first you might say, oh my God, that's so many levels. But trust me, guys, like, if you want a strategy that has enough frequency, meaning the amount of trades that you take, you don't want to come up with this extremely crazy complicated thing where you need 50 different things to happen because all you need is just one of these levels. Okay? I'm not saying you need all of them. If you have multiple of them, great. That stacks confluence. But all you need is one of these levels and you're going to see that this can find you opportunities pretty much every single day. Because when you simplify trading, like, what is a trading strategy? Like, literally all of this is going to be into two parts, right? It's going to be your levels and it's going to be your entry. Like every single trading strategy, that's all it is. Whether it's support and resistance, whether it's a candlestick pattern, whether it's harmonics or ICT or volume profile, it's all just your levels or entry. And one of the things that you need in trading is a good amount of levels. Otherwise you just hesitate all the time because you're waiting for this occurrence that only happens once every week and you're never going to make money trading like that. And what that is is just fear and procrastination dressed up as perfectionism. And it's one of the worst cancers I've seen in the trading space. Now, step number 2 is going to be P, for profile. Also, I realize I didn't even have this marked, but this is one of my favorite and most powerful strategies, which is going to be our first candle levels, which we hinted at earlier. But we're going to break this down when we get to the chart examples. So what we want to see happen is a tag into a low volume node. Now, to be clear, you're not just trading only reversals, right? Like as we've talked about, the market can make a big move in the direction of that low volume node. And if that's happening and we see aggression into this, we're in fact expecting a very aggressive move. Now, if the market reverses from it, that's great too. Now, this can be any low volume node. Some really easy ways to spot these are the previous day or the current week, but you can also use the custom range that we talked about a second ago and throughout the whole video or the composite range. So again, it gives you a lot of different key levels. And C is for confirmation trigger. And this is going to be our third step and how we actually execute the trades. It's very simple. We just want to get a close below or beyond the level on our entry timeframe, which for me is the 5-minute chart. Now, I don't recommend using this on a 1-minute chart if you're just getting a candle closure. If you're using a 1-minute chart, you'd want to have more market structure confirmations. But I found that the 5-minute gives just as good risk to reward and it eliminates a lot of the noise. And for a lot of you guys will make you a much better trader. Now, we also have a bonus if we have CVD agreement. And if you didn't remember this part, you skipped over it, go back and watch the liquidity section. In this video. Stop loss is 2 ticks, or this is 0.5 in price. Like if you're trading Nasdaq or ES, let's say if the level was, you know, at 100, your stop would be at 100.5. Okay, pretty simple. And for the trade management, which this is the most important part, we want to use price weighting, which I'm going to break down for you on the chart. Now let's put everything that you've learned today together into a strategy. That way you walk away from this video ready to go out and execute. So if we look right here, we had our weekly profiles, and you can see as well as the RTH profiles, we're opening up higher each day. We're in a bullish market. Okay, so that gives you your bias. Also, even though we had this gap down, the market opened above the previous week's value area. So this week you're going to be looking for longs. So what I'm going to do here is I'm going to just mark out this level right here. And this is what you can do every week. You can just mark out the previous week's value area high and then mark out the previous week's point of control. So you have your previous week's levels and you can label them if you like. I'm not going to take the time to type them all, um, because all levels to me I look at very similarly. Okay, so after we've marked out the previous week's levels and we've got our bias based on that, what we can then do is come into each session with a very clear plan of exactly what we want to do. So I'm gonna go down to the 5-minute and go to this date, which was April 20th, and this was just this past Monday. All right, so let's come into this day, and as you can see, the previous day closed inside the value area, and this new day opened up inside yesterday's value area. So in this example, you would have came into this day bullish because the weekly was bullish and you have neutral bias on your daily checklist. So you're going to come into this day looking for buys. Now usually you probably come into the market and you're very, very anxious, wondering what to do, and you switch up. On days like this, you have a very clear plan. So what we're going to wait for is to see if you can then trade down lower, see if you can trade into some kind of key level in a low volume node. So if we want to go back and look at the weekly profile just for a quick refresher of where we're at in terms of Volume, as you can see on the previous week's profile, right here is a very low volume node. Okay, so if we wanted to mark all this out, I don't want to keep the charts too messy. You can kind of just get a feel for these things as you continue to trade. You'll see that we're in a low volume node there. Okay, so just know we're in our low volume node and we are trading into our key level, which in this example was that previous week's value area high. Because if you're bullish, you're going to be looking to retest old areas of value because that's where the market used to find fair value. If it's still bullish, you should see reactions from those areas to see if, to see if buyers are still in control. So as the market's coming down here, what you want to wait for is to see if we can come back and reclaim the current day's value area or get any of your normal ICT confirmations. So as you can see right here the market traded into this fair value gap that we formed because you're looking at this like a key level, right? You also over here, you swept these equal lows. Now I want you to pay attention to what lows these are as well. So if we want to mark out the trading sessions now, the way that I like to mark them out is by marking out 6 a.m. So I'll just mark out a vertical line and then we can also mark out midnight and that gives us the London session. So like I said earlier, you can trade previous session liquidity and some of you guys from my channel um, already know this strategy, or at least know some of it, um, but now I'm going to put it on steroids for you. So right there we have the, uh, London session in this box right here, and you can see that during this move down where we're already bullish, we traded into the low of that session. So we had our liquidity sweep, you had a key level, you're also into a low volume node. The stars are kind of aligning here. So this gives you an extremely high confidence that this trade is likely going to be a winner. So as soon as you get your normal confirmation, whether it's like a candle closure back through the level, which was right here, so you got that candle closure. Notice it's a little bit better than, you know, a typical IFVG entry because you're trading with more confidence, you have more reason to be aggressive and you're going to be able to get really good risk to reward. So at this time you would enter the market right on that candle's closure before the IFVG and you could put your stop loss right at the structure down below. Now, as you can see, just from here to the point of control, which is where you would be trading the first target, that is going to be a nice 2:1 risk to reward. So very good trade setup and it hits in a kind of quick manner. It takes a little bit to get there, but that's okay. But what I like to do in these scenarios, like I said, this is where price weighting comes in because I'm bullish. The way I look at trading is like, what's a winner and a loser? A winner is when the market is bullish and I'm in a long. Like, it doesn't matter if I'm getting a little micro movements against me. Like, if you think like that, you'll never be able to catch big trades and hold on to them. So in my definition of what a winner is, I'm going to want to hold on to this trade as long as it's suggesting that it's still a winner. So what would that mean in this scenario? Well, as soon as we hit into this point of control right here, I'm going to start moving my stop loss up in profits. So I could— you could either move it to this value area low or just recent structure. Okay. So as you can see, what was the structure that was formed? We push right here. and you could put a stop loss there and then hold the trade for longer. And I would have probably just held it to the close. And in this example, it didn't give like a crazy amount extra risk reward to the naked eye. But I mean, 2.3R compared to 2 is a huge difference over time. Um, you have to train your brain to think like that. Don't think that that's not because it's a big difference. And these are those micro-optimizations that, you know, actual profitable trader will think about instead of trying to like always swing for the fences or always, you know, trade within their comfort zone. So that is one trade example. Now let's go and break down another. So this is another recent example. You can see that this is on April 22nd, and I actually live traded this with my mentorship, which I'll leave a link for you guys to apply for at the top of the description, where I'm actually sharing my screen and like trading this live with you as it's going. Um, and we did catch this, this trade. So on this example over here, we had the value area high, which was right here. And if we ask ourselves you know, what was our bias checklist. Now in this example, you can see the market did close outside of that value area low. So just based on that, you would say, okay, well, that's a little bearish. But remember, the weekly is bullish. And on this day up here, we opened up above that value area. Okay. So if we look at this day, we open up above it. So since we have more leaning towards that bullish side with— we have the weekly profile and the way we opened, then we'd lean bullish on that day. Now, this is going to be probably my favorite strategy of all time. And I've tested this over so much data and it's extremely, extremely powerful. I'm actually working on optimizing it further with a lot of market data that I am building for this other software company that I'm launching later this year. A little teaser, but I can actually look at the data of this and see over time like what is the best method of executing, how far do these trades go on average and things like this. Now, this strategy is extremely simple. Okay, so we know we're bullish. I'm not using the RTH for this. I'm literally just going in here and I'm just marking out the opening range volume profile. So the first candle's range. Now, if I want to go and mark out— so if we see right here, we have 9:30 to 9:45. It says first 3 5-minute candles of the day, right? So what I'll do is I'll take a volume profile and I'm going to mark out those first 3 candles. Now what I'm looking for specifically is a closure outside of this value area. So if I just wanted to say, uh, every time I get a closure outside of this range, that is going to be a trade setup. Very, very simple. It's literally stupid simple. I mean, anybody could trade this. If you can mark a volume profile and you can look at a candle closure, you can trade this. Now whenever this candle closed right there, I execute on this candle. So it's really like the open of this next candle. And then I will put my stop loss at the point of control. So if you see right here, I put it 2 ticks beyond the point of control. And as you can see, we had like so close to getting stopped out because I'm right here, that's at 35. I'm going to go to 34.50. And as you can see up at the top left, we went to 835.25. So we were 3 ticks away from getting stopped out. But again, this strategy is insanely precise. So typically what you can do with this strategy is you could just go for a fixed 2R for starters. and that is right around where I got out of the trade. I actually didn't catch this full move. Just for transparency's sake, I should have held on to it longer than I did, but it is what it is. I got out of the trade around here. As you can see on your screen, I made a couple thousand dollars trading this move. And as I said before, I traded this live with my Inner Circle of Traders, actually screenshotting this, calling it, entering the trade as it's happening. So what I should have done though is I should have let this thing run a little longer and I should have trailed up my stop under each candle and just let it kind of run because we're at all-time highs. Again, I just exited the trade too early. Shit happens sometimes. I'm not going to sit here and act like I'm perfect, but I still made money on the day. That's just my reflection of it. All right, so now let's take a look at this example. As you can see, we had a bullish bias because we closed above the value area high and we opened above the previous day's value area high. So you can just start your checklist of marking out the previous day's levels. So at this time, you could then take your tool mark out all these little low volume nodes and then see which ones kind of overlap with fair value gaps, right? So if we see right here, you had a fair value gap right here. And if we zoom in to the volume profile, you can kind of get that pocket within. So if we just mark the fair value gap, right, let's just, just mark the fair value gap and see where it matched up with the volume profile. As you can see, if you're just trading the top of the fair value gap or even where this low was that, you know, wasn't mitigated, then you're not going to get the best, uh, entry or the best level. So you want to take it down to where we had the lowest point of volume. Now you can also see there were a couple other areas like this in the chart. Price just didn't get to them, so you could have marked all these levels out as well. So there's another low volume node right there, and you really want to look for like the lowest points of volume that overlaps with fair value gaps. We also had our previous day value area high and the point of control right here, so you could have been looking for those levels as well. As you can see, price didn't get there. Now let's take a look at what price was doing in the session. So if you're bullish and the market opens up, you are looking for fakeouts to the downside. That is ICT 101. So what did we get here? We also didn't just trade into those key levels, you swept out liquidity right here. So we know the market is now hitting into lows, we're hitting into key levels. We are looking for a very, very quick entry. We want to enter the market pretty close to the bottom of this when it's happening so you can get the best risk to reward. So if we go and put back on our profile right here, so as you can see, we hit into this level, kind of close beyond it. As soon as this 5-minute candle comes back and closes, you're good to enter the trade right there. Um, there are some other tricks you can use with like order flow. If you guys again want me to make like a video on order flow tools like Bookmap or Footprints, uh, here on DeepCharts, um, let me know and I'm happy to make content on that. Those tools are very powerful. A lot of people get turned off by them because they think they're complicated, but they're really not. Just like anything, you can, you can learn anything. I have faith in that. Um, so right here, you trade into that level, you enter on this candle closure. And if we're talking about like where we want to trade to, it's pretty simple. If you're in a bullish market, especially at all-time highs, you can trade to the nearest high. But like in this example, just trade up to the obvious areas of liquidity, right? Because if we're expecting the market to be bullish and you have this bullish structure here, we can mark out the profiles. What you're expecting is, you know, to make higher highs of yesterday, right? So we could just trade towards those highs. Now, another way you could look at this is if you notice right here, where do we trade to in the volume profile? So after you hit into those highs, what you can do at that point is you can kind of like mark volume profiles on the swing point that traded into the level. Now this is a little bit of an advanced tool. You could just take profits there, whatever. But if you want to use these concepts to the max, what you can do is look at whatever price leg hit into your take profit and you can kind of see like that's like a micro range in and of itself. So what you can do in these examples is watch and make sure like, do we get a candle closure under this? Or you could just put a hard stop there and you see you can hold the trade much longer. So that's just another way you could hold on to these trades and use these concepts. Like one thing I really hope clicked for you guys is that I'm giving you guys the keys to the castle here, trying to break down exactly how this stuff works. Yes, I'm putting it together in a mechanical way, but I challenge you guys, like, you want to think about, okay, I understand what the volume profile does, why it's important, how can I apply this? Like, study your charts, actually go through and see for yourself how this works, and that's the way you're going to build real confidence. Now, I want to be very clear, this is going to take time to master, as is anything that is worth doing. And it's probably going to feel a lot harder when you're alone on the charts, because if you're anything like me, whenever I was coming up as a trader almost 10 years ago now, I would remember just watching videos and then going out in the market and it was like I just forgot everything or I had no confidence in what I was doing. And all the stuff that clicked when I was watching the video all fell apart as soon as it came time to actually go out and execute. So if you want to get access to my mentorship where we trade live every single day during New York and London session, 5 days a week, you get an 8-week boot camp learning everything that I have learned in my 10-year career. Every single trade that you take is reviewed in our proprietary trade journaling software that you get access to. You also get access to Smart Trader AI, which is trained on every piece of content I've ever made, years and years of market data. Years of my trade journal, and it's basically like downloading my brain into yours. You also get access to our community, and we're so confident in this system that we guarantee you will be funded in 90 days, or we will trade with you until you are. Now, due to this and the intensive nature of this mentorship, not everyone will qualify. I want to be very clear, but if you are interested, there is a link to apply in the description. If the link does not work, then that means slots are gone. For this enrollment. And we covered a ton of stuff in this video, and I want to take time to thank you guys for watching and really congratulate you, because if you made it this far, then you are much more advanced than 99% of other ICT traders. And hopefully you are seeing that all the stuff you've learned does work. You just have to be able to have something that gives you real data and confidence behind it. Otherwise you keep falling victim to these so-called psychological issues and you end up just overthinking and staying unprofitable. So I hope this video was valuable to you. If it was, make sure to subscribe, leave a comment of what your experience was and other videos you want me to make, and I'll see you guys in the next video.