Basic Blogging Tips for #eci831
Alec Couros walks through WordPress basics: writing posts, embedding images from Creative Commons via CompFight with attribution, adding YouTube videos, and organizing with categories and tags. A second speaker covers inviting comments and creating category pages in your menu.
Chapters
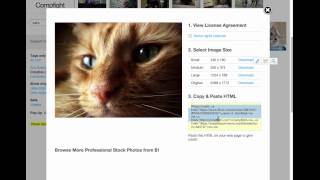
Hey everybody. This is a quick recording for ECNI831. What we wanted to do is just give you a sense of how to master a few skills in WordPress or wherever you're creating a blog. The principles apply to most spaces, but some of the technology that we're using here in this specific place is for WordPress. So some of the techniques will be for WordPress, but the principles are kind of the same. So we want to start you off with, first of all, once you have your blog, some just basic real quick tips is first of all, your blog will look something. Your blog address will look something like this where you have some unique word. Mine's not a very good example. It's quite long and doesn't have my. It has some numbers in it. You probably want to do something like your name, for instance. If you haven't done that, that's fine.WordPress.com so this is the site that the world can see. This is just a sample site, nothing special here. But a quick, quick way to get to your admin is to know that your site, if you go WP admin will take you to your dashboard for that particular site. So that's one thing that's kind of important. The next thing we want to focus on is creating a new post and adding some links. So what we're going to do here is just going to go to posts. So, so in your dashboard, here's a little pushpin. Click on posts and what we're going to do is add a new post. And so what we've got here, I just want to show you sort of the basics of starting a post. So here is another great post. Of course you want to come up with a better title for that because it will be hosted on ECI831CA hub. And if everything looks exactly the same, it's really good to kind of grab the attention in terms of title and then I'm going to do something like this. So a lot of your posts, for instance, might have come from reading someone else. So here's an undergraduate student in our other class by the name of Paige who probably kind of gets really gets the idea of a basic blog post. What I like about this post, without looking at the content specifically, is that she's got a visual on her post and she's also got some links to sites that she thinks is great. It's really important to think about links, for instance, to expand on the information that you present in a post. And there's no reason not to have links where there can be links. So for instance, she identifies certain sites like Mindshift, but at the same time she says I shared this article. And she actually goes and post. In this case she actually links to her Twitter where she shared an article. So you can actually even link to Twitter posts. So I like what Paige has done here. Now if I were talking about Paige in general, what I would probably do is just go to her blog and link to this address. So if I wanted to link to her blog, for instance, if you're seeing something in your post, such as I was just reading Paige's blog, you, you would link to that particular link, which is a short form of the entire blog. If you are speaking specifically about a post, usually if you click on the title, you can actually see an expanded URL which actually includes the entire URL. So if you want to speak specifically about a post from a student, if you grab that longer URL, then what I can do here in my blogging space and back in WordPress I can go I was reading Pages post about what was it about? Let me just take a look here about Feedly, about exploring Feedly. And I really liked and I'll just put it like that for now. And so in this post, I was reading Paige's post about exploring Feedly. What I might do is highlight that entire piece here, click on the link button, click on or paste the link in there. And what I'm doing here is actually reading or posting specifically to Paige's post. So the reader is able to actually go and read the post that I'm talking about. So it allows me not to have to expand so much on what you said. And also what's kind of neat on the back end is it actually creates a little bit of what's called a pingback. So it'll notify page in her blog through probably her email that I'm talking about her. And when you're done with that, you can click Publish. But we've got more to come, so I'll stop right there. Alright, I'm back at the post and I also noticed that I should probably have some sort of image or photograph something visual in the post as well. So one of the great sites to check out is a site called Comp Fight where you can actually find a lot of images. It's superior to Google Image search in some ways because it allows you to do. It allows you to search for instance, for Creative Commons images. And it also has a really cool mechanism for actually for actually citing images, which is really kind of an important thing as, you know, as teachers. So what I'm going to do is just search for something rather irrelevant just to prove a point. I'm just going to look for cats, then I will take me to the comp fight page. And what I can do here is look at a number of different images of cats. But what's also important about this is right over here you can actually see where it says Creative Commons and what Creative Commons is. It's basically, it allows you to use those images. Anything under the Creative Commons is basically something you can use without fear of being sued or ethical dilemmas around stealing someone's comment, sorry, content. So I can use any one of these caps I particularly like. Let's see, this one looks rather pensive. And what I can do here, a couple of things. So first of all, if you don't want to download the image, what you can actually do is see that there's a number of different images here and I need about a medium sized image, about 500 pixels by 374. Sounds good. I'm going to do a right click or on a Mac do a control click and then I'm going to copy the link address. So what I can do here is come back or go back to my post and then I'm going to put in click on the image button, which is add media. Oh, sorry. Actually that's not what I want. I only want to use that if I'm adding or uploading my own media, which is a different topic. But I'm going to see if I can find the little image tool which I can't seem to find at this particular moment. Where is it now? Oh yeah, I go to the text editor and what I can click on here is click on the image button. So I have to click on text and then I'm going to click on image. And then what I'm going to do is just basically paste that JPEG image or the URL of the image in there and press ok. And then what I'm also going to do here is enter a description of the image. So I'm going to put a pensive cat and then press ok. And that's kind of an important thing. That's an accessibility thing. So someone reading this with a visual impairment can actually see or can actually hear what the image is to add some context to the image. Now if I go back to the visual view, you can actually see that the cat has been put there. But what's kind of bad about that is I'M missing. I'm actually missing the citation for this. What's cool about Conflight, if I go back here for a second is they actually have a photo credit link. So if I grab and copy and paste that HTML there and then go back to my post and I have to be in text view for this. So if I click on text, I will look about where the image is and I'm going to just paste that underneath. And what you'll see when I go back to visual view is it actually has a photo of a cat along with the credit for the photograph and my post as well. Of course, you could put the image below as well. The post, whatever makes the most sense. But at least you have a link back to the image and you successfully pasted an image here, so that's a good start. So another thing you may want to think about is embedding YouTube videos in a post as well. You're going to need this later on when you do your final projects. Some of you are actually doing learning projects, so you're Embedding your own YouTube videos for the duration of the course. At the very end, when we do your final summaries of learning, you're definitely going to probably, definitely, probably definitely going to post a video of some sort, especially if it's in video form, which most projects are. So at one point you should at least know how to embed a YouTube video. Of course uploading YouTube videos are matter for another video, but let's just go to YouTube and just happen to find a funny cats compilation. Oh, those crazy cats on YouTube. What you can do here is basically copy the URL. So any video that you see on your screen on YouTube, copy the URL. So I'm just going to copy that, go back to my post and what's cool about this if you're in visual view, so don't go into text view, but stay into visual view for this. I know it sort of is confusing of when to be in visual and when into text, but. But in this particular case, WordPress has a little cool mechanism that allows you to basically just copy the URL. And if you copy the URL and if I go to just to show you if it works or not, you can go to preview. I'm going to click on preview, should open up another page and you'll notice I have my cat, my witty posed and a YouTube video all in one there which is useful. Now that particular YouTube video is kind of big. So another thing to know about is if you go back here there's actually a number of other options, like if you click on Share, for instance, if you want to change, there's a few things here. If you want to, say, start at a particular part of that video, you can change it. I think there's more here. That's not what I'm looking for. Oh, under embed, you can actually change the size of the video. So if you wanted a larger video or a smaller video, that actually the embed code changes a bit different. Now that stuff you'd have to do under the text menu. It's a bit advanced, but for the most part there are variations in terms of how you can embed a YouTube video. But if you're just looking for a quick and dirty way of adding a video, just simply add the URL and it'll hopefully find a size that works for you. And of course, when you're done that, you just have to click on Publish, if this post is actually done. Pretty weak post at this point, but you've got the basics of basically how to create a post, how to create a link, how to add an image, and how to add a YouTube video.
All right, so now that we have this fantastic post about cats that Alec has created, there are just a few more things we might want to do before we publish. So one suggestion for your post is, in order to increase your readership, you may want to think about adding some questions at the end of the post. So in this post, I might ask, how do you feel about feebly and cats? It's a pretty random question, but that seems to be what we're discussing. And at least then we've invited our readers and given them something to comment on. Another thing you might do to bring a few more readers to your post is to add some tags, but because that will make your post a little bit more searchable. So in this case, I might have tags like feedly cats. That's really about it that we talked about in this post. But you could add all sorts of things in there if you had a post that dealt with education or assessment or technology. And then I would just add those. And the last thing we might want to do is to categorize our posts. And that can be really important if you're developing a major project that has a bunch of videos and posts related to it. So I might add a new category that's called Major project. So maybe this is the first post in my Major project post. So what I could do then is I could categorize this post as major project and Then I'm just going to going to take the link to page out so she doesn't get a ping back on this really quite ridiculous post. But at this point, I am going to publish the post. And now when I look at my post and I scroll to the very bottom, I can see that the entry was posted in Major Project. And what I can do then is if I click on Major Project, it gives me all of the posts that are categorized in that way and it'll actually give me this different link that only shows my posts that have been in that particular category. And what I can do from there, if I want all of those posts to show up in a particular page, is I can actually create a category page for them. So if I go back into my dashboard, I can go down to appearance and then to menus, And then from there, under pages, I can add a category page. So I can say view all I want to add Major Project now and I can add it to my menu. So now it's going to show up over here. So now this is the menu that I have for this particular blog. You can see it's kind of some random items. But let's say I wanted to put major project under Ecomp355. I can just scoot it over like this and it'll show up as a page that goes, that drops down from that as well. So just to show you what that looks like, if I save the menu. And then I head back to my portfolio. Now if I go to Ecomp 355 and I click down on it under Major Project, I can see all of the posts that have been categorized in that way.
More from Alec

Episode 14 - Dr. Alec Couros: The EdTech Explorer – Rethinking Education with AI






Online Learning in a Hurry Guest episode 6 - Alec Couros - Student's in spaces