Enhancing Zoom Conferences with OBS
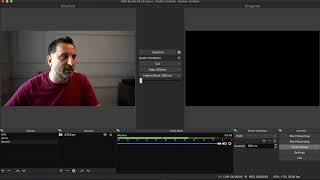
Alec Couros shows how to use OBS Studio to layer your webcam, slides, and images into a single Zoom feed. Install the OBS Virtual Camera plugin, arrange your sources in Scenes, use Chroma Key to make backgrounds transparent, and send it all to Zoom at once.
Chapters
Hi everyone. This is just a short tutorial on how you might use OBS or open broadcasting software to enhance your presentations in Zoom. So this is a screen capture of a recent presentation that I gave in Zoom. What you see here is a transparent presentation layer superimposed over a live video. Essentially, I'm running a slide deck over my video versus having to screen share separately. I think that this produces a nice integrated effect with the video and the text. I'm also able to quickly bring in multimedia elements into my presentation. The GIFs and videos that you see here were embedded into my slide deck and are now easily superimposed over my video feed. So the first thing you'll need to do is download and install OBS Studio. It's free and open source software for video recording and live streaming. It's quite popular in the streaming segment of YouTube, very powerful and certainly worth getting to know. The next thing you have to do is download and install OBS Virtual Cam. This is a plugin that extends the capability of OBS to become a virtual cam that you can use with Zoom and other software. Video conferencing software like Google Meet, for instance. While this step may seem a bit more complex, if you scroll to the bottom of this page, you'll be given steps to how to proceed. So if you're using Windows, you should be good to go at this point. If you're on a Mac, there's one more step. Virtual Cam compatibility has been disabled for the Mac platform. To fix that, you'll have to do a couple of things. First of all, you have to download something called XCODE from the App Store. It's fairly easy to use. And then you'll have to type a line of code into Terminal. I'm going to put that information in the notes under this video, just in case the guidance changes on this. All right, so we finally made it to OBS Studio. And what you're seeing here is Studio Mode. And I'm not going to show you everything here because it's actually a quite complex piece of software. But I'm going to show you everything that you need to know in relation to Zoom. So first of all, the sources pane over here. I think that's going to be important. Essentially these are all the things you can add. You'll notice there's different audio inputs. You can add a browser, for instance, images. You could put various video capture devices, that would be your cameras, all sorts of things there. And then over here are your scenes. And the scenes are essentially how you arrange these. A screen. And if you're thinking about this in zoom, whatever is going to be on here, the way that you arrange all of these sources is going to replace what you would normally see as just your face from a camera on Zoom. All right, I'm going to talk a bit more about scenes and sources. As you see over here, I have scenes. I actually have one from before that I showed you before. And I have a brand new demo that I started. And of course you can always add as many scenes as you want by pressing that plus button. And then you can just go through, alternate through scenes while you're in zoom, if you'd like. Each scene can have one or more elements or sources. And so, for instance, while I'm in the demo scene, I can go plus, and I might want to add a video capture device. And so right now I have one existing, so I've already configured this one and you can see that there I can make it any size I'd like, I can move it anywhere on the screen and then I can actually go. If I wanted to, I could add another video source. So another video capture device here I'll go create new and I'll just do. This is going to be my imac cam. I'm going to press. Ok, I'm going to go to find my device and there's my FaceTime iMac cam built in. And I don't know why you'd want to have more than one camera, but you could put as many as you wanted there. Then you might add, say, some, maybe an image, for instance. And what I'll do over here is maybe add a gif. I know I have one saved on my desktop, so I can browse for a GIF or image or video or whatever type of media you'd like. So I will go to desktop, bring this in. If it is a gif, it won't actually run right now, but when you're actually in zoom, when you're presenting, you'll see it run there. So that's just an example of how you can put elements on the screen and drag them across. All right, so I'm going to go through and demonstrate that original premise that I showed you. Where you have a video camera, then you have this slightly transparent PowerPoint or Keynote in front of you that you can use. So what I'm going to do, what I've just done, is I went down to the plus button, I created a new scene and now I'm going to add elements to that scene. All right, so you have a scene called Demo 2. Of course, you could call this anything you'd like. Maybe you want to name it after a course. But the important thing is that you have or you're working with a particular scene and you have it clicked or selected. Then beside that window, if you're in the standard layout, you should see the Sources window. And then I'm going to hit the plus button. And in this case, I'm going to add a video capture device or webcam. Now you can create a new webcam. If you haven't done this before, you're going to have to do that. This will allow you to explore the different webcams or video capture devices that you have connected to your to your computer. If you've done this already, then you'll have a list of ones that you've used before. In this case, I have my DSLR connected to my computer, so I'm going to click on a 7.3cam and that'll bring up the webcam. And of course, I can put this anywhere on the screen or in this case, what I'm going to do and what I'd recommend for this particular effect is to make it full screen. All right, before I go to the next step, I want to talk briefly about the use of PowerPoint or keynote slides, and particularly the backgrounds. So what I've done here is I've created a PowerPoint or a keynote, in this case, Slide Slide Deck. And what I've done is created the background as a solid green. You could do this as a blue or any color that you can select in Chroma Key App. Essentially all of this green real estate is going to be transparent. And what I'll see on my screen are these particular areas. I've actually done this for you. I've added templates to the notes so you can use them whether you use PowerPoint or Keynote. So you can start from that. So don't have to bother trying to find the background, for instance. And so essentially what I've done here is just giving you a couple of different options of a slide. And of course, I'm viewing this in presentation mode, which is going to be really important. And you can try, say, a white background that would be transparent. You can try with the background. It depends on what's behind you really, to make this work. So essentially that's going to be really important is you're going to have to choose a slide with a solid layer color. That would work well in a Chroma Key situation, because that's the next step here all right, I'm back to obs. And what I want to do now is while I'm in the demo 2 scene, I'm going to add another element. In this case, it's going to be the keynote presentation or PowerPoint presentation that I just showed you in the previous step. So you're going to go to plus and then you're going to go down. You're not going to be able to see this, but down this particular list you'll see at the very bottom it'll say Window Capture. And so you click on Window Capture and it'll ask you to create a new one. So I'm going to go and call this Keynote 2. And then what you'll do here is this window opens up and from this list you're actually going to see a long list of basically everything that's opened up on your desktop. And down here you should be able to see this. I'm going to choose Keynote, called it Demo, that's the file name and I'm going to click on that. And you'll notice that that brings this up as a layer. Again, I have this in Presentation mode, so it's actually in presentation mode. Depending on the way that you set your PowerPoint up and your screen up, there might be some black bars on the side, but you can deal with that by making this big enough, or of course going back to the PowerPoint or Keynote and, and adjusting there as well. But now you have a layer, but of course now you've got a problem where the video is gone. And I'll show you how to deal with that in the next step. Alright, last step here, but before I do that, I'm going to show you a couple of important buttons. Notice this eyeball here. This is just essentially you can make each layer visible or invisible. Of course, you can move these things around if you wanted to. If you want to put them in a different order, that's also possible as well. And when you're managing these and trying to move them around, it's really helpful to use the lock. The lock will just make sure that you don't accidentally change things or move things around. This is really quite important as well. So I'm going to lock my camera layer, but I'm not going to lock my Keynote layer. And what I'm going to show you here is the important piece here. I'm going to right click on this or I'm going to on a Mac, press Control, click, and then at the very, very bottom, let's see if I can get this on the bigger window, you'll see where it says filters. And this is where this is really important. There's a number of filters you can play around with here, but at the bottom, the one that we want is under effect filters, we're going to hit the plus button and what we're going to do is click on chroma key. So we'll bring up the chroma key and we can just leave it called as chroma key or something else you want. And essentially the magic is done for you. You can see that the chroma key. I can see the slide at the same time as the video. There's a lot of things that you can do to adjust. If you don't like the way that the video looks or the way that the presentation looks, there's a number of different adjustments that you can use. You'll notice that the key color type here is green. And that's if you were using a different background, you'd have to use a different color here. Obviously, if I did blue, it's not going to work. That's why we chose green for the end the slides. And this opacity is kind of a neat one. You can make this quite transparent if you want to play with these effects. As I mentioned in the presentation, I did different things as well where if I actually run the presentation, I can see I've tried different things. The black doesn't seem to work very well with that particular size of fonts, and the thin font white seems to look a bit better in this particular case. But you can kind of see that it's really quite transparent over here. It's kind of a neat effect. So play with this. I think it's worthwhile taking a look at and learning. And I hope you enjoy this. So this is really just the final step of putting everything together, connecting OBS to Zoom and showing you how that works. Essentially what you want to do is you've got OBS running, you've got everything set up the way you want it. Then I'm going to start a new meeting. In Zoom, it's connecting and you may see this particular screen. Essentially what's happened here is when I go to the video options in Zoom, you'll notice that you have your regular options. You may not have as many as I do, but you'll have probably at least a camera, what I've chosen here. So for instance, if I just wanted to use the camera, I can use this webcam over here, for instance, which is not one of my favorite ones. Or I can use the OBS Virtual Camera. Still nothing there. So the last trick is, when you're in obs, make sure that you go to Tools and Start Virtual Camera. That's that added plugin that you had to to bring into this and to use that. That's what it adds to the Tools menu. And you can click on Start. If that doesn't show up yet, it's probably because you haven't had hit the transition button. But once you do that, essentially what you see here on that side is what you're going to what everyone's going to see in Zoom. And depending on what you do over Here with your PowerPoint or Keynote, you can go through your slides, you can see different things. And of course, even if you get into video, there's a few slides later in my presentation that have video, so you don't necessarily have to be on screen all the time. For instance, I have other videos that actually go right over top of me. You can kind of see me in the background, but it's really, really not that noticeable. But hopefully this is the type of thing that you wanted to do when there was interest in doing something like this. I think it does accelerate or enhance your Zoom game a bit, and I like the possibilities for this. Of course, there's a bit of a learning curve, but it's really not that bad. If you have any questions about this, feel free to comment down below or certainly just hit me up on Twitter. I'm at Kurose C O U R O S A and I'll be very happy to help get you working.
More from Alec

Episode 14 - Dr. Alec Couros: The EdTech Explorer – Rethinking Education with AI
Online Learning in a Hurry Guest episode 6 - Alec Couros - Student's in spaces