Brand Mascots - Flux.1 Kontext vs ChatGPT Comparison - Dzine Tutorial
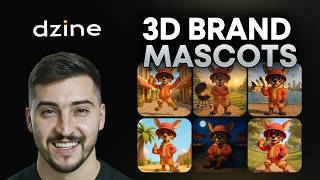
Jeremy Mura demonstrates using Dizajn/Zine AI to create a 3D brand mascot (an Australian kangaroo holding a squeezable barbecue-sauce bottle) and compares two image-generation modes: ChatGPT Image Gen and Flux (Kontext). He shows prompt construction, style selection (Dazeen/"Zine 3D render v2"), iterative refinement (color, hat, goatee, sunglasses), and then uses Flux to generate consistent poses and scene variations while using ChatGPT for alternative stylizations. He finishes by enhancing/upscaling images, removing backgrounds, and exporting PNGs for use as brand assets.
Chapters
So you're probably a logo designer or brand designer if you're watching this. Now, what if you could use AI to create 3D mascots to actually make brands feel more alive instead of all the blanding that's been going around. And you can do this all with a simple language using the zine AI. I'm actually going to be comparing Flux context and ChatGPT to see how it deals with making mascots and making a consistent character in different styles. And yes, this video is sponsored by design. Just a heads up, let's get into it. So I'm in the design workspace. They've got a lot of AI tools, which I really like that you've got that flexibility. Now what I've done is gone to text and image and I started generating a mascot. Now my idea was to have a Australian kangaroo that has a. The product will be a squeezable barbecue sauce that you could put on pizza, meat pies, sausages, whatever, you know, Aussies typically eat because we do love having Barbies, especially in summer. But I just thought it would be cool to have like some sauce or something. So once you're in the text to image, you've got your tools on the side. Aspect ratio, face match, color match, and the generation mode. You've probably seen this before, but what I've done, what you want to do is click on the little tab at the top left there where it says Flux. And what I like about design is they got community profile. So this is community generated art styles that you could use. And there's just like hundreds here, which I think is really cool. Illustrations, 3D characters, voxel art, pixel, whatever. But you've got styles on the side, so if you want illustration or 3D, you can click on that. For this one, I want to do a 3D character and I'm gonna be using Dazeen's 3D render v2. You've got some other cute ones here, toony vibes and more of a 3D pixel guy here. But I'm gonna stick with zine 3D render v2 and I'm gonna put in my prompts. I already got my prompt here. I'll just paste it in. As you can see, young Australian Ma, male kangaroo, 3D character that wears a hat and has a special squeezable sauce bottle in his hand. Give him a retro jacket, beach shorts, sunglasses and make him look athletic. Give him a two tone bucket hat, make his face happy, to give him long wavy hair. So I'm describing the character that I want and so this is what it generated and I thought it was a pretty good start. I just had to refine it as it didn't have the clothes and had different colors. And then I really liked this one here. So what you can do is you can double click this and add it to the canvas. On your canvas you can do heaps of different things. You've got AI razor, hand repair, expression transform, and if you want to do variations, you can go to the side and generate some more variations. So if you want the AI to come up with some more images based on this design you like, you can do that too. And then we've got two new variations, which is really cool. I think I like this one, but I just don't. I want a different hat. So what I'm going to do now is I'm going to compare Flux and GPT. So I'm going to double click this image. It's gonna add it to the canvas. And what I wanna do now is use the chat editor. So on the right hand side you can see you've got chat editor. Make sure you click on that. It's got a little robo icon and you're gonna get the prompt tool pop up on the bottom. And what I can do now is change it to GPT and I can regenerate whatever I want. I can also change the ratio to square or portrait, landscape, whatever you want. And then it's gonna tell me how much it's going to generate. So what I want to say is make the hat have wavy lines and make it yellow and red, make his sunglasses brown color, give the kangaroo a goatee. And then I think that's fun for now. And I'm going to click generate. So what the AI is doing is using ChatGPT's Image Gen model, which we know is pretty solid when generating images, usually it takes a few tries to get what you want. But after this, I'm going to show you Flux, which actually can create consistent scenes and create different poses with our little character. And this is going to be great when we're building a brand identity or building a suite of tools that the mascot can use for website design or whatever we're working on. The generation is complete, so I'm going to add this and we can see what it looks like. So pretty cool. They've actually changed the style of the pixels. Like it looks like it's got a little bit of a like brush stroke effect on the character. The colors, the glasses change, they got the goatie. The source looks pretty Cool. It's got sort of like a Shaun the Sheep, like, Clay style vibe going on. Background's basically the same. They just didn't change the hat. The hat color needs to change. So I'm going to go back to the chat editor now. I'm going to switch the models to Flux Context and this time I'm going to say change the hat color to red and add wavy lines, no stars. And I'm gonna say keep all other details the same and we're gonna get a different version. So this one was the updated version with Flux, so you can see it retains all the details. It just changed the hat. It didn't add the wavy lines, but. And I don't know what to do with the stars, so it wasn't 100% accurate with that. But I'll just wait on the GPT version to see what I was able to do. Cool. Okay, so you can see the GPT version. It actually changed some elements. It did update the hat. I really like the hat. It looks really good. And the character is vibing the bottle here. I don't like how it changed that squeeze bottle. And that kind of looks like a logo, which is alright, but everything else I feel like is fine. It's looking good. So I'm gonna use this guy here and what I'm gonna do now is go chat it out and let's go to Flux. Now. What we can do, put him in a different scene in a different pose. So I'm going to say make the character be jumping in the sky with arms up. And then I'm going to say keep all other details the same. And there we have it. Flux is able to keep the character, the bottle the same and change the background to something else. And it retains all those details, which I really like. So then we can always just come back here. Click on the image, click Chat editor and we can say character pose is him squeezing source from the bottle onto pizza. And we're going to change background to side at a lush park, let's say with birds flying background. We'll press Enter and let's do another one. Do a character pose with two bottles squirting out reddish brown barbecue sauce. Keep all other details the same. Do that again. You can see this one here looks really cool. So it's able to consistently keep the character the same, which I really like. And then don't worry if the pixels are not where you are. You can always go ahead and upscale the image later, which I'll do. So this is really cool. He's in a park. He's sort of like squatting. There's no food there. We've got this one as well with two bottles in his hand. So that's kind of nice as well with a plain background. So if we want to do we can upscale then cut this image out so you can do background remove. So I'll do that and then I can use that character and put him on a website or a design that I have. You can see you've got this character here which is really cool. Okay, so that's flux. Now change character. Pose to him squirting tomato sauce on a, let's just say on a burger. Change it. Opposed to him squirting the bottles. Tomato sauce on a burger. Keep all the details the same, generate cool. So it's not able to get the squeeze in the bottle, which is kind of not what I want. But I think for this I can add source later or Photoshop it or whatever. But the main thing is that we can add different poses. Let's go back to one of the other images we had, for example, like this one. And we can say stuff. Stand with arms folded with no source. Bottle with eye winking. Background should be a barbecue. Other in the time with sunrise in the background. Keep all other details the same. Press Enter. Now if I were to do this and change the model to ChatGPT and I have the same prompt, like let me copy the prompt. You just click the little information button up top here for the recent one. So this one looks really cool. So he's winking, he's got the arms folded and it's a barbecue. So that's perfect. I can click copy and I'll just paste it in here. And the model is going to be chatgpt and let's see what it does for that version. Now once you're happy with it, what we can do is go down to the image on the right hand side. You can see enhance and upscale. So we can upscale it or you can enhance it if you want. So, so if we enhance it, let's just say default and we can go smooth or we'll go detail and I'm going to click enhance. So it just makes it a little more crispy, sharp and bigger. Adding those details that I need. And then I'll do one version of an upscale. Let's just go two times PNG and then I'll also, I'll select this and I'll do one with the background remove so we can see this image png, we'll go two times and we can see the upscaled image here. It's looking really good. Look at all the details. You got the lighting pretty nice from the back at the sunrise. I think that's really cool. And then we got the transparent version right here. So that's really great. So we can go drop it in Photoshop, Illustrator or whatever you want to do. So let's see GPT's version. So this was GPT's version. So we've got. You can use the arrow keys to go filter through. On the side you've got all the images. I did. This one was Flux and then this one was GPT. So GPT is similar. Like, they look pretty similar. It's just, I don't know, a bit more stylized differently. But the thing is, with GPT, the character is a bit different. Like if you look at the nose, the nose is different. There's no goatee. So Chapter GPT is not able to keep consistency, but with Flux you can. So that's the comparison between Flux and ChatGPT Image Gen inside the zine AI. If you do want to try to Zine, I'll put a link in the description below. You can. You can try it out and start creating 3D mascots for your brand. I ended up creating some other brand assets here, as you can see, and I had a little bit of fun with it. Let me know what you think in the comments. If you want to see me create a brand or logo, then you can actually watch this video here and watch my whole process.