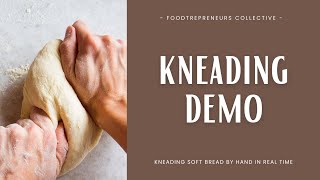
In this supplemental tutorial, Lesley Pascual‑Bartolo walks viewers through the complete hand‑kneading process for an enriched brioche‑type dough used in her "cheese rolls à la Mary Grace" recipe. She explains why she omitted the autolysis step in this video, then demonstrates how to incorporate butter and sugar in two stages while keeping the dough manageable. Lesley shares her personal hand‑kneading motions—using fingertips, a spiral motion, and a pink bench scraper—to develop gluten without a stand mixer. She tests gluten development with a flour‑sprinkle test, a gentle press (bounce‑back) test, and the classic window‑pane test, offering troubleshooting advice for sticky dough and flour balance. The video also discusses when a stand mixer is preferable for larger batches, recommends specific mixer brands, and notes that the same dough can be adapted for ensaymada. Throughout, Lesley uses bilingual (Tagalog/English) narration and promotes her social channels. The tutorial aims to give beginners a clear, un‑edited view of hand‑kneading enriched dough so they can replicate the cheese rolls and other breads confidently.
Chapters
This video is supplementary to my cheese rolls à la Mary Grace recipe video. In that video, I gave you bread-making tips, tricks, and techniques, but I didn't show you the full kneading process of enriched dough by hand. I thought it would be really helpful if you will see the full kneading process without cuts and speed-ups, so that you can recreate the cheese rolls recipe. This is something that I would have appreciated when I started baking bread. Honestly, if I had this kind of content, that would have saved me a lot of pain and would have been easier to learn than what I did. But everything worked together because I was able to be more effective as a teacher for learning it the hard way. So, if you're new to making cheese rolls, you know that we're going to use the autolysis technique. It's not just about mixing the ingredients. We need to let it ferment for a while. Means gluten formation. So here, in this video, we didn't mix the dough, we didn't do the autolysis technique. So it's still raw, it's still lumpy. Okay, so at this point then, we've mixed all the ingredients except butter and sugar. And after about 3 minutes of kneading. Bakit dini delay? Kasi ang butter ay fat at ikokot ni to among the flour proteins, so mahihirapan silang mag-interact sa isat isa to form gluten. Ang sugar naman ay water hungry, kaya agawan niya pa nang too big ang harina, ekay lang andin yun para ma-activate ang gluten formation. So ano tong kneading technique na ginagamit ko? Hindi ko alam. Usually kasi you use the heel of your hand Kaya lang very messy pag ganun, kasi yung buong kamay mo ang dumidume. Pero di to mai kita nyo na mostly yung nagtatouch lang sa do ayon ahy manga fingertips, okay? Tapos I'm doing this, I don't know, parang spiral motion, okay? So ayan, at this point dinagdag ko na yung first half ng butter, so first half mo na. In very simple terms, tagang kaylang yung ilang muta pa pa sok dun sa dough. Okay, at mararamdam man yung dito, nanagi gin less sticky yung inyong dough. Okay, so kaylang yung yung combine e incorporate well. Bago idagdag yung next half ng butter at chaka yung sugar. So obviously I am using my bare hands to knead the dough. Assumption, punat, palagi, shempre sakayat ang pagkawan ng pagkain ay ang paguhugas ng ating mga kamay ng mabute. So I don't really recommend using gloves to knead your dough kasi kailangan niyo siyang mafili, kailangan niyo maramdam maniyo inyo. Dough. At walapanaman ako na kita talaga na nagminid na naka-gloves. Even your best chefs in the world would always just use their bare hands, their clean bare hands. Okay, so nakita nyo ayon dinadagdag ko na yung second half ng butter at chaka yung sugar. At ulitin ko lang olet yung pag-incorporate well. Dito sa mga ingredients. At this point, okay, so talaga kaylangan, very well incorporate. So parang talaga nilalumo, pero ang dough at this point very soft, actually. Me laban pa din, soft sha pero me laban, hindi sha parang nagshash, nag, um, tawag dito, yung mag, yung madaling nagbebreak. So it's already forming one shape, okay. Tapos Very helpful. Ayan, nakita nyo yung aking pink na flexible bench scraper. And tawa jan, mura lang puyan. Usually comes in a set of 3. Napa ka helpful po for bread making by hand. Okay, or kahit na hindi by hand, nakakatulong de sha ko nyo ay sa pag scrape ng bowl. Bowl? Sa pag scrape ng bowl. Bowl. Sorry po. So katoran nana sabi ko ko, nina parang sariling technique ko lang tong ginagawa kung ganito ma hand motion. Diko alam ko miga nyan official technique. Meron kasing tinatawa ng Bertinet method. I hope tama yung pronunciation doon. Kung sa ini slap and fold yung dough. Into the surface of the table. But this is not applicable to those who have little dough. For one, it's sure that if you have more dough, you can use this method. But actually, if you have more dough, so if you're planning to start a bread business, I really recommend that you stand mixer. Your hand mixer, because you need to knead the bread, so it's more difficult to use the motor in your hand mixer. Stand mixer, put a lagay, your heavy duty, because your stand mixer— hand mixers, lagay, that's not lagay lang ng stand, pero yung stand mixer like your Breville or your KitchenAid Yung kasi yuma familiar ako na brands ng stand mixer, yung ma tatahastalaga yung wattage. Pag ganon, siempre les pagod po ang pagmamasa niño, y siempre kapag maraming napuhen ginagawan bread, mahirapon y mano-mano. Another thing na pagdi napung skip kapag meron na kayong stand mixer ay yung autolysis, which takes an hour, so malalasen din yung time needed to prepare your dough. So kapag na fully combine yun po the rest of the butter and sugar, paedipo kayo mag timer ulit for another 3 to 4 minutes of kneading. Ayun pa lang may kita yun na deba ya, nyung dough na 'ten. Mas nagiging stronger na sha, kesa sa kanina, tapos mas nagiging smoother na 'den sha. Okay, so tolo ito loy lang, tolo ito loy lang po yung inyong pagmamasa. Okay, so I make sure na yan, asisemot ko po yung mga nadidikit-didikit para namamasarense la. Okay, so yan, etong cheese rolls la Mary Grace na recipe, actually you can also use this for ensaimada. Tinikman ko yung cheese rolls na Mary Grace side by side dunsakan la ensaimada, I think it's just the same dough. Actually, next week po, isha share ko yung aking ensaymada recipe using a very similar dough, mas yadjust ko lang sha kasi gusto ko nang konting chewiness sa aking bread. At this point, ampararamdam nang inyong dough ay very soft sha pero may laban. Niretene yun yung shape nya. Koy hindi yun na sha basta basta parang Nabreak lang, okay? So I hope talagang panoorenyo nang buho itong video na 'to. You can watch this as you do your own recreation of the recipe para talagang side by side tayo, para makatabi tayo ng gomagawa ng bread. Kung yan mi ganito lang ahong na access na content before malaking malaking tulung putalaga sa By the way, don't forget to like and share this video. Subscribe to our channel. We also have Facebook and Instagram @foodtrepreneurscollective, and TikTok @lesliestestkitchen. Yeah, so after about 3 minutes, let's test if the gluten is formed. So we'll add about a tablespoon of flour. Patuli ko mina masa yung aking bread. Ayan, itanyo si ni si mut ko pa talaga. Okay, ah, kung mapapasin yurin pong ayon lang ako nagdagdag ng flour. Ya, ako nagdagdag kanina ever kasi masisira yung balance ka ng ating flour and water. Tapos, ayan, kita kita na man, very smooth na yung top. Pero conti pa, conti pa ng pagmamasa. Okay, to check, ayan, ipok lang natin or i-press gently. As you can see, medyo mabagal pa yung balik nung pag-press no. So i-masa ko pa sha for another minute, tapos test ulit natin. Dito rin, may kita niyo hindi Flour, okay. Yung smooth top, kaya kung ganun po, pedi kayong magdagdag pa 'nan about a tablespoon of flour sprinkle 'nyo lang po sa inyong table. Okay, nakakapagod po talaga sha pero malaking na po yung mame menos niyo sa pogo, dahel na dun sa autolysis technique na ginawa natin. Kapag hindi niyo po ginawa yung autolysis technique, it will take around 10 to 12 minutes of kneading, bagong yung mahita talaga yung magandang gluten formation. So na yon, test natin ulit. Pueden natin gently press and check kung nagbabounce back immediately yung ating dough. Para hindi magstick yung finger nyo, pueden yon pong i-flour. Or kung hindi naman talaga sticky, okay na puyon. Pero if you find it sticky na dumidikit sa inyo yung dough, then i-flour nyo po. Tapos, yung last na test na pueden yon gawen ay yung windowpane test. Kung saan koko wakayon ang kapirang got, Nado tapos trainyo't siyang stretch. Kapag nag-stretch into a very thin film, na nag-pass through yung light, then you have good gluten formation. Well-kneaded napo ang inyong dough. So from there, apeding yun napong i-rest ang inyong dough. Ayan, I hope this video helps you successfully recreate my cheese rolls à la Mary Grace recipe and any other bread recipe out there. Sa ulitin po.