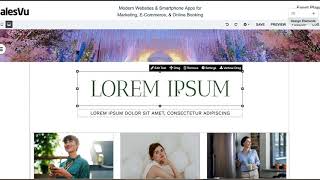
Walk through building an event planner website with SalesVu. Upload your logo, customize the banner with multiple images on a timer, add social media links, edit the About and Gallery pages, and point a custom domain to your site by changing the A record in DNS.
Hi. Today I'm going to show you how to create a website using our event planner template. So create a site and you can see our template right here. If you need something more specific, you can email us with your name, email address and your requirements and click Submit so that we can plan it for you. For this tutorial, I will use a ready made template. So here is our template and I'm going to be using this website as an example from time to time. So the first thing I'm going to start with is upload my own logo. So I click Edit image, Add image and I'm going to upload the file from my computer. I'm going to click Save, skipping and copying. Then I'm just going to scale the photo to however big I want it or however small I want it. Once I'm happy with that, I'm going to move on and edit the slogan. What I'm going to do is I'm going to change the font style, the font size and the alignment. Then what I'm going to do is I'm going to edit the banner. So I'm going to add my images to the banner. So basically you can add multiple images and you'll see in a minute I'm going to upload my first photo. Photo save. Skip cropping. Once the image has uploaded, you can see at the bottom there's a slide timer. So I'm going to set it to 3 seconds so every 3 seconds the image will be different. Then I'm going to add a couple more images to a banner I've done uploaded. You can also swap them around by dragging the image to the place where you want it to be. Then I'm going to show you a preview of how it would look like. Going to click on preview. So as you can see it changes every three seconds like what we set in the timer and you can upload as many images as you want. We're gonna add the social media links by clicking on Add social media icon. Now I'm gonna go to the website that we're using as an example and I'm gonna copy her social media links. So what I'm gonna do is I'm gonna click on her social medias, copy that link. So I'm opening a couple of social media pages here. So what you're gonna do is copy the link of, go back to Sales View Website builder and paste the link on there. Click Save and then let's do the same for the Instagram and the Pinterest that she has as well, now I'm going to edit the other images and replace them with my own. Sa after we're done, we're going to edit the about page. So click on sitemap and click about. Then again, as you can see, I'm going to upload my own image and you can have multiple banners as well. Then once we're done, I'm going to edit the text at the bottom and change the images as well. I'm going to use the website that I showed early on as an example to edit the text. I'm going to click on the text box, click Edit text and from there I'm going to type in my text and I'm also going to put in a slogan SA to replace the image. I am going to click on Edit image and upload my own image. Now I'm going to edit the Contact us page. So I'm just going to copy how it is on her website. So I'm going to copy paste this, this, go to SalesVu website and edit the text and place it in the position that I want, change the font size and basically play with it a little bit until I'm happy with how it looks. I'm going to add more text. So under design elements, I'm going to drag the text section and bring it to the white space, paste there so that we don't have a blank space. And then I'm going to go back to the website to copy her Contact Us page. Just going to copy paste this one. Then I'm going to edit this one as well. Sa, I'm going to add a background color to this box. I'm going to click on settings and choose the color that I want and I'm going to copy that color throughout the whole text. So settings and then choose the background color. I'm going to show you how to put links in the footer. So I'm going to click on two dots right here. So for example shop, I'm going to put that in the footer. So click the two dots and click Put in footer. So it would look like this. So you see the links down below, not at the top of the header. Also edit this content below so you can put your own email and your own number. Then I'm going to edit the page called Gallery. So it's going to look like this. So let's go back to Sales View website, click on Gallery. Then I'm just gonna scroll that up there. Then I'm going to edit all these images to my own images. So to upload my own images. I'm gonna click the image, Edit image, Add new image, select file. Once you're happy with the website, what we're going to do is click on settings, Website settings, switch to own domain and follow the instructions. I'm just going to copy paste the IP address given here. Go to my domain, see, as you can see, eventsforlife.co.uk click the three dots manage DNS. Then we're going to click Add. Click type a host to at then points to the IP address that we copied. Then I'm going to delete this so it's not duplicated. I'm going to go back to the sales view website because I'm going to copy my domain onto the website URL. Click on save. Okay, Then what we're gonna do is click on Publish. Then paste your URL there and publish. So now when you're gonna open a new website browser and type in your URL or your domain, as we're going to do right now, it's going to open the website you just created. Now you have completed your website. Thanks for watching. Please let us know if you have further questions.
 eCommerce, point-of-sale (POS), ERP and Data Analytics platform for retail and restaurant businesses