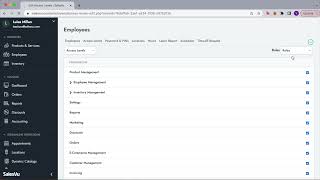
A SalesVu Technical Support tutorial showing how to add and manage employees in the SalesVu portal: required fields for new employees, adding images and contact info, grouping by roles, assigning web/device/app access levels and restrictions, assigning locations, viewing hours/labor reports (including compensation, overtime, commissions, sales, tips), and creating/syncing schedules with calendar notifications.
Questions this video answers
First name, last name, and email.
SalesVue Employee Management and Permissions. The first thing I'm gonna show you.
Is how to add the employee, which is going to be in this main screen with the Add employee green section in here or with the plus icon. And then I'm gonna walk you through these other different parts of this employee section.
Perfect.
So in here we can see all the list of your active employees. In here, in parentheses, we can see what is the role. We have managers, cashiers, the owner, volunteers, and you can create these roles according to your company. So for today, I'm going to do an example with Alex Martin, which is going to be an admin. So again, in here I'm just editing, but you can just simply click here on Add Employee. There are only three main things that are mandatory whenever you create an employee, which is the first name, the last name, and the email. In here you can also add an image of all of your employees. You can add all the information according to the date of birth, status, the phone number. It's something that is not mandatory, but we recommend simply because you can sync your calendars. Once you create their own calendars, they can sync to their phone and receive notifications not only by email, but also to their phones. So that's a very good best practice. In this section. Now, at the end, if you scroll all the way to the bottom, you can select the employee group. If you have different employee groups for volunteers or admin, or for cashiers, at the end you can also select the roles. This is going to help you have a quick access to the access levels. For example, you can create the access levels for all the managers. And then whenever you want to create a new manager, you can simply select the role of a manager. And then you can skip the part of doing individually the access levels for each one of your employees. But of course, it's available, so you can do it specifically to each one of them. And then at the end, the employee type, admin or employee is just going to be useful for us in SalesVu to know which one is logging into the account. Perfect. Now, access levels. So in here, as I was explaining before, the access levels can be divided by roles. So cashiers, IT managers, servers, they can do different things on the web access. So in the portal, in the backend, which is what we're going through right now. And also they can do different things on the pos, and you can restrict or give access to according to what you want your employees to do. So we can go here and go through the manager's access just to show you a quick example of how this would look like.
Perfect.
So we, as I was explaining before, we have the web access levels, the device access levels and the sales view app modes. So here we can see that as a manager you probably want this person to have access to all of it. The product management, employee management, inventory, all of it. This person has access to everything here except for the last part of it. This could be according to you, you can simply add whenever you want this person to have access or not. It's just simply clicking through it. We have very good articles that explain what each one of these axles mean. And you can always ask us in case you have any specific questions about one of these access levels. At the very end you can see that we have restrictions, which is what you don't want this person to do. Right. So in this example, you don't want your managers to not have access to edit their own hour report or to hide the filters. These are some things that you probably want these managers to have access to. So that's why they are on. Yes. And then again if we go to device access levels, we can see again that the manager has access to absolutely everything. To open the cash drawer, to delete the order, to maybe process discounts on the spot, things like that you want this person to have access to. And then at the end restrictions, you don't have this ones activated. For example, you do want your manager to have access to all of the settings, so that's why this is not activated. Or to hide the current shift details. This is something that you want your manager to have access to, so that's why are not activated right here.
Now let's go to locations. So if you have multiple locations, you can assign the locations to your employees. It happens sometimes that the employees can rotate through different locations if you have many in one same city, for example. So that's when you can enable and disable them according to your locations. Now we're gonna go with hours. You can set the hours to then have a full complete labor report in here you can see when did they clock in, when did they clock out and how much they registered in here. Now the labor report is something that is super useful because you can use this calendar to select specifically when do you want to get this report for and then the advanced options for, you know, employees locations or job titles. So if we go through locations, maybe you want to select Milan Arts center and then we will be able to see what is the labor report of this location with the name of the employees the job title, the total hours and any other extra information such as compensation, overtime hours. If you want to keep track of salary, you can do it as well. Commissions can also be taken into account here. Total sales, tips, rewards and deliver cost ratio. Now let's go to scheduler. Perfect. In here you can do the exact same thing. You can select if you want to see the scheduler for one of your employees. Using this drop down menu. You can also select for example the location. If you have multiple locations, you can actually select where is the schedule for all of your employees. So in here we can see that each one of them have a color coding that was designated when the employee was created. The nice thing about it is that we can see in detail all the information of each one of the employees their time. If this is a schedule that you want to be repeated for every day, or it could be very particular. For example, this is a volunteer that only works on Mondays. You can totally set it that way and also select when this will be end and then have any comments. And this could be say for only one shift if you have something in specific for the past for the next month. Or you can actually save it for all future shifts. Now you can create different shifts or schedules for your employee or have even for employee groups. You can also save any specific schedules that you want to work on as a draft or whenever you publish them. Your employees will receive the notifications on their phones or emails if their phone number and their email was already added whenever you created the employee. So those are nice things about this schedule. And also if you use this drop down menu you can do the calendar sync. So if you do any updates, your employees will also receive these updates automatically.
 eCommerce, point-of-sale (POS), ERP and Data Analytics platform for retail and restaurant businesses