Learn how to set up and run a Hosted Event in SalesVu, from picking location and time slots to tracking inventory, closing the event, and generating an invoice.
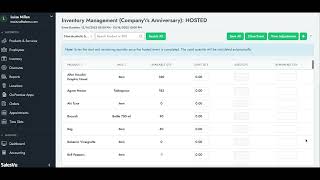
Welcome. In this video I will be walking you through how to create a hosted event. Hosted Event is part of the event management features that SalesVU has to help you manage event in three different kinds. In other videos we have talked about pre ordering Cash event and now this video is for Hosted events. Same as Cash events. The workflow is very similar. What we're going to do is first go to time slots and in here we're going to create our event. The first thing is checking the location. So we're creating the hosted event in the correct inventory location. Then we're going to click on add time slot and under event type we're going to select Hosted event. Next is a sub selecting the start time and end time. So this could be for this example we're going to create for Friday. Now it's going to start at 5pm and it will end on the same day at 10pm you can also set it as something recurring. And for this example we're going to name this event as Company Anniversary. Now we're going to click on save. Once this is done you can see that your event has been added to the other events that you have in here you can see the details and you can always come back and change any information and also delete it as well. Now the next thing is simply setting up the inventory. So the same thing we're going to inventory and then we're going to check the tab of Event inventory. Once we are under Event inventory we can see the events we have created and we're going to now set up the inventory. From this drop down menu you can also change the event type in case you want to change from hosted to cache or Cache to hosted. Now we're going to click on Set inventory and same as Cash event we're going to simply add the products that we will be giving away in our hosted event. Now this could be any type of beverages. If you come here you can use the drop down menu to find a specific category or you can utilize the search bar to find a product or you can search by sku. Next we're going to be able to change the start quantity. In this case we're going to add 10 units of each one of these products and once we're done we're going to simply click on save all. Now since this is a hosted event, you won't need to use your iPad to process transactions. Everything will be calculated manually. So after you enter the start quantity and you proceed with your event, take orders and finish the event, the next thing you can do once the event is done is come back to event inventory, search for the event and then come here and set the inventory. Now in here what you would need to do is simply go to the categories or the products that you offered and manually count how much has been used. But now that will be simply added in here. In the column that says remaining quantity, you can simply say how many cans, bottles or items are remaining so that the system can simply calculate how much has been the use quantity at the end when you close the event. So after you have added all the remaining quantities, the next step is clicking on Save All. You can add any notes you prefer. This is optional. Then click on Done. And once this step is done, all you need to do is simply close the event. Now in here you have two options. You can pay order in cash, or you can come here and send the invoice. Here you can add any email address you prefer at the email address of the manager, owner or admin who is in charge of finishing the transaction and paying this invoice. Now the event has been closed successfully, you can come here and see the use quantity that has been calculated by the system automatically. As you can see here, this column has been added automatically. And then if you would like to check the order the invoice that was sent and check all the products that need to be paid by the person who's in charge, you can come to orders and then simply click on advanced options, go to order type and select all. Now in here we can see the customer. The customer is going to be the person who the invoice was sent to. Now in this case we can see that there are two orders in here, two different dates. We can just simply come and check the one that we need. Of course when we open the order detail, it will tell you the order number, the order source which is going to be the host event, and then we can see the event name, the start time, end time, and then we can see all the different products that need to be paid at the end. You can pay this order directly from here. You can email this invoice, you can edit it, print it, or even delete it. Thank you for watching and let us know if you have any questions.
 eCommerce, point-of-sale (POS), ERP and Data Analytics platform for retail and restaurant businesses