
SalesVu POS System: Basic Restaurant Bundle Demo
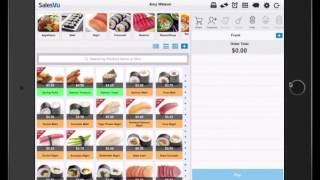
Walk through SalesVu's Basic Restaurant Bundle POS system, from employee login and table management to menu setup, discounts, check splitting, loyalty programs, and QuickBooks integration. See how to create menu items on the fly, restrict discounts by role, and sync orders across devices.
In this video, I'll cover a walkthrough of the SalesVu basic restaurant bundle. On the login screen, you can have employees clock in and clock out with their different IDs. Each can log in with a separate login like this. Each login will correspond to a different level of access, both on the Point of Sale app and the web portal. You can see that Amy is logged in to the Point of Sale app at this time. However, other employees can also clock in and out by using the time clock icon here without Amy having to log out. You can do this by clicking the time clock and they can enter their particular pin to clock in. Click on the table map in the top right here you can view the table layout. This is scrollable, so if you have a large footprint, we're able to accommodate that. To open a table, simply click on the table you want. In this case we'll use Table 6. We can now start a tab at this table. Modifiers in SalesView work like this. We have vegetable ramen. We've got cup or bowl option. You can have a value added option like this. So on the bowl we're adding $1.50 to it. You can also have additional options that would display the next chevron. Additionally, you can enter special requests to here. All this information will appear on the ticket on the right hand side. If you make a mistake and you need to delete an item, you can simply left swipe like this. If you need to edit an order, click on pencil icon like this. Go back in, change a modifier hit Done again. So we can add multiple items to the order. If you'd like to change the quantity of an item, you can click here. If you need to make a runtime discount, you can press on the percent sign here, enter a percentage or currency value of the discount and apply that. This can be restricted depending on who is logged in. If you want only managers who have access to this particular type of discounting, that's possible. You also have the option to do discounts with this button here. And these buttons would apply to an individual product, group of products, individual category, group of categories, or all products. These work very well for things like employee discounts or perhaps member customer discounts. We also have time based discounts. If I select this Tuna Nigiri, there's a discount automatically applied of $1. This can be set up on the website portal and we'll show that later in the demo. To search through items on the menu, you can navigate by selecting different categories at the top. You will then see a curated list of SKUs appear below that. Categories can have subcategories as well. You'll see. If I select beverages, the subcategories of non alcoholic wine, tea and beer appear at the top. If we select these, the SKU list further gets curated and we have only those items. So it's very easy to navigate an extensive menu or product list. You can also change the view of the SKUs to be in line like this if you prefer, or grid pattern with or without images. If you need to add a new menu item on the fly, you could simply click this plus sign, enter a name, select category, enter a description if you wish, enter a selling price, select the appropriate tax bracket, or add a different tax bracket. You can select a color for the particular SKU button. If you have a UPC code for this particular item, you can enter it there and you can press Save. If you'd like to add a customer to a table, simply click on the Table Mac icon on the top right hand corner, select the table you want, add the items to their tab. We can fire that order to the kitchen and then we can switch tables by simply selecting the table map again and selecting a different table. You can add some items to this table and switch back to take the payment from the previous table. If you're not using the table map and you'd like to enter an order and have a name on a particular order, you can do so by modifying the order number. Simply press on the order number and enter the name of the customer to override it. Now you can add some items and you'll see on the order screen the customer name here. If you'd like to open tabs via Pre Authorized Payment with a credit card, you can do so, but only with Swipe Only credit card readers. Please contact our support for details about this. When it's time to take the payment, if you need to split the check, simply hit Pay and Split Payment. You can split the payment by amount as many ways as you'd like. Split the payment equally, or you can set custom amounts for each customer, click Pay and take the payment with whichever tender you prefer. Alternatively, you can split the check by item by clicking Pay, Split Payment and Split by Products. Say we want to split this three ways. You can simply click and drag items to each applicable customer. If you wanted to split one item between multiple customers, simply click and hold like this. Select the customers you wish to split the item between and click Done. If you make a mistake or need to move an item in between customers, you can simply Drag it from one customer to the next. You can take payments from each customer by clicking Pay, taking the corresponding payment via cash, credit card or other payment method, and continue this process until all payments have been received. Once all the payments are made, the table will become open again. If you'd like to use the SalesVue customer loyalty program, you can activate it and you will receive this pop up each time you start a new order. To add a customer to your loyalty program, simply enter their phone number. If they haven't been added to your loyalty program before, you will receive this notification. At that time, you can simply click yes, enter their name and click Done. We've successfully added this customer. Click ok, we'll see. On the right hand side we have their details, their name, email and phone number. This will be stored in Sales View and you can reference this later as customers are making purchases after payment is received, you will now see details about their loyalty balance earned thus far and additional loyalty points needed to unlock their account. Once their account is unlocked, you'll be able to add loyalty payment on the previous screen. If you'd like to sell a gift card on SalesVU, you can simply select the gift card category at the top. Here, select the amount of the gift card you want to sell. In this case, we'll do a $40 gift card and you'll see this appear. This is going to activate the iPad camera. You can hold the barcoded gift card in front of this to activate that particular gift card. You can also enter the gift card number manually here. Once the gift card number is entered, you can click Pay and take the payment for the gift car. You'll get a notification showing the new balance of that particular gift card. If you have some items you want to pay for by gift card, you can simply click Pay and on the point of sale, you can either manually enter the gift card number here, or you can activate the camera on the iPad and this will be able to capture the barcode image of the barcoded gift card to take a payment. If there's not enough money on the gift card, you will get this notification. You can close out the shift by clicking on the piggy bank icon here. Click on that and you'll see a breakdown of all the different tenders for the day you manage the cash from here. Maybe we want to take out some cash. Buy coffee. Enter that info there, hit Save and you can see we deducted that amount. You can do a deposit to the safe. If you have a printer connected, you'll have the ability to Print this slip off and you can close out the shift from here. These closeout reports will be saved to the cloud based server and can be accessed at any time from the web portal. As with other functionality on the pos, you can limit access to this screen to only certain employees if you wish and it will be pin protected. You can also have employees have their own individual cash. Certain restaurant merchants like to do this and we can accommodate that. Just contact our support and we'll let you know how to set that up. In the web portal, you're able to customize your products and service offerings. You can click here. You'll see all the categories listed on the left and the product names listed here. If you'd like to add a new individual product, click Add Product Populate these fields Name Selling price Upload an image if you wish, you can select an optional color for the tile on the point of sale. Select category select whether the good is non sellable, sellable or if it's a service. You can select if you're tracking inventory for this item. If you are, there's some additional fields to populate. So if we track by weight or if we track by another unit, the units are customizable. We can help you set up custom units. We have some populated here already. For instance cups, fluid, ounce, gallons, liters, etc. If you need something else, we can help you set up a custom unit here. You can also configure modifier groups and components. Components will be used if you are having the product draw inventory for from a larger inventory unit. The best example of this is something like beer. If you want to sell a pint and have the pint be deducted from a keg inventory unit, we can accommodate that with these components. These could also be components like recipes for a particular item that you're selling. Modifiers are fairly self explanatory. You can save modifier groups. So for instance a modifier group could be something like cooking temperature and you could reuse that modifier group across all the items that you need to. You can add to these at any time. You can manage the categories here. There's a hierarchy of categories so you can have multiple levels. When you're creating a new category. You can have a parent category assigned here. So this is a subcategory of something else. Or you can have it be a standalone category. There can also be an image if you wish included. When you subscribe to Salesdew, our onboarding team will contact you and assist you with your product list. Build all you need to do is submit a picture or a CSV file of the product list and you can do this on the dashboard here. This will be clickable when you sign up for your free trial. You do need to be subscribed to take advantage of this service. Another web portal feature you'll want to use for this bundle is the Table Reservations configuration. From here, you can customize the table Map. As we mentioned in the Point of Sale demo, we can accommodate any layout. It's very easy to customize this. If you need to move a table, you can simply drag it like this. Click Save Layout and back on the Point of Sale, you'll see that that is updated. To add a table, click here. You can assign particular employees to this or not. Pick a name, select a shape, select capacity and press ok, now we've got our new table. We can drag and drop that wherever we like on the table map. Hit save and that's now synced with all the iPads. You'll want to activate the Cross Device Sync if you're using SalesVue in a restaurant. To do that, click Settings. You go to Cross Device Sync and activate it here. This will allow you to sync data across all devices. So for instance, if you're opening a tab on one device and you want to close it out on another, this will allow you to do that. Same goes for the Table Map. You can open a table on one device, close the table out on another device. By enabling the sync feature. You'll also want to set up your Employees module. You do that by clicking on Employees. Here we have quite a few different features. First thing you'll do is enter any employee information here. Want to add a new employee? Do this. Populate these fields. Most importantly is going to be their name and phone number, which you'll see why in a moment. After that's done, you'll want to go to Access levels where you'll customize that employee's access levels. For Amy, you can see we have website access levels. She has access to all of the website. We can restrict access to different areas of the website by toggling this to no. Same goes for the payment device. Any of these different actions, you can restrict these simply by toggling this to no. The scheduler is the next thing you'll want to set up. This allows you to create a shift for one or multiple employees. To do so, simply drag like this. Customize the time. If you need to select the employees or the group of employees that the shift will cover, you can repeat this shift multiple times. Perhaps this is the Tuesday, Wednesday, Thursday shift. You can repeat it every week, every two weeks, etc. Select a particular end date. Perhaps this is through the end of the summer. You can add a comment if you wish and you can create and publish here. Once you've created all your shifts, you'll want to publish notify all. This allows you to send text messages and or emails to all of your employees based on your notification settings. The notification settings can be configured here and you can select what you'd like to happen or various different actions. Salesboot will also create both Google, Cal and iCalendar events for all shifts that are scheduled. That way all your employees have their shifts right on their phones. You're also able to enter different compensation levels for each employee. Here. Labor reporting is handled through the labor report. You can pull a report for a specific date range or use a quick pick in the reports. They'll look like this. You'll have the name, location, job title, total hours, normal hours, overtime, commission earned, and several other fields. Included in these fields are credit card tips that a particular employee earns. If you're pooling tips, you'll have to calculate this separately. Passwords and PINs are all managed from this module. If you turn off employees access to the employee management module, they'll only be able to view a read only version of the scheduler, Time off requests and shift trade requests to set up gift cards and loyalty, click on here first. We'll start with the loyalty program. It's very easy to set up. Go to Loyalty settings. By default these will be zero. Simply select two numbers first being the loyalty percentage. This is the percentage of purchases that will go towards customers loyalty balance. Then select an unlock threshold amount. In this case we'll have $10. So a customer must earn $10 before their loyalty unlocks and they're able to make purchases with loyalty dollars. Simply click Save and you're ready to go. The Gift card module allows you to manage all the outstanding gift cards. You've got the outstanding balances here of active and inactive gift cards. All all customer names who have cards their respective balances. You can recharge cards from here, review recharge history, edit cards and see all the card numbers. We can also import gift card numbers from external gift card systems. Discounts can be configured here. We have three different types of discounts, non time based, time based and coupon codes. Time based discounts appear on the point of sale. A badge will appear on the particular item during the time that you have selected the discount to be applied. For instance, if we want to set up a happy hour discount, we choose a name, select the discount value, perhaps it's 15% off, and perhaps it's on a particular category. Let's say appetizers. We'll want this to run 6pm to 8pm and we'll start this today. You can select which days of the week this occurs either every day or perhaps only on certain days, maybe Wednesday and Thursday. You can select an end date, select this to end after a particular number of occurrences, or opt for no end date. Simply click Save and the discount is set up. Reports can all be viewed here in the Reports module. You'll see Sales reports, average ticket, discount reports, drawer reports which show any time the cash drawer is open for a no sale, closeout reports which we covered earlier, zero reports, tax reports, cash adjustment reports, and modifier reports. The sales report works like this. You can view a report graphically, pie line bar chart or view it in a table. You can select a date range or use a quick pick. In this case, we'll look at year to date sales for a top line report. This is all you need to select and simply hit submit and you'll have a top line number of sales for all stores and all products during the particular date range. So we sold this quantity. This is the undiscounted amount and this was the discounted amount. You'll be able to see a breakdown of the tenders here. If you want a more detailed report, go here. Show cumulative sales for select the drop down menu and select either Products or category level. If you select Products, you'll see a complete list of products shown here. You can drag this down or scroll to see your entire list of products. You can select all products or you can select an entire category or individual products. You can decide whether or not to show categories or products with no sales as well by toggling here. You can further break this information down by the point of sale, which is the iPad or iPhone the actual transaction happened on. You can break it down by the employee who sold the particular item, or if you have multiple locations, you can break it down by store. Here's what a report by product for year to date would look like. Reports in the table format are exportable. SalesVU basic restaurant bundle also includes the Accounting module. This allows you to use the SalesVU Easy accounting as well as the QuickBooks integration for both the online and the desktop variants of QuickBooks. It's very easy to set up. Please contact our support for assistance.










