
SalesVu Web Store Shipping Setup
Walk through SalesVu's shipping setup: create custom statuses, set delivery thresholds and flat rates, configure time slots and zip codes, and update order status from POS or KDS.
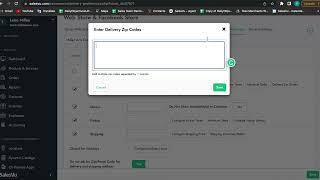
Welcome. In this video I will be walking you through delivery and shipping setup. Under location settings go to Custom shipping status and from here select the location. Now in this screen you can create the shipping status to what your preference is to any name that you would like and then you can select on the checkbox if you want this to be by default the point of sale, the customer kiosk or any other app point of sale that you prefer. This is just to show how they would look like under the POS for your employees to allocate the custom shipping status for the orders. If you scroll down you can type the name of any status that you want to create and if you scroll to the right you can see the menu that allow you to create the template to set up that confirmation to edit it or delete any status. Now if we go to the web Store and the Website Builder we will be able to set up the shipping for online orders. You can access this through the web Store or also from the Website Builder. If you have the web Store on the left side menu, all you need to do is click then under Delivery preferences here make sure you are in the correct location and then start setting up the delivery. Here you can see the different delivery mechanisms and the things you can customize. The first thing is configuring the delivery price. So once you click on it it will ask you if you want to turn the delivery on. You are going to select yes and here you can customize some things. First if there is a free shipping amount you can set it up. Then if there is a flat rate or if it's by order amount and different ranges and also by order weight. And you can select the weight measurement too. Here are some ranges too and you can add more if you need to. Once you're done all you need to do is click on save. Then we have the configure delivery times. So if this is going to be enabled for ASAP delivery option, you also have the option to do it by seat number and you can also select the time slots for the week where you are delivering. If it's going to be only on the weekends you can select this and also the hours from and you can add more time slots and simply click on save. Once you have this information then the minimum delay, if it's going to be by hours or by minutes, then the delivery zip codes, you can simply add them and separate them by a comma. And last but not least is going to be the configured default values. Here you can use a store address value and Simply enable this for yes or no. Then for each one of the delivery mechanisms you can also configure some things like for pickup, the configure pickup times for shipping you can also select the countries you're shipping to. So for example, if you are on United States, you can select the country and then simply select the states. If it's all the states, you can set it up as all or if it's only in a few of them, you can select the checkboxes. If you also do other countries, you can click on add more and simply select the country and the states as well. If you scroll down you can also see the holidays. So if you are close for some holidays you can select the date and the hours and simply add other slots for any other holidays. And last but not least, you have the pickup address. So this could be the address that you already have on the location of your store. Or if you want to add a different one to have that enabled for pickup, you can simply add the information of the address that you need to add and then you can also select the device group by that little drop down. So if it's by different floors, different places in the same location, that can be enabled there. And you can also delete the addresses that you're not utilizing anymore. Now I'm going to show you another way to access this same page but from a different view. So in the left side menu you could have the Website builder so you can click there and then you will be redirected to where you build your website. Now in here you can see that there is a little menu inside that says Products enable disabled products, Payment and settings. Click Settings and then you will be redirected to the same menu that we were just in that has the web store and Facebook store and also has the delivery preferences and also the general settings for the website. You can do the exact same thing we were doing previously with all the shipping delivery information, time slots and so on. Next I'm going to show you how you can see this on the POS and how you can change the order status from the POS. Here all you need to do is go to the shopping cart icon which will show you all the orders. And from here you can utilize the filters on the top to find an order in a specific. Now in this example what we're going to do here is check an order that it's already open and all we need to do is click on the plus icon to see more options and then we see the three dots that say more we're going to tap in here and then tap on change delivery status here you can manage if the order has been placed has been shipped for takeaway. Remember these options are created on the backend and they will be showing in here. So according to the order status you can simply update this here. Now you can do the exact same thing on the KDS here I'm opening the app and you see here the orders with the specific information and then you have the three dots that say more. Again you tap in there and then you tap on change delivery status you will see again the same status and all you need to do is tap on the one that needs to be updated to. Once we do this we see this on the delivery pickup mail we see the new update then we can also check for the filters the orders that have been updated for that specific status and track them this way. Thank you for watching and let us know if you have any questions.










