
Website 1 Clothing Boutique
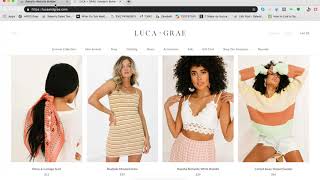
SalesVu walks through building a clothing boutique website from scratch using their website builder. The tutorial covers selecting a template, editing pages through the sitemap, adding products with images and prices, embedding Instagram, customizing colors and banners, and connecting a custom domain via DNS A record. Domain propagation takes up to two hours.
Hi. Today I'm going to show you how our website builder works. It's free and easy to use. I'm gonna give you an example by recreating this website using one of our templates and you will see that later on. So here is the information about our branded website, and when you scroll down a little bit, you can click the get started button to start. So this is our landing page and you can either go ahead and click Create a site or if you want to use one of our templates, select your business type. So as you can see, we cater to all businesses and template for everyone. Today I'm going to use the women's clothing template. So when you select the template, just click Edit. And now we can start creating the website. On your left is the sitemap, and here you can go to each page. So you can go to the about page if you want to edit that, or the contact page, whichever page you want to edit. On the right side is the design elements. So as you go on creating the website, you can add design elements to it. So it just means you can add pictures, you could add text. So I'm gonna go ahead and copy this logo from the website that we're using as an example and save it to my desktop. Then on the website builder, I'm gonna click Edit Image, then click Add Image, Select File and then I'll upload the photo that I just saved. Click on Resize to automatically resize it. And now you have the logo. Then I'm going to copy the text. So edit text. I'm going to quickly look into the other website and copy the text there. Now we're going to change the banner. So click Edit Banner at the bottom left corner. You can change the slide timer. Then Add image, Select the file from your computer. I'm going to upload another image. So just click Add image again and then select another file. You can upload as many as you want. For now, I'm going to have 2. I'm going to delete the template. 1. Now let's continue editing the rest of the homepage. I'm going to edit the text here and I'm just going to click on the box and click Edit Text. Now I'm going to show you how to add an image. Under design element, you will see image. You can click that and drag that onto the website and then it will prompt you to upload a photo. So from there you can upload your photo, adjust the size and upload however many you want. As an example, I'm uploading a couple of photos for you to see and then I'm resizing them by dragging so I can actually resize them however I want. I'm just adding a few more photos. Again under Design elements, click Image and then drag it to the website and then upload your picture. SA I'm just changing the text of this header. So I'm just going to click on Edit text and add the text that I want and I'm going to show you how to add a background color. I'm going to click Settings and then choose the appropriate background color and then I'm going to continue on resizing the actual header. So to resize I'm just going to click and drag the box and and place it where I want. And now I'm going to add a text to each photo to describe the item and include the price. Again, I went under design element and clicked and dragged text section. So I'm just replacing the text and adding it with what I want to put doing the same steps for every photo Facebook. Now I'm going to replace the two images that you can see here. So I'm just dragging it in place and then I'm going to click Edit image and upload the image that I want. When you click Resize, it automatically resizes the photo to the dimensions given. Now I'm just going to replace the text. You can put anything that you want. I'm just going to put View products and I'm also going to change a few of the descriptions to the descriptions that I want. You can also change the background color of the text by clicking on Settings and it will show you the background colors that you can choose from. I'm just going with the same theme of color pink. So now I'm going to show you how to insert your Instagram on design elements, drag widget code onto the website, then Click on Instagram widget.net and it will show you a new website wherein you will input your Instagram username, then scroll down and click Generate. The preview will show how it would look like in your website and just copy the code. Go back to the website builder and paste. So now you can't see it, but once you click on Publish, it will show you how it would look like. So there you go. I'm going to proceed to copy some of the pages from this website. I'm going to copy the about page. So under the website builder I'm gonna click on the sitemap then click about. So I'm editing that page so I'm just gonna change the image and then I'm going to change the text to how it looks like in that website that I'm copying. Let's proceed on editing another page. I'm going to edit the contact page now. So on the sitemap I'm gonna click on Contact so it will bring up the contact page. In the contact page, I can edit it any style that I want. So for today I'm gonna add in some text and I'm gonna change some background colors like I showed you previously, just to repeat the instructions. To add a background color to the text, you're gonna click on Settings so it will show you all the background colors you can choose from. And adding a text to the website again under Design Elements, drag the text section to the website and then edit the text so that you can put whatever text you want to put in. So now I'm going to edit all the other pages like I did previously. So when editing again, you click on sitemap, click on the page you want to edit and you can add text, you can add pictures. So now I'm going to show you how to add products to your website. Under Sitemap, click Shop and then scroll down. Click Product. A pop up will appear and you can click Add Product to start adding products. So I'm going to upload an image first. Since we're using this site as a reference, I'm going to use the exact photos, the exact name, and the exact price and description of the product. Once the image is uploaded, you can just simply close the tab and start on writing the product name, the product price and description. Then I'm going to add the category and this time I'm just going to save and add new. So if you have a lot of products, you can just click Save and add New. This way it would be more efficient and you don't have to keep on clicking Add Product. Every time you add a new product, you can put it all in one go. Now I'm going to show you how to add your own domain name. So we're going to click on the Settings icon, click Website Settings and by default it would show you the domain name salesvu will give you. Just click on the switch to use your own domain name and as you can see, we have written instructions on what to do. So for example, I'm gonna go to my domain name and I'm clicking DNS Zone Editor. Then I'm gonna add new. Under ahost for this part you may want to reference back to the SalesVU website editor. So basically I'm going to type in the DNSA record and the IP address that is given to me on the SalesView website editor. Then I'm going to click Save. Then I'm going to click on the Website Editor page again, put my domain name, click Save. Okay, and then I'm gonna publish. Then you can choose connect your own customized domain and put your domain name there. Then click on Publish and you're done. Congratulations. I want to remind everyone watching that sometimes when you create your domain name for the first time, it may take up to two hours for it to be working. If you have any more questions, feel free to chat with us on Support or email us@supportalestu.com thank you for watching.










