How to Fix Curb Rash (Work Meister)
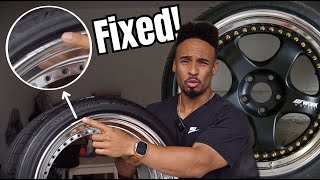
Justin Page repairs curb rash on Work Meister wheels for his Infiniti Q50, sanding from 80-grit up to 2000-grit wet sand, then polishing with Mothers and Never Dull compound. He swapped the original gun-metal finish for satin black powder coat and replaced silver bolts with gold-plated ones.
Chapters
Oh, that was a good one. What is up, YouTube? Today is a special day for moi because I'm really trying to start this channel, and this is my second, third video, but I've been getting some different equipment coming in. Got a new lens here. I'm using my Sony 6300 that's been collecting dust for the past 4 years. New lens, got a Sigma, I think it's a 35mm on there. I need to get a wide-angle lens that way I can actually do some more closer-ups, especially if I'm doing the point of view Also today I got the DJI wireless mic because I know that I have my Rode here, which I was using, but it's the smaller one. It's not the shotgun. Um, but obviously when you're pointing and I'm talking, cause it's pretty much just me, I'm not filming someone else who is the main person. It's me filming and pretty much narrating whatever's going on here. So I feel like the wireless mic was just like prime to be able to do. I like this. I was trying to decide between the Rode and the DJI, but I went with the DJI only because it has its own case. It's just like AirPods. They charge in here. It's all together integrated. The Rode, I know, has wires that individually go to each part. So it's just the part that goes on the camera, which is up there, and then you got your wireless mic here that obviously has to charge too, but they all charge separately with 3 different cords. That's just too much. I got a message today from one of my boys, Eric, over at HD Customs, that the faces of these new rims that I just got, I got some Workmeisters SPs, S3— 3— 3P S3. I'll put it right here. I got these rims here which are very hard to get. They're made in Japan. It's about 18 months to be able to get them, but I found somebody local in Orlando who was selling them, who's had them about a year. Problem is, is that they were a gunmetal gray and I don't want them gunmetal gray. I'm trying to go for the satin black, so my boy hooked me up here. We're gonna go pick those up. We're gonna take a look and see how these look, and then I'm gonna do probably a video on fixing the rims that I did purchase. It does have some curb rash on it, so maybe I'll do a video how to fix the curb rash, why not? But this is all learning experience, we're just doing as we go. Channel's gonna grow and it's— I'm— this is a hobby, this is just— I like recording and I'm just gonna make videos just because I like making videos, so why not? So let's get it. So use the Werkmeisters, these are the S1s, 45 bolts to take these off. This was a pain in the butt doing that 4 times by hand, terrible. Not doing that again, so I actually bought a battery operated wrench. Let me get these bad boys polished up there by hand, clean the rims off inside. Ended up buying some gold bolts, we'll see how that looks. Kind of like the silver and the gold on it, just to give it a good little offset there with the satin black. Two days later. Been a couple of days since I last worked on the project here. I've been at work, the ER. I may look a little different. We had an N95 mask fitting test, so they make us shave so that way we can get refitted for our N95s. Don't get me started with that. But yeah, we're going to finish the project with the wheels. I'm going to go through each one of the barrels here and look at the lips. And I don't know if you guys can see on here, but I'll zoom in. There's some curb rash here around the edges, so we're going to go through, we're going to buff that out, fix it, get it nice and smooth. Then we're going to put on the faces, put on all 45 bolts on each tire, and we're going to see how this fits. Now, by no means am I an expert at doing this. I'm sure there's plenty of videos on YouTube showing you how to do this. Buy this kit, click this link, get this. Sure, whatever, but this is how I'm gonna do it, and if it works, I'll let you guys know it works. Right here along the edges here, got some curb rash there, just a little bit here, not too crazy. We're gonna sand it, try to buff it, and we're gonna polish it, get these looking right. First thing I'm gonna do is I'm gonna get some isopropyl alcohol. I'm gonna spray the rim down and get the surface nice and smooth, getting off any of the grease that's on here or any previous polish that was on. This is only because I'm going to put some tape down and tape off the area that I'm going to be doing. That way I don't scratch up the good chrome. Get some of that grime off of it. I'm going to mask off this area. This is a pretty gnarly gash there. It's probably not the best tape job ever, but That's all right for now. I got my Dremel here. I believe this is my 80 grit that's on. I'm just going to knock off all the giant craters here and try to smooth this out as best as possible. It's not going to be completely smooth, obviously, as this is a tougher grip. It's pretty scary at first when you're doing this because you're sitting here obviously beating up the rim more than it already is, so you're pretty hesitant it. So with confidence, you can do this. If I could do this, anybody can do this. This is what I use for the project, Black Decker sander. I got this off Amazon. I'll put the link down below. Nothing too crazy, nothing too fancy. And I'll get some discs, which I also found variation of different grits in a box. It was a pretty nice kit. I'll also put that down below in case you guys are curious on what I use or want the same one. We're going to work ourselves with different grits. I did the 80 first. I'm going to do 120. I'm going to work my way all the way up till I get to 600. And when I get to 600, That's when I'll start doing the wet sanding and I'll spray water on it, sand it down, continue to work the grit up. Remember, the higher the grit goes, the finer it is. So when we get to our 2000, that's when we're going to really just put the shine into it and smooth out all those rough edges. So it should come out and feel rather smooth. This is Velcro. Slap this bad boy on, try to line up the lines as best I can. Biggest thing when you're sanding is that you want to make sure that you're not taking off too much material. Material. This is a curved edge, so you're not trying to make it flat. So I'm working across nice and easy, pretty evenly, as best as I can. This was, this was a big gash here, so I don't want to take it down too much to match it. So if it's just a little indent there, it's not that, not that critical, at least for me. If you're a perfectionist, obviously you want to sand it down as perfect as possible or take it to professional. But I mean, in this case, it is what it is. It's not that critical for me. 120, we're going to go up to the 240 here. And put this on the right way. Now, is it necessary to go each grit? Maybe, maybe not. I'm not 100% sure, but that's just what I'm going to do because I want to make sure this is right. And I'm sure there's a lot of forums that say different things, what to do, what not to do. I just only have one day off, so I need to get this done today. I got to work in my ER for the next 7 days straight. You still see the little indent right there. That's not going to bother me too much, but I just don't want to take so much material down. So we're good on that part, at least for me. So we're up to our 600 now. This is going to be our wet sanding. Get this nice and wet. Spread the area a little bit here. Since we're getting down to a good area, I'm going to take off the tape here. I can mask and blend in the good chrome and the bad area here. 800 grit, like I said, working our way up. 1000. All right, so we're getting there. It's getting nice and smooth. It's not rough. It is nice. No cutting fingers. 1500. 2000. I don't know why the 2000 is purple. Purple is legendary weapons in video games. Maybe that's what it is. Nice and smooth here. No craters. Just actually, there's one, just that one I was talking about originally right there, but nice and good. We're gonna polish it next. I like to use Mother's Mag and Aluminum Polish, and I also like to use the Never Dull. What I'll do is I'll take some of the Never Dull and I'll dip it in here. I'll take some of the Never Dull here. This is just wool. I'll pull some of this out. Dip it in the Mothers and then just work it nice and easy around the rim here. Let's just go along here. Oops. Really getting in. And I'm gonna do the entire rim since I have everything apart here. Once you work in all the applicator, you'll notice that it'll start turning black. That lets you know that you're doing a good job. You don't have to rub real hard into it, just nice easy passes along, and you'll see that it'll start turning black. And I'm going over with the microfiber towel here, and I'm going around the edges and getting off all the excess. As far as all of the curb rash, it is smooth. I also went ahead and did another side over here too. Nice and smooth. It feels good. Now this, this right here, I'm gonna have to fill in. I'm not gonna be able to just buff that down, so probably have to do Bondo and just cover that over. Maybe, I don't know, it's a little different. But in the meantime, I'm pleased with it. First time doing it. Bam! All right, now that this is clean and been buffed, we're gonna slap on these faces that we just freshly got powder coated. Oh baby, it's already looking delicious. I don't know about you guys, but your boy's got good taste. That is so much better than the gunmetal. And a lot of people get the shiny black, but I wanted to be different. I feel like the chrome is already accent enough, so this makes this pop out. And then we got something special happening here. Now these wheels originally came with these silver bolts here. These silver bolts which have the Work logo in the middle— not sure if you're able to see that, but I'm trying my best here. These are expensive. $720 for these bolts to get all 180 for these wheels. Now I say this because I really don't care for the silver bolts. I wanted gold bolts. Again, $720 for all these. I was not paying that from Work. So instead I got them on eBay. It's very hard— oh crap— it's very hard to find these bolts of this size for a decent price, but I got these for $150 for 200 of them, so I got some extras. Bam! Gold bolts all the way around. This is gonna look sick. I put on the side here so I can have access to both sides because I need to tighten the front as well as the back. I have a, uh, for the front, 5/15 blind socket wrench, I believe. And then on the back side here, I have a 13. So the OEM ones are 11s, but these are 13. Also highly recommend getting a powered socket wrench because I took these off originally by hand and I was out here for about 4 hours trying to do that. But leave the link below on Amazon. All right, I'll do the inside first, get this nice and snug. Which is very risky doing it with one hand here holding the camera. Originally I was going to paint the silver ones gold, but then I just thought about the longevity of the paint being on this and the hassle it was to take these bolts off. And let me let you know that that is not going to happen. So just think of future-proofing myself. This here, just get a nice crank. Same on this side here. All right, so 4 down, 41 to go. Much, much, much later. Finally got all 45 of these bad boys on. This is what we're sitting like. Dang. Now we need to add one final touch on this. You can't have a Work wheel without the Work sticker. I'm gonna clean off the surface with some isopropyl That way we can have a nice solid clean surface to stick this on. We'll go on this side over here. All right, so I'm gonna get this nice and even as best as possible here. I think I'm good with this. Patting it down, making sure you're getting a nice seal all around the letters. That way when we peel this off, we won't be pulling off the letters. Oh, that's broke off. There we go. Sheesh, it looks so good. The sticker just gives it character. Appreciate you guys for joining me in on this. New to YouTube, like I was saying before, so this is my project. We're working with my Q50 here. Sick rims are going to be coming on the car soon, so stay tuned to the projects. I'm going to be uploading some new things fitness stuff, other things that come to mind. This is just— we're filming as we go. Eventually we'll build into a niche, but I appreciate you guys for tuning in with me. Regarding the rims and everything, if you guys have any questions or concerns, or if you have your own way of doing things, I, I'm an open mind. There's no such thing as no knowing at all. Leave it down in the comment below. Make sure you guys subscribe, stay tuned to the next videos. Again, I'm Justin Page. Peace. [MUSIC] [MUSIC]
More from Justin










How Women Are Taking Back Control of Their Sourdough Bread (And Saving Hundreds).