Colin Brown shows how to build a course in eBizSuite by creating a product, adding sections and lessons, uploading videos and files, and organizing everything with drag-and-drop. Courses can be free or paid, lesson thumbnails should be 1280 × 720 px, and you can add text, videos, PDFs, and assessments to each lesson.
Chapters
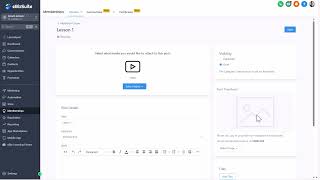
In this training, I want to show you how to set up courses in your eBizSuite platform. To do that, you're going to go to the menu, you're going to go to Memberships and Courses. And under Courses, you're initially going to see the dashboard, but you're going to want to click on Products. Each course is considered an actual product that someone can actually purchase. You can have courses that are free that you add to your membership. But for the most part, you're gonna, we're all here to make money and provide solutions for our customers. And to do that, you can go ahead and create a product under Courses. You'll see that I have a couple that I've set up here, at least temporarily. If I were to go ahead and click on Create Product, going to get some options, a sprint course, a marathon course, membership, build your own. And they're pretty much the same. I've gone ahead and clicked on marathon course. You can see what that looks like. It basically just puts the structure together. So when you do that, it'll click Create This Marathon Course. You'll click on it and it will show you the product structure. Now you'll notice that at product structure, you'll have a plus sign. This will allow you to create a category. Each one of these sections are categories, the introduction, fundamentals, the what, the why, the how. And then within each category or section, you can go ahead and click on the plus sign and you can add a lesson. A subcategory, or even an assessment. Let's go ahead and click on Add Lesson. Give it a title, and when you create it, you'll go ahead and just click on it and it will allow you to edit the content inside that lesson. First of all, you can go ahead and upload a new video file for your training. You'll want to possibly add some kind of text that will be at the— that will be shown at the bottom of the course to maybe give some instructions on what they should be doing. You can also have some supplemental material, and you can add those like in a PDF or Excel spreadsheet or some type of document or image that, that would be beneficial to the, the student. And you can just click on Add Files for that. You can also create a thumbnail for each section, or in this example, it's Lesson 1. You don't have to do this, but it does make it look nicer, and they can all even be the same image. The recommended size is 1280 by 720 pixels. And you simply upload that. When you're done with all those, then you go ahead and you can click on Publish and click on Save, and that will make that particular section published. Now, in the event that whenever you add a new lesson, it's going to be at the bottom of wherever the section that you are adding the lesson to. So to move it, you just highlight it, it'll turn into these three lines, and you can just drag and drop it into the place or the order in which you want it to appear. Simple as that. And then likewise, anytime you see these 3 or 4 lines, whatever that is, you can actually move sections in the same way. So in the event that you don't have it set up in the way you would like it to appear. So there you have it. That's how you create an initial course. And of course, we'll talk more about populating it and some of the smart things you can do when in actually creating the content and the outline and everything. Else. And we'll do a lot of that using AI. But that is how you create a course and add lessons. So now it's your turn. Go ahead and create your first course and add a few lessons, and let's see what you come up with.