Colin Brown shows how to configure email sending in eBizSuite using either your own SMTP account (Gmail, SendGrid, Microsoft 365) or Lead Connector's service. He walks through domain verification, email warming to build sender reputation, reply and forwarding options, and the analytics dashboard that tracks opens, clicks, bounces, and complaints.
Chapters
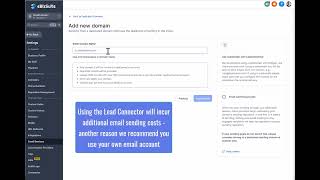
In this section, we're going to go over setting up your email services so that you can send out email blasts and send out emails through the eBizSuite system. So to do that, we're going to go to, once again, Settings and then Email Services. Now there's two options here. You can either send through an existing email that you already have in place, or you can send through our private label service, which is Lead Connector. When you first come to this page, you'll see that it's important that you do everything you can to boost your email deliverability, and this requires that you set up a specific domain for this. If you don't, you're not going to get very many emails delivered. They're going to go right into spam. So it's important to do this properly. Ideally, you're going to use your own existing email account, but if you don't have one and don't have a desire to get one, you can definitely do that. When you get to this page, you're going to click on Create Dedicated Domain. But let's assume you have your own email account existing for your own domain. What you would do then is simply click on Add Service. Then you can choose your SMTP provider, and you've got options of Gmail, Yahoo Mail, SendGrid, and Other. And Other will allow you to put in any SMTP gateway, and you just need to put in the server, the port number, your username, your email, and your password. In the event that you're using Microsoft 365, make sure that you have turned on your SMTP Send option so that it actually will send. You want to make sure you also test this before you go live with anything, so be aware of that. That's how you add your own email service. If you're using Gmail, you just simply put in your email and your password and you're ready to go. Let's assume you do not want to create a new email account. In that case, you can use our default provider. However, once again you will need to set some things up so that you have a custom domain so that you have better deliverability. And even then, it's still challenging. So just be aware of that. In this case, we click on dedicated domain. We're going to click on add domain. It's going to give us some pointers here. I highly recommend you read this over here and also read this about the email warming process, which basically other inbox providers start calculating your domain's sending reputation in the first 2 to 4 weeks. And if they see that you have engagement with the emails that you're sending out, then you're going to get a strong reputation. If you do not, and people are claiming that you're spam or they're not responding or they're not opening their emails, that's going to be an indication to them that you have a poor reputation. And having a good reputation is extremely important to get your emails delivered into the inbox Otherwise it's going to end up in the spam folder. So be aware of that. To do that, you'll want to create a unique domain, and basically it's a subdomain. So for example, you could put in something in the front here that's a subdomain, and then yourdomain.com. So as an example, I will put in growthadvisors.syncnet.com, and it comes up and shows me what needs to take place in my DNS record for the SyncNet.com domain. So I would need to add all of these records in there for this to actually work. And once you've entered these into your DNS, it still may take a couple hours, possibly even 24 hours to 48 hours, before you can come back here and click on Verify Domain. Once it's verified, then it's going to send out through that subdomain that you've created that has your domain attached to it, and you'll get better results than using the default. It is our recommendation that you go ahead and add a service and use the existing email that you already have. It's going to have a better reputation and you're going to have better success getting those emails into people's inbox instead of to the spam folder. If you have any other questions about how to set this up, go ahead and submit a support ticket and we'll get you set up. The next item on the menu in Email Services is Reply and Forward Settings. This is where you could put in a forwarding address so that you could have any email sent out not only to whoever the client or prospect is, but also have it sent to your own email. So I highly recommend that you do that. You could also use BCC, it's a blind copy as well, and then just forward to assigned user., and then click on save. And then reply address. This is a reply to address. It's going to be added to all the emails. I recommend that you use an actual email address here. You're going to get better responses and you're going to have your sending reputation be better. So put an actual email reply here. And then the next one is email analytics. This is where you're going to see all of your sent and delivered and open and clicked, complain, bounce, unsubscribed, and failed. So you're going to be able to have analytics that show the success of your email campaigns. And then finally, the last one is a risk assessment. It's going to allow you to see and verify all your email, especially if you have some type of large list. It's going to show you the number of emails, how many were delivered, undelivered, and unknown. And this is also going to help you in your email reputation. So that covers all of the sections in the email services. And if you do have any additional questions, be sure to reach out to our support group and fill out a form, and we'll get you the help you need.