Canva Tutorial
Learn how to set up a brand kit in Canva and use templates, fonts, and logos to create consistent marketing materials for your business. The speaker walks through practical steps for nail salons and other small businesses to build professional designs without design experience.
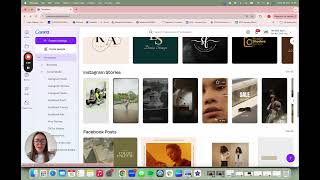
Okay, so I just want to give you a quick run through of Canva, how it works, what we use it for at the Nail tech. Org and what you can use it for in your business. So whether you have a nail business and you are trying to attract clients or really align all of your branding for your marketing, whether you have a salon, a training academy, whatever it is for Canva is going to be so, so useful. I've been using it for years now. There's two versions of Canva, so there's a free, free version or this Canva Pro. I pay for Canva Pro. I know it's, I think it's between 10 and 20 pounds a month, but it's definitely worth paying for it if you use it. But what you can do is start off on the free version and then if you feel like you want more of the features that are available, then you can upgrade and pay for Canva Pro. So when you log in or create an account, this is what it will look like. So we have our own Nail tech. Org account and I will be absolutely lost without it. We plan everything on here, so we plan all of the content that you see inside the Nail Tech off. We will plan our website pages on here. We will plan all of our social media posts on Canva, so we use it a lot. So the first thing I want to show you is this here, which is the brand section. I'm going to take you to brand kits. And what this means is once you have a logo and your branding and your brand colors and your typography or fonts for your branding, which I will go through with you in the next module, and you really want to keep that aligned. So whether you are creating a poster or creating a social media post, or creating a web page, whatever that looks like, you want to keep the same fonts, you want to keep the same brand colors, you want to keep the same theme throughout. So you really want to create yourself like a bit of a brand identity so that you're not just creating posts or creating covers for things that have all different stuff going on. It just becomes a lot less recognizable and a little bit chaotic for the customer as well. So we want people to be to see any of your marketing, doesn't matter what it is and know straight away that it's from you. And the way you will do that is by really solidifying your brand identity and your brand kit. So I'll teach you all of the brands and stuff in the next module, but you might already have your own branding for your business as well. So once you have it, you want to come over to Brand kit and you want to upload it all into this section. So we have ours here for the Nail Tech. Org. So if we click into it, you'll be able to see all of our logos. So we have 43 different assets that we use all the time at the Nail Tech. Org. So we have logos for each of our programs, we have a submark logo, we have our main logos, we've got NCO approved, we've got all of the things going on and we also use logos of other brands as well, like our accreditation companies and things like that. So you can see that, that they're all stored in here, really easy to access. So when we're creating posts and things like that, we're able to just pull our logos over. There's just so much in here. Then if you scroll down, we've also stored all of our brand colors in here as well. So the exact pantones for each of the colors that we use within our brand kit are all input into canva. So Canva has stored these and know that there are colors. So it'll make it easy for you. I'll show you in a minute. When you're making a post, then you can store all of the fonts that you use. And so there's quite. It looks like we've got quite a few fonts in here, but really they're just different versions of the same fonts. So if you were doing a heading, if you were doing a page title heading or a smaller heading, we would use this one for example. And then again for this one, if you're using tiny writing, if you're using main headings and stuff like that. So there's actually only two fonts, but they're all laid out in the exact way that we would use them and stored in here. And then you've got other areas as well to put like graphics, icons, photos and stuff like that in. But we mainly just, just use it for our fonts, our logos and our colors to make everything really easy to access. So then I'm going to take you back to the homepage and once you've installed all of your branding in Canva, you are good to go. Now, if you don't have any branding and you want to actually make your own branding, you can do that here too. So you've got a number of different things and a number of different templates that you can use on canvas. So let's click over to templates and if you scroll down here, you will see there is so much for you to use. So if you don't have a logo already and you haven't pinned down your colors and your fonts, and you don't have a budget to work with a graphic designer to do these professionally for you, I would definitely recommend at some point in your business journey, putting the budget aside to work with someone professionally, because it definitely will make a difference to your branding. But at this stage, it's something you can make in Canva. And these are all templates for logos. So you can actually click through these and find a logo that you like, amend it with your business name and stuff like that, and then you've got your brand colors and your logo as well. You can create Instagram stories. And there are so many different templates. So again, depending on your brand. Oh, what if I just click there? Let me go back. Depending on your brand, you're able to choose some of those and edit them, but you don't want to just choose random ones. You really want to go with your theme or your branding. So if your branding is all sort of like dark and mysterious and really beautiful, you then don't want to pick something like this with neon text. You want to really make sure that everything aligns and it's really identifiable as you and your brand. So don't get too carried away or distracted by how many templates there are, because I definitely have to rein myself in sometimes when I'm on Canva. So obviously you've got Facebook posts, stories, all of the things you can do your price lists on here, you can make posters for in your salon or leaflets, Instagram posts, there's so much. So I'm just going to scroll back up to the top and if you are whatever you are going to want to make, you can find it in here. So if it's a flyer, if it is anything like that, and you can also search at the top. So let's say you want to create your price list in here. You can type in price list and there's loads of examples that will come up. And these ones are story templates as well. So once you've created them, you could print them. You can also put them on your social media stories, so they're really great for sizes as well. And you can choose the ones that really align with your aesthetic. And then you can change the fonts, you can change the colors to your own brand once you are in. So you can do that on here. You can also just go back, create Your Instagram posts. Now, the only thing with the Instagram posts is that for some reason they do them square. And if you look on Instagram now, it's more of a longer post. It's longer than the square. And I don't really like the square anymore. For graphics, I feel like it looks quite cropped and it's not as aesthetically pleasing to the eye. So if I am creating an Instagram post, I will use posters instead. And this creates the image in the perfect size now for Instagram. So that's just a little top tip is to use that there. But let's say, for example, you wanted to create a story. So I'm going to go into this here and I'm going to click. Well, you can either choose a template or you can search in the templates as well. You can search by theme. So if you want to put in a certain theme, you can like, say, for example, your branded is really dark, you could do this one and it'll take you to all the dark themes and you can just click the one that you really like. So let's say, for example, you wanted to choose this one, that's a video here. And you can click customize this template. So then once it comes up, if you go into brand, like I said before, you've got all of your colors in here, you've got all of your fonts in here. So you can easily just change the fonts to your stored fonts. They all appear in this here. It Sorry, this here now tech. Org, so you can do your fonts that you use like this and you can choose other fonts if you want to, but it's all easy to access because you've already put in your colors. So again, you can use the shuffle or you can go into the actual text, click here and all your fonts will show at the top. So it's a really easy way to make your own images. You can swap stuff out so you can delete that. Then you can change the background to your colors here. And then if we wanted to put in the nail Tech. Org font, I would do this. Change it to the dark green. And we always do spacing. So you can see now already it's starting to look like your own. Brandon. And then we might want to put our logo so you can go to. You can go to elements, you can add all different things here. You can go to brand and you can add in your logo. So let me just find here. So we can add this in here. So you can basically create all of your own graphics and then once you're done, you just click share and then you click download and you're able to save it to your desktop. You can also Canva is also an app, so you can actually also access the app on your phone. I find it harder to use the app just because the screen is a lot smaller. So if you're trying to get like the granular details of things, sometimes it's a little bit hard to do and with your thumbs. So I always create using my laptop and then if I want to save it to my phone or make some small tweaks, I can do that on my app and it's a lot easier to use then that way as well. So yeah, I think that's pretty much all I've got to show you. You can also click uploads and you can upload images like your own images that you might have. You can draw on it. So if you wanted to draw something specific, you could do and there is literally so much that you can do on here, you've also can save it then to your projects. You can create different folders. So if you've got different projects going on, you can upload stuff to the folders. And yeah, it's just absolutely amazing for you, for your brands, for you to be able to create all of these things. And we create things like our workbooks on here. So this is one of our workbooks here. It's got all branded, nice and easy and then you can just save them at the end. You can duplicate. If you just go to file and make a copy, you can then duplicate it and say, for example, this one is mindset. You can change. Oh, you can change the title. Hang on, I need to send that to the back. Here we go. So you could change the title. It could be business program or something like that. You can move things around. It's just really easy. It's so drag and drop and so you don't need to be really tech savvy in order to use it. You can just have a little play about with it, upload your own images, upload your brand kit. And yeah, it makes it nice and easy for you to use. So any questions, let us know. But have fun, explore the different features and we will see you in the next lesson.