How to take content & use CapCut - Charlotte Fulcher
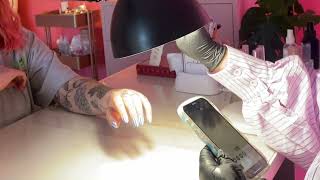
Charlotte Fulcher shows how to shoot and edit photos and videos. Position hands to flatter tattoos and different skin tones, shoot from above with lower exposure, crop to 5:7 in editing, then use CapCut to add text animations, whoosh transitions, and voiceovers.
Questions this video answers
16:9 (changed from 4:3).
5:7.
Approximately 20 (sharpness set to ~20).
Volume 10.
Compressing a 35-second clip down to 5 seconds.
Chapters
Hey guys, Today I'm going to be teaching you how I position my client's hands when I am taking photographs. As you can see, my client has tattoos all on her arm and her fingers and I absolutely love getting them involved in the pictures too. Both of my clients hands are different as well. They're both different colours. So I like to get them both in the shot wherever I can. So to take a picture like this, there are a few things that I do. I bring my client's hands all the way closest to me so that there's less background noise. And I like to have it so the hands aren't touching completely, but they're kind of just like resting on each other, but really lightly, like they're almost not touching. And then once the hands are in position, I bring the lamp right on top of the nails. And one of the most important steps is to always wipe your camera lens before you take your pictures. And since Instagram favors more rectangular pictures, I go onto the settings of my photo by clicking the arrow and then press 43 and change it from 43 to 16 9. And this way you can take rectangular pictures and then play around with the lighting, play around with the hand angles. If you are taking the pictures and you're like, I don't like that, then just move the light, move the hands. Like my clients know that they can be sitting here for a few minutes whilst I get the perfect picture. As you can see, I am very particular. I'm always kind of like shuffling her around, even if it's literally by the tiniest amount. And I'm like, oh yeah, that's better now. At this point I wasn't really happy with the background so I just shuffled her hands all the way closest to me. And to just get rid of any of the background noise. I also angle my phone from above rather than taking it kind of like face on. Because if you take it face on rather than above, you're going to see the chair in the background here. Like everything's going to be in the way, it's going to look messy. So I always shoot from above and I turn the exposure right down as I'm taking a picture here. As you can see, this is just to make sure that the background noise, if there is any at all, maybe your clients wearing like a clashing colour top or you just think the top won't fit into the aesthetic of the photo. The then turn the exposure right down and that is going to kind of like darken out anything that you don't want in the picture, but still focusing on the nails. Shooting from a little further away as well will also allow you to have more room to crop if you took them too close to the nails. Then when it comes to editing the pictures, you might be like, oh, I really don't like that angle. But taking it from above and quite far away, you can crop and kind of manipulate how the picture looks. I took a little screen recording when I was taking the photos just for you guys to see from like your camera's point of view. How I'm turning the exposure down, so I'm just dragging the sun down and making sure I get the nails in the center grid and turning the exposure right down, as you can see, it gets rid of all the background noise. My experience, this kind of pose really works well for my clients who have finger tattoos, arm tattoos, and also have quite long nail beds. But I have a lot of clients who don't have long nail beds and they particularly find that pose quite difficult to hold as well. So this is another pose that still looks really good and I sometimes do as well. I get one hand on its own, making sure the fingers are nice and relaxed and same kind of thing really. I take from above and turn exposure back down and again just play around with the lighting, play around with the positioning, bring them closer to the desk. If you're kind of wanting to switch it up and have a few different edits to kind of pick from. I asked my client to move her hand away in the background just so the picture is a bit more clearer and there's nothing going on in the background here. I've screen recorded how I edit my photos. My first step is to take it to 5, 7. This is quite a favored shape on Instagram as it's quite rectangular and also quite square as well. I find it that it fits perfectly for the grid and there are three settings that I adjust and that is always exposure. If I've not turned it down enough when I'm taking the photos, I just turn it down a little bit more. I turn the highlights down and I also turn the sharpness right up. So this kind of just brings out the color and sharpening to about 20 just makes it super, super clear. These are just my preferences though, so if you have a little play around with your settings, you might find that you don't like your pictures as exposed or the highlights so colorful. So it's just playing around with it and figuring out exactly what you like. And as I mentioned before, taking your photos from far away is super Helpful because it gives you space to kind of play around with them and crop them exactly how you want. As you can see here, I'm kind of like messing around with how I want it to look. But this doesn't mean this is how you need to make yours look. This is just my guide and you can kind of run with it how you like. I like to make my pictures super bold to kind of fit in with my colorful branding. Now we're on to how I edit my videos on Capcut. So here I wanted to do a little transition to make it super flowy. So I videoed myself walking up to my mirror and turning around with my mug. But instead of it being like a 10 second clip that can be quite disengaging, I move it all and I basically here I'm finding where I want to split it and then I'll delete the part that I don't want so it flows nicely. So here I'm going to delete and then again I'm going to find where I want it to stop. I'll crop it and then delete it and you can see how it all comes together. And I'm doing this just by using the split tool right at the bottom left. I'll let you guys just kind of watch what I'm doing for now because I'm just repeating the same steps. For this clip I wanted to add the zoom. So what you do is you go to Video Effects and there will be an option for zoom in like zoom lens. So I'm just going to use that one. And then to add some writing, you click on Add Text and choose a font that aligns with your branding. And I chose SQL. And then you just place the text where you want it on the video. I wanted the text to look like it was almost being typed out. So I went onto Animations, went on to Typewriter and clicked that. And to make it even more engaging, I went onto sounds and wanted a typing sound for my typewriting text and added that to the part where it is being typed out. And for the clip after that I wanted to add a transition. So I went on to Transitions and then clicked and clicked the effect left to make it look like it was swiping left and obviously had to accompany a whoosh sound to that effect to add even more dramaticness to it. And because I'm planning on doing a voiceover, I didn't want those sounds to be really overriding. So I set them to volume 10 and now it's time for me to show you how I do my voiceovers. So you want to go to audio and then click record and it will give you a three second countdown. And I always do mine in short outbursts. Okay, guys, Just like that. And then I also get rid of any pauses at the beginning and then drag it to the start. Okay, guys, and here you'll see me just recording a few more. And once I'm done with that, I'm gonna make sure that they overlap. So there's no pauses in between each word. And it's not very engaging. I like to have mine. So it's really fast. Okay guys, have you missed me? Because I've missed you. That was slightly too slow. So I'm just going to move them so they overlap even more. Okay, guys, have you missed me? I've missed you. Still not perfect. I need to move the second one. Okay, guys, have you missed me? I've missed you. Perfect. So I'm just going in to record even more clips. And when I'm recording to make sure it overlaps that line that you can see. I always make sure that it is just at the end of the previous voice cycle. So they overlap. And then there's not much to edit once I'm done. So I thought let's give you a little insight what a realistic I've missed you. So I thought let's give you a little insight to what a realistic. Let's give you a little insight to what a realistic day in the life of a so what a realistic day in the life of a nautech looks like. And here you're about to see me try and move this piece of voiceover, but it moves too quickly. So I zoom out, which is basically spreading my thumbs to each side of the screen to make them wider. And they're just much more easier to move when they're bigger. And this is the finished result of all that work that I've just done. Okay, guys, have you missed me? I've missed you. So I thought let's give you a little insight to what I and if you're wanting to speed up a clip, say you've got a really long clip and you want to show the whole thing, but you don't want people to get bored. This is how you speed it right up. It's literally as simple as you click on the video that you want to speed up. You click the option speed and it will give you a big dial that you can basically change how quickly the video goes. So what was a 35 second video is now only 5.